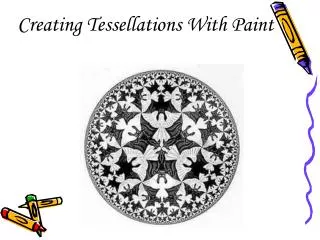
Creating Tessellations With Paint
580 likes | 738 Vues
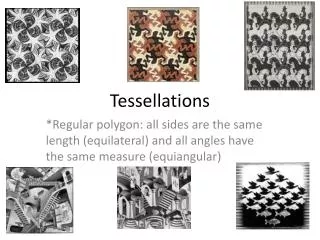
Creating Tessellations With Paint. Open Microsoft Paint. Go to: Start, Programs, Accessories, Paint. Change the view to zoom in: Click on View, Zoom, Custom…. Then, select 600% and click OK. Turn the grid on to see the individual squares: Click on View, Zoom, Show Grid.

Creating Tessellations With Paint
E N D
Presentation Transcript
Open Microsoft Paint. Go to: Start, Programs, Accessories, Paint
Change the view to zoom in: • Click on View, Zoom, Custom…
Turn the grid on to see the individual squares: • Click on View, Zoom, Show Grid
Select no outline mode. Select the a fill color. Select the rectangle draw tool.
Click on the Draw (rectangle) tool and draw a small rectangle in the middle of your screen.
Fill in the rectangle you drew by selecting the Paint Bucket key, and clicking in the middle of the rectangle
Modify the Top and Bottom Choose the Select Tool Start outside the black top edge of the rectangle and select a section of the rectangle
Modify the Top and Bottom Drag the selected section of your rectangle to the opposite side of the rectangle and place it exactly in line with its starting position.
Modify the Left & Right Edges Choose the Select Tool Start outside the black top edge of the rectangle and select a section of the rectangle
Modify the Left & Right Edges Drag the selected section of your rectangle to the opposite side of the rectangle and place it exactly in line with its starting position.
Make a “Mirror” Image You need two copies of your shape. One Black and one Red (or whatever color you want). Choose the Select Tool
Make a “Mirror” Image • Draw a selection box around your shape. • From the Edit menu, select Copy (Ctrl C) • From the Edit menu, select Paste (Ctrl V)
Make a “Mirror” Image • Move the copy of your image to an appropriate spot. • Change the color of your copy to another color • Now move both of your “originals” to the top of the screen
Create the Tessellation Check the settings:*make sure that the transparent background is still selected*make sure background color is set to White
Piecing it Together Using the Select tool, make a copy of the one of your shapes and place it in the middle of the screen.Next, make a copy of the different colored shape. It should fit exactly next to the other shape.
Piecing it Together Continue placing copies such as black, blue, black, blue…to build your tessellation like this
Completing the Design Can you fill in the space right to the edge like this? Can you think of any other ways to “finish” the edges of the tessellation?