Creating a multi-page form using Tab Controls
In this guide, we will learn how to create a multi-page form using tab controls in Access. By employing the Tab Control method, we can effectively design a Main Form/Subform combination for data that originates from two related tables. Get to know how to use controls like page breaks and tab controls to allow users to navigate between different pages seamlessly. This tutorial will also cover the properties of tab controls, how to align objects, and how to utilize filters for efficient data management.
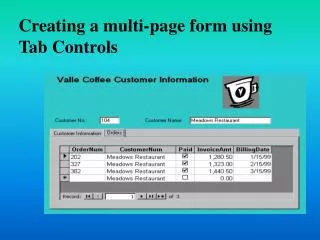

Creating a multi-page form using Tab Controls
E N D
Presentation Transcript
In today’s class, we will be using the Tab Control method to create the Form / SubForm combination.
Last week we took a look under the hood so to speak, at the principal behind the process.
When you create a form containing data from two tables that have a one-to-many relationship, you actually create a main form for data from the primary table and a subform for data from the related table. Main Form SubForm
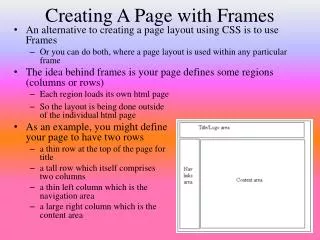
You can use tab controls to create a form / sub-form combination, or you can simply add more fields to a form from the same source making a multi-page form. Main Form SubForm
You can create a multi-page form in two ways: by inserting a page break control in the form or by using a tab control. If you insert a page break control in a form, the user can move between pages using the Page Up and Page Down keys on the keyboard.
If you use a tab control, the control appears with tabs at the top, with one tab for each page. The user can switch between pages by clicking the tabs. Page 2 Page 1
To create a tab control on a form, you use the tab control tool from the tool box.
Tab Controls, like any other object have properties. They can be viewed by right clicking on the tab control and selecting Properties from the short cut menu.
It’s important to note also, that not only does the tab control itself have properties, but each tab has it’s own set of properties as well.
The caption property for each tab is where you place the text that will appear on the tab.
To use the control wizard to add a tab control to a form, first, open the form in design view and make sure that your Toolbox is visible.
Next, make sure that your wizard control button on the Toolbox is active. (inserted)
Then, click the tab control tool on the toolbox to activate it, and release the mouse button. The tool becomes inserted and the cursor will change.
Next, position the pointer in the form at the location for the upper left corner of the tab control and then click the left mouse button.
The exercise beginning on page AC 5.41 in your book shows steps of the creation of a tab control using the wizard.
Once the tab control is placed on the form, you are now ready to place objects on the control, such as labels and fields, and you can then align each object accordingly.
To align labels on a form, first select the labels that you want to align.
To select multiple labels, click the first label, press and hold down the shift key and click the other labels while holding down the shift key. After all the labels have been selected, click format on the menu bar, point to align, and select the alignment that you want. right, left, etc.
Recall that a filter is a set of criteria that describes the records you want to see, in a datasheet or a form, and their sequence. A filter is like a query, but it applies only to the current table, datasheet, query datasheet, form or form datasheet. If you want to use a filter at another time, you can save the filter as a query.
Access provides four filter tools that allow you to specify and apply filters. Filter By Selection, Filter by Form, Filter For Input, And Advanced Filter/sort.
With Filter By Selection, Filter By Form, and Filter For Input, you specify the record selection criteria directly in the form.
With Filter By Selection, finds records that match a particular field value.
Filter By Input and Filter By Form find records that match multiple selection criteria, using the same Access logical and comparison operators that you use in queries.
After applying a filter by selection or by form or for input, you can rearrange the records using the Sort Ascending or Sort Descending toolbar buttons, if necessary.
Advanced Filter/Sort allows you to specify multiple selection criteria and to specify a sort order for the selected records in the Advanced Filter/sort window, in the same way you specify record selection criteria and sort orders for a query in Design view.
The above is the Advanced / Filter Sort window. Notice that it looks just like a query design window. The difference here is that it pertains only to one table, where as a query can use multiple tables.
By saving a Filter as a Query, you can reuse the filter in the future by opening the saved query. To Save a Filter as a Query, First, Create a filter using Filter By Selection, Filter By Form, Filter for Input, or Advanced Filter/Sort.
Next, Click the Save As Query button the the Form/Sort toolbar to open the Save As Query Dialog box. Finally, Type the name for the query, and then press the Enter key (or click the OK Button).
To apply a filter that was saved as a query, First, Open the form to which you want to apply the filter. Then click the Filter By Form button on the Form View toolbar.
Next Click the Load from Query button on the Filter/Sort toolbar, select the query you want to apply. Access loads the saved query into the Filter grid.
Finally, click the Apply Filter button on the Filter/Sort toolbar.
Quick Check Review Page AC 5.54
Quick Check Review Let’s take a few moments to break up into discussion groups. Each group will discuss the quick check questions on page AC 5.54 in your books. We will then review the answers at the end of the discussion.
Quick Check Review Session 5.3 1) Describe how you would use a Control Wizard to add a tab control to a form.
Quick Check Review Session 5.3Additional Question 1) Which control on the toolbox should be active in order for this wizard to be used?
Quick Check Review Session 5.3 2) How do you right-align a group of labels?
Quick Check Review Session 5.3 3) What is the purpose of Filter By Form?
Quick Check Review Session 5.3 4) How do you reuse a filter in the future?
Quick Check Review Session 5.3 5) What is the difference between opening a query and applying a query to a form?
Your task today is to complete the exercises in Tutorial #5 Page A5.40 through Page A5.54 The disk is Level 2 Disk 1