Marketo Training
Marketo Training. Questions: Jeff Barrus jeff.barrus@wilsoncenter.org. Contents. Introduction – 3 Logging Into Marketo – 8 Marketo Dashboard – 11 Marketo Programs – 13 Setting up an Event Invitation – 24 Sending an Email Newsletter – 75. Introduction.

Marketo Training
E N D
Presentation Transcript
Marketo Training Questions: Jeff Barrusjeff.barrus@wilsoncenter.org
Contents • Introduction – 3 • Logging Into Marketo – 8 • Marketo Dashboard – 11 • Marketo Programs – 13 • Setting up an Event Invitation – 24 • Sending an Email Newsletter – 75
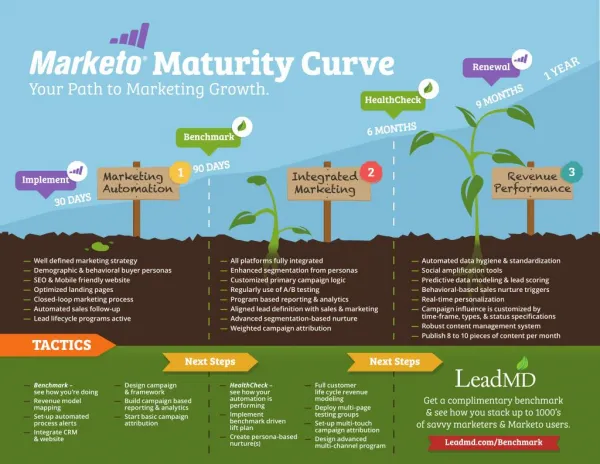
Introduction • Marketo is the Wilson Center’s new marketing automation system. It is used for the following functions: • Sending email newsletters • Sending event invitations, as well as automating registration and check-in • Tracking contact (or lead) engagement
Leads • Marketo is built around around a database of contacts or leads. • The email address field is used as a unique identifier for leads – a lead can be in the system multiple times if they register through multiple email addresses. • Marketing communication is automatically suspended for leads with invalid email addresses.
Lists • Lists are the primary means of sending email communications through Marketo. • Leads are segmented into multiple lists based on a nearly unlimited set of criteria. • Some lists can be self-subscribing, so users can add and remove themselves at-will through an online form. • Other lists are static, meaning that the lists are curated by Wilson Center Staff. • Note: Can-spam laws state that leads must always be given the option of unsubscribing themselves from ALL Wilson Center communications, even from static lists.
Email Newsletters • The term “email newsletter” is used to describe any marketing email sent to promote Wilson Center research and activities. • A newsletter can be a short email that includes links to download Wilson Center content, or longer emails featuring more detailed information about Wilson Center activities. • Email newsletters must always include clear calls to action (Download Now, View Now, etc.).
Event Invitations • Event invitations are emails sent with the purpose of inviting a contact to attend an event. • The single call to action in an event invitation is to RSVP NOW. • A series of automated follow-up emails have been created to increase the likelihood of event attendance.
Logging Into Marketo • Marketo is accessed by logging in through http://www.marketo.com:
Entering Your Credentials • If you don’t have a Marketo login, Please contact jeff.barrus@wilsoncenter.org for a Marketo invitation:
Please Do Not Share Your Login • We ask that Wilson Center staff do not share their login credentials with interns or other staff. • All Marketo users must be given their own Marketo login, including interns.
The Marketo Dashboard • Although there are many areas available in the Marketo Dashboard, most work is done under the Marketing Activities tab:
Campaign Folders • Each Wilson Center program or institute should have its own Marketo campaign folder. It’s here that you’ll be doing most of your work:
Marketo Programs • Automated marketing activities in Marketo are referred to as “programs.” • These are not to be confused with Wilson Center programs. • Although there are many types of programs in Marketo, the Wilson Center uses the following: • Default (for general email blasts) • Event • Marketo programs reside inside of campaign folders.
Marketo Programs Make Things Happen • As stated before, programs are automated marketing activities. They allow you to: • Send a simple blast email • Send an event invitation, as well as automated follow-ups • Register leads for events • “Drip” out content to leads over a specified period of time based on how those leads engage with the Wilson Center
Default Marketo Programs • Several out of the box Marketo program templates have already been created for your Wilson Center program or institute: • Event Invitation – Panel with Keynote • Event Invitation – Panel without Keynote • Event Invitation – Single Speaker • Newsletter – Single Column
Additional Marketo Programs • If you don’t see a Marketo program that fits your needs, please contact jeff.barrus@wilsoncenter.org. • We can create a program for almost any marketing activity you can think of – we will work with you to make sure you have all the program templates you need to send your marketing communications.
When All Else Fails … • If you are not comfortable running Marketo programs yourself, the COMM’s team is always happy to assist you.
Inside Marketo Programs • There are several directories and files inside of a Marketo program:
Program Directories: Assets • Program Assets include all of the file types used to distribute content and collect information from leads: • Emails: all of the emails in the program • Forms: all of the forms used to collect information from leads • Landing pages: the Marketo web pages where leads go to download content or fill out forms • Lists: the dynamic lists of leads used to send emails and track engagement throughout the program
Marketo Event Programs: Emails • The following emails are included in most event programs: • Invitation 1: the initial invite sent out to the entire list • Invitation 2: the second invite sent out as a reminder to members of the list who have not registered • Confirmation: a confirmation email sent to list members who have registered for the event • Reminder: Email reminder for registered attendees of an event • Follow-up for Not Attended: post-event email with links to media and resources • Follow-up for Attended: post-event email with links to media and resources
Marketo Event Programs: Forms • All event programs contain a registration form for the event. The included fields are First Name*, Last Name*, Email Address*, Title and Organization. • Marketo uses dynamic forms – if we already have information on a lead in the default fields, it will automatically swap them for empty fields. • * denotes required fields
Marketo Event Programs: Landing Pages • Each Marketo event program contains the following landing pages: • Registration: the page that contains the registration form for the event • Confirmation: the confirmation page that automatically loads after a lead registers for an event
Program Directories: Campaigns • Smart campaigns are composed of the automation “logic” that allows the programs to run. • Usually smart campaigns are built out in a series of steps, located in the Progressions directory: • 01.Send Invitations – sends the initial email blast along with any follow-up communications • 02.Registered – used to register a lead for an event • 03.Attended – used to change the lead to an “attended” status and send a follow-up email after the event. • 04.Not Attended – used to change the lead to a “not attended” status and send a follow-up email after the event.
Setting Up an Event Invitation • Find the program template in your directory that fits your current marketing goal. • For this exercise, we’ll choose an event with a single speaker:
Clone the Program Template • Right-click the program template you want to use and select Clone from the menu:
Clone Event: Clone to Location • Choose A Campaign Folder in the Clone To drop-down list:
Clone Event: Folder • For Folder select your Wilson Center program folder for events:
Clone Event: Name • Enter a name and date for your event:
Clone Event: Create • When you are satisfied with the new event’s settings, click “Create”:
Event Creation • The new event and all of its assets and campaigns will now appear in your directory:
Setting Up Your Event • In Marketo, content and design are completely separate – you will not edit the HTML of your emails or landing pages. • Event details are stored in fields called “Tokens” – these fields automatically populate the program emails and landing pages with content and preserve the format of the original template.
Token Checklist • Before you begin setting up your programs in Marketo, you first need to have all the information necessarily to fill out the token fields: • Subject line for Invitation 1 • Subject line for Invitation 2 (invitation 2 is sent to leads who did not register when the first invitation was sent) • Event Title • Event Description • Event Date (in this format: Monday, January 1, 2020) • Event Time (in this format: 10am – 12:30pm) • Event Location – the room at the Wilson Center where the event will take place • Intro Speaker • Intro Speaker Title • Event Speaker • Event Speaker Title • Moderator • Moderator Title • RSVP Link – this is the link to the Marketo landing page – we will show you how to get this on the next page. • Link to Wilson Center Event Page – the link to the event page on the Wilson Center web site. • Post Event Resources – the resources you expect to be available following the event (Transcript, video, audio podcast, etc.) • Current Year
Access My Tokens • Once you have all your content in the token checklist, click on the My Tokens tab in your current Marketo program menu:
Enter Your Event Information • Double-click on each token field and enter the requested information:
Check Your Assets • Once all the information has been entered into the tokens, click on each email and landing page and choose “Preview” to make sure all the event information is correct:
Campaign Progressions • There are four progression steps in the campaign progression: • 01. Send Invitations • 02. Registered • 03. Attended • 04. Not Attended • The only two steps you need to be concerned with now are the Send Invitations and Registered steps. • Attended and Not Attended are both used after the event.
Activating Registered Step • Registered must always be activated first. • The Registered step is what enables the event’s registration form to work. If it is not activated, the campaign will not work correctly once the email is sent. • To activate, click on Registered inside the Campaigns > Progressions folder.
Setting Up Email Reminder for Registered Attendees • Every registered attendee should receive an email reminder for the event. • You will need to manually set the day and time the email is sent to registered attendees. • To do this, first click on the Flow tab:
Understanding Flow • The flow tab shows every step the campaign will execute after the lead fills out the registration form: • Step 1: The lead’s program status changes from invited to registered. • Step 2: After the lead’s status changes to registered, they receive a confirmation email. • Step 2: The system waits a pre-determined period of time (it defaults to 1 week). • Step 3: The system sends a reminder email to every registered attendee one week after they register.
Changing the Wait Step • We don’t want the registered attendee to receive a reminder email a week after they register, because that week could be after the event actually occurs. • We want to send a reminder email to every registered attendee 48 hours before the event is scheduled to occur.
Changing the Wait Step (Continued) • To do this, click on the cog icon next to the duration of the wait step:
Setting the Wait Time • Enter a date and time 48 hours before the start of the event • Under duration type, select Date • For date, select a day 48 hours before the start of the event:
Setting Wait Time (Continued) • For the time field, have the email go out at 8:00am and click save:
Activating Registered Step • With the email set to send, you can now activate the Registered step. • Select 02.Registered in the file tree and click on the Scheduletab in the dashboard:
Activating Registered (Continued) • Click the “Activate” button:
Activating Registered (Continued) • Click “Activate” in the dialogue box that pops up:
Verifying “Registered” is Activated • The light bulb icon next to 02.Registered should now be lit, indicating that the campaign has been activated:
Sending a Test Campaign • Before you send your final invitation, you should first test the campaign to make sure it’s working correctly. • To do this, you should make a test version of 01.Send Invitations.
Copy “01.Send Invitations” • To create a test copy, right-click on 01.Send Invitations and select Clone: