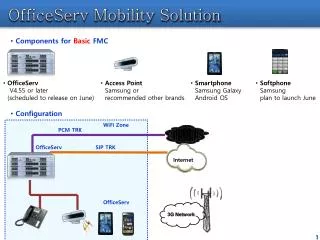
OfficeServ 7200
Enterprise IP Solutions. OfficeServ 7200. Data Server S/W Upgrade (v1.1x -> v1.2x). Mar, 2006 OfficeServ Lab. Samsung Electronics Co., Ltd. NOTE (upgrade method v1.1x -> v1.2x).

OfficeServ 7200
E N D
Presentation Transcript
Enterprise IP Solutions OfficeServ 7200 Data ServerS/W Upgrade (v1.1x -> v1.2x) Mar, 2006 OfficeServ Lab. Samsung Electronics Co., Ltd.
NOTE (upgrade method v1.1x -> v1.2x) OS 7200 upgrade s/w package(above v1.2x) is not compatible with previous version (below v1.2x) because new SW based on OS7400. Both bootloader and firmware image of version 1.2x have to be newly installed to upgrade the system. Configuration and log are not compatible with previous version either. You have to configure the system manually after upgrading the system. Moreover log data will be disappeared after upgrading the system. • First, replace BootROM version v1.00 to v1.2x. • Connect the serial cable to the SIO port of board. This cable has to be connected with your local PC. (baud rate : 19200) • Turn on the system. • Please input “d” or “D” when following messages are displayed in serial console. Then system booting will be stopped, and changed to boot loader mode.
NOTE (upgrade method v1.1x -> v1.2x) 5. Set bootcf parameters on the bootloader like following diagram. -.setenv bootcfstart 0xfd000000 -. setenv bootcfend 0xfd03ffff Then input “erase bootcf” to initialize bootloader environments on. -. protect off bank 1 -. erase bootcf
NOTE (upgrade method v1.1x -> v1.2x) • Reboot the system. Please input “reset” like following diagram. • When reboot the system, boot loader will be run with initialized boot loader environments. • Please input “d” or “D” when following messages are displayed in serial console. Then system booting will be stopped, and changed to boot loader mode.
NOTE (upgrade method v1.1x -> v1.2x) 9. Check boot loader environments. Boot loader environments should be changed if it incorrect. (Please input ‘printenv’)
NOTE (upgrade method v1.1x -> v1.2x) • Change network parameters to connect WIM module to TFTP server. To upgrade software, WIM module has to be connected to TFTP server which has the entire package image. • Please save environments that you changed. Please input “saveenv” like following diagram.
NOTE (upgrade method v1.1x -> v1.2x) Environment(OS7200) In this case we will use eth0 port IP : 192.168.0.210 Hub or Switch TFTP server e.g. Execute the PumpKIN program. S/W package exists in the TFTP server directory Serial I/O cable Management PC TFTP root directory
NOTE (upgrade method v1.1x -> v1.2x) 12. Enter the “install all” command install [os | firmware | configdb | logdb | all] os – Linux Kernel firmware – Root File System configdb – Config DB File System logdb – Log DB File System all - All of them • Then following messages are displayed in the serial console. • Please wait until the entire package would be installed successfully. • Maybe it takes about 20 minutes to install all package images.
NOTE (upgrade method v1.1x -> v1.2x) • If upgrading procedure was done successfully, then you can boot the system with newly installed package image. Please input “boot”, then following messages will be displayed in the serial console • If above messages are displayed in the serial console, it indicates that system booting is done successfully. Then you can configure the system with upgrade software via Web page.
Upgrade using Web Management 1. Run the Web Browser. 2. Access the initial IP of WIM using HTTPS. The IP initial value of each board is as follows: WIM - 10.0.0.1/24(eth0) - 10.0.1.1/24(eth1) - 10.0.2.1/24(eth2) - 10.0.3.1/24(eth3) In case of upgrading WIM SW from v1.1x to v1.2x you should use bootloader. Other versions of WIM will have no problem with Web Management. Note
3. Login using the administrator ID and Password. (ID : admin / Password : root or admin)
4. Select the [System -> Upgrade] menu. For the types of upgrade, there are ‘TFTP method’ and ‘File Transmission method through HTTP’ as well as Local method that uploads the user’s PC.
V1.21 5. The package version to upgrade should be entered like ‘v1.21’ in the [Package Version] field.
V1.21 Enter the address of the TFTP/HTTP server Web based upgrade – TFTP/HTTP 6. For TFTP / HTTP, enter the address of the TFTP/HTTP server and click the [OK] button. * S/W Package file name : wim-pkg-v{version_number}.tgz
V1.21 Web based upgrade – Local 6. For Local method, the relevant package file should be existed in the user’s PC. Click the [OK] button after selecting the file. (In the TFTP / HTTP method, the files of the relevant version are searched automatically and downloaded, but for Local method, the entered version name and file name to upload should be identical. If Package Version is 'v1.21', the file name is ‘wim-pkg-v1.21.tgz'. )