OfficeServ 7400
Enterprise IP Solutions. OfficeServ 7400. Quick Install Guide - Data Server – VPN. Mar, 2006 OfficeServ Lab. Samsung Electronics Co., Ltd. Contents. > VPN Overview > IPSec Settings 1. IPSec Connection Between OS7400s ◆ RSA key ◆ Pre-shared key ◆ X.509 Cert

OfficeServ 7400
E N D
Presentation Transcript
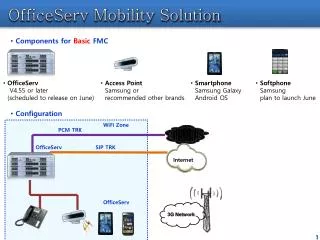
Enterprise IP Solutions OfficeServ 7400 Quick Install Guide- Data Server –VPN Mar, 2006 OfficeServ Lab. Samsung Electronics Co., Ltd.
Contents • > VPN Overview • > IPSec Settings • 1. IPSec Connection Between OS7400s • ◆ RSA key ◆ Pre-shared key ◆ X.509 Cert • 2. IPSec Connection Between OS7400 and PC (Remote User) • ◆ Pre-shared key ◆ X.509 Cert • 3. IPSec Connection Between OS7400 and Cisco Router • ◆ Pre-shared key • > PPTP/L2TP Settings • 4. PPTP/L2TP Configuration on OS7400 System 5. PPTP/L2TP Configuration on PC (Windows 2000/XP) • > Application Cases • 6. IP Networking (QSIG) Application Cases 7. H.323/SIP Application Cases
IPSec PPTP/L2TP VPN Overview - GWIMS • - System to System • - Need GWIMS D-board • VPN: Virtual Private Network • IPSec: Internet Protocol Security Protocol • PPTP: Point to Point Tunneling Protocol • L2TP: Layer2 Tunneling Protocol IPSec • - System to Node or Server to Client (ex: PC) • - Don’t need GWIMS D-board Branch #1 Remote User Office 본사 PPTP, L2TP Internet VPN Tunneling Branch #2 Serial 2Mbps Serial 2Mbps Private Line
payload payload Internet payload payload payload payload VPN Overview – IPSec, L2TP/PPTP • Tunnel Mode (don’t support Transport mode) • Tunnel Protocol (IPSec, L2TP/PPTP) • Key Management : IKE, ISAKMAP, X.509, pre-shared • Authentication : MD5, SHA-1 • Encryption : AES,3DES • Transform Protocol : AH, ESP Mobile User VPN S/W Remoteaccess payload BusinessPartner Headquarters Tunnel VPN S/W Extranet encryption VPN new header payload payload Branch VPN payload Intranet payload VPN payload
IP header AH IP payload Authenticated except for mutable fields in ‘IP header’ IP header ESP header IP payload ESP trailer ESP auth Encrypted Authenticated New IP header AH IP header IP payload Authenticated except for mutable fields in ‘New IP header’ New IP header ESP header IP header IP payload ESP trailer ESP auth Encrypted Authenticated VPN Overview – IPSec • Transport Mode • Tunnel Mode
VPN Overview – IKE • Internet Key Exchange • Phase 1 • Generate IKE key • Main mode, aggressive mode • Authentication • Pre-shared key • Digital Signature • Public key encryption • Revised public key encryption • Phase 2 • Generate IPSEC key • Quick mode
IKE connection flow Crypto & Auth algorithm(SA) proposal SA choice Responder Initiator public key exchange(Diffie-Hellman) Diffie-Hellman Transmit Identity confirm and transmit Identity SA proposal, public key exchange, transmit identity SA choice, public key exchange, transmit identity transmit hash value
VPN Overview – OS7x00 • 2. Choose Phase 1 / Phase 2 parameters. • 1. Configuration • 3. Check status
VPN Overview – OS7200 via OS7400 OS 7200 (v1.12) OS 7400 Lists Max. Tunnel 100 Tunnels 1024 Tunnels H/W Chip Hifn 7951 CN 1120 IPSec, PPTP, L2TP IPSec, PPTP Protocol Phase 1(main), Phase 2(quick) Phase 1(main, aggressive), Phase 2(quick) ISAKMP 3DES 3DES, AES Encryption RSA, Pre-shared key, X.509 Authentication
New Dest IP165.213.89.227 New Src IP 165.213.89.238 Dest IP192.168.0.100 Src IP 10.0.0.100 payload Dest IP192.168.0.100 Dest IP192.168.0.100 Src IP 10.0.0.100 Src IP 10.0.0.100 payload payload 1. IPSec Connection Between OS7400s VPN of OS7400 allows you to connect different networks.The following figure illustrates basic network settings for using OS7400 VPN: ② Tunneling (IPSec) WAN1 165.213.89.238 165.213.89.227 WAN1 ③ 10.0.0.1 LAN 192.168.0.1 LAN ① ④ payload PC 10.0.0.100 PC 192.168.0.100
The above figure shows packet forwarding when making communications from PC (10.0.0.100) to the target PC (192.168.0.100) using VPN. • ① Create and forward a packet whose dest IP is 192.168.0.100 and whose src IP is 10.0.0.100 from PC (10.0.0.100). • ② The original packet is encrypted through the VPN gateway. Add a new IP header (Dest IP: 165.213.87.227, Src IP: 165.213.89.238) to create and forward a new packet. • ③ Decrypt the forwarded packet in the VPN gateway. Then, forward the packet to the destination host by referring to the destination IP of the original packet. • ④ The PC (192.168.0.100) receives the original packet properly.
RSA key (1) If you click [VPN] from the main menu, the following window will appear. Click the [Add] button to select a VPN gateway and to determine an authorization method.
RSA key (2) Set OS7400_1 first. Enter the information on OS7400_1 in Local settings and the information on OS7400_2 in Remote settings. Click “find” button to upload OS7400_2 RSA key. (Click the Management => RSA [Download] button to download the authorization key and to deliver the key to OS7400_2.)
RSA key (3) Set OS7400_2 in the same method as OS7400_1. OS7400_2
Pre-shared key (1) Set the Pre-shared key field in the same method as the RSA key field. Enter the shared key, which is a password to be used for user authorization, in the Pre-shared key field.
Pre-shared key (2) Set OS7400_2 in the same method as OS7400_1.
X.509 (1) Click Certification from the left menus. Once the window below appears, click the [Add] button to create a CA certification.
X.509 (2) Once a window that prompts you to create a CA certification appears, fill out all of the fields, and click the [OK] button.
X.509 (3) Once a window that prompts you to create a host certification appears, fill out the fields, and click the [OK] button. Note that you must remember the password.
X.509 (4) Click the [Download] button from the window below to download a certification.
X.509 (5) Click Config from the left menus, and then select Local Certificate. And click OK. Select X.509 Cert and click the [OK] button.
X.509 (6) Then ‘Local Certificate’ and ‘Local ID’ are displayed. Enter the password used for creating a host certification in ‘Password’ and ‘Remote ID’ value. In this case, Remote ID value is OS7400_2’s Local ID that is acquired in the same method as OS7400_1.
X.509 (7) In [Management] from the left menu, select external device and click [ok] button.If Activity is set to Stopped, click the [Run] button. (If Activity is set to Running, click the [Stop] button, and then click the [Run] button again.)
X.509 (8) Click Status from the left menu to check the current status and log of VPN connections. OS7400_1 “OS7400_1” “OS7400_1” “OS7400_1” “OS7400_1” “OS7400_1”
Tunneling (IPSec, PPTP, L2TP) 2. IPSec Connection Between OS7400s and PC (Remote User) Remote User 165.213.109.101 Internet WAN1 165.213.89.245 192.168.0.1 LAN PC 192.168.0.100
Pre-Shared key (1) Enter information on PC in Remote settings. (Since a PC does not have subnet, leave the fields on subnet blank.)
Pre-Shared key - VPN Client (1) If you select [Start] -> [Run], and run ‘mmc’, the window below will appear. Select [File] -> [Add/Remove Snap-In] from the Console window.
Pre-Shared key - VPN Client (2) If you click the [Add] button from the <Add Standalone Snap-in> window, the window below will appear. Select ‘IP Security Policy Management’ from the snap-in list, and click the [Add] button.
Pre-Shared key - VPN Client (3) Once the window below appears, select ‘Local computer’, and click the [Finish] button.
Pre-Shared key - VPN Client (4) If you move the <Console> window, the ‘IP Security Policies on Local Computer’ submenu is created under ‘Console Root’. Right-click the submenu to select [Create IP Security Policy].
Pre-Shared key - VPN Client (5) Enter the name of description of the IP security policy in the <IP Security Policy Wizard> window, and click the [Next] button.
Pre-Shared key - VPN Client (6) Clear the ‘Activate the default response rule’ checkbox, and click the [Next] button. Once the window below appears, select the ‘Edit Properties’ checkbox, and click the [Finish] button.
Pre-Shared key - VPN Client (7) If the <XP IPSec Properties> window appears, the created item will be displayed. Clear the checkbox, and click the [Add] button.
Pre-Shared key - VPN Client (8) Once <Security Rule Wizard> starts, click the [Next] button to select ‘The tunnel endpoint is specified by this IP address:’. Enter the WAN interface IP address (165.213.89.245), and click the [Next] button.
Pre-Shared key - VPN Client (9) If you select ‘ Local Area Network[lan]’ from the <Network Type> window and click the [Next] button, the <Authentication Method> window will appear. Select the ‘Use this string to protect the key exchange [preshared key]:’ checkbox, and enter the user password registered with the firewall. Click the [Next] button.
Pre-Shared key - VPN Client (10) If you click the [Add] button from the <IP Filter List> window, the window below will appear. Enter ‘outbound’ in the Name field, and click the [Add] button.
Pre-Shared key - VPN Client (11) If you click the [Next] button from the <IP Filter Wizard> window, the window below will appear. Select ‘My IP address’ in the Source Address option, and click the [Next] button.
Pre-Shared key - VPN Client (12) Select ‘A specific IP Subnet’ in the Destination address option. Enter the address of the internal network (192.168.0.0) and subnet mask (255.255.255.0), and click the [Next] button.
Pre-Shared key - VPN Client (13) Select ‘Any’ from IP Protocol Type, and click the [Next] button. Select the ‘Edit properties’ checkbox, and click the [Finish] button.
Pre-Shared key - VPN Client (14) If you click the [OK] button, the outbound option will be created as shown in the figure below. Click the [Add] button to create the ‘inbound’ option. Enter 192.168.0.0 and 255.255.255.0 in ‘A specific IP Subnet’ of Source Address. Select ‘My IP Address’ from Destination Address. The next settings are the same as the previous ones.
Pre-Shared key - VPN Client (15) If you click the [OK] button, the window below will appear. Select the ‘outbound’ option, and click the [Next] button.
Pre-Shared key - VPN Client (16) Select the ‘Request Security (Optional)’ option, and click the [Edit] button.
Pre-Shared key - VPN Client (17) Select ‘Negotiate security’, and then select an option from each of ‘AH Integrity (None)’, ‘ESP Confidentiality (3DES)’, and ‘ESP Integrity (MD5)’ in Security Method Priority. Click the [Move Up] button to move to the top. Select the ‘Session key perfect forward security (PFS)’ checkbox, and click the [OK] button.
Pre-Shared key - VPN Client (18) If you select the ‘Edit Properties’ checkbox, and click the [Finish] button, the outbound option will be created as shown in the figure below. Click the [Add] button to create the inbound option.
Pre-Shared key - VPN Client (19) Once <Security Rule Wizard> starts, click the [Next] button to select the ‘The tunnel endpoint is specified by this IP address’ checkbox, and enter the Remote User IP address (165.213.109.101). Click the [Next] button.
Pre-Shared key - VPN Client (20) If you select ‘Local area network[LAN]’ from the <Network Type> window and click the [Next] button, the <Authentication Method> window will appear. Select the ‘Use this string to protect the key exchange (preshared key):’ checkbox, and enter the user password registered with the firewall. Click the [Next] button.
Pre-Shared key - VPN Client (21) If you click the [OK] button, the <IP filter list> window will appear. Select ‘inbound’ from the window, and select the [Next] button. The next settings are the same as the previous ones.
Pre-Shared key - VPN Client (22) Select the [General] tab from the <XP IPSec Properties> window, and click the [Advanced] button. Once the <Key Exchange Settings> window appears, select the ‘Master key perfect forward security (PFS)’ checkbox, and click the [Method] button.