Welcome
Welcome. Desktop Timer Tutorial. Notes: During this tutorial you may move to the next screen or back up, by using the navigation arrows. You may also use Page Up or Page Down on your keyboard. Welcome to this tutorial.

Welcome
E N D
Presentation Transcript
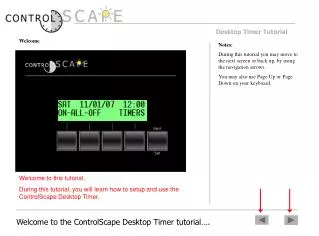
Welcome Desktop Timer Tutorial Notes: During this tutorial you may move to the next screen or back up, by using the navigation arrows. You may also use Page Up or Page Down on your keyboard. Welcome to this tutorial. During this tutorial, you will learn how to setup and use the ControlScape Desktop Timer. Welcome to the ControlScape Desktop Timer tutorial….
Using The Timer Desktop Timer Tutorial Notes: The display screen shown in the image to the left, is the default screen. The first four buttons have different functions which are indicated on the lower line of the two line display. The fifth button sets the parameter and/or moves to the next item. The default screen line 1, shows the time and date. Line 2 indicates that Button 1 is “ALL ON” and Button 2 is “ALL OFF”. The third button has no function and Button 4 is “TIMERS ON/OFF”. Using the Clock … The Main Screen
Desktop Timer Tutorial Using The Timer Notes: The All On and All Off function allows the homeowner to manually control the lights on the system. There is also individual light load control as indicated on the next page. Pressing Button 1 “ALL ON” will manually turn on all the lights on the system. Press Button 2 “ALL OFF” will turn off all the lights on the system. For individual control …. Press the NEXT/SET button. Using the Clock … the All On and All Off functions
Desktop Timer Tutorial Using The Timer Notes: The screen now changes to show button control for Device 1 – 4. Pressing the button under 01 will turn on Device 1. Pressing again would turn it off. Press the button 01. Using the Clock … individual light loads.
Desktop Timer Tutorial Using The Timer Notes: There is a logic that is helpful to understand. If the Device is high-lighted (as is Device # 1 to the left), then the clock will send an OFF Command when the button is pressed. If it is not high-lighted, the clock will send an ON Commend. The timers do not send according to the current state. The timers will send what is requested. Note that when Device 1 is successfully turned on, the indicators highlight Device 1 to indicate it is ON. Press the NEXT/SET button to scroll through additional devices. Using the Clock … individual light loads.
Desktop Timer Tutorial Using The Timer Notes: The TIMERS can be stopped from running by pressing the TIMERS button on the main page. When this button is pressed, the message “TIMERS ARE OFF” will flash across the date. This means that the timers are suspended. This is a useful function for homes that are not always occupied, such as summer homes where the customer may not wish for lights to come on when they are not there. They can just press the TIMERS button when they leave and all timer routines will be suspended. It is also used as a VACATION MODE. Do not confuse Devices with Timers. This means that Timers are off, not that devices are off. The 4th button on the main page is TIMERS. Press this button to stop timers from running. TIMERS ARE OFF will flash across the time on the upper line. Press TIMERS again to re-engage. Using the Clock … Timers Engaged and Disengaged
Sample Project Desktop Timer Tutorial Notes: This project is using 4 transformers and is also controlling 4 high voltage light loads. To start the tutorial, lets create a sample project: Devices: #1: Front Transformer - Landscape Lights #2: Front Transformer – Trees #3: Rear Transformer – Landscape Lights #4: Rear Transformer – Trees #5: Front Door Sconces #6: Front Porch Lights #7: Garage Sconces #8: Flood Lights To Enter “Programming Mode”, Press and hold the NEXT/SET button for about 3 seconds. A sample project ….
Desktop Timer Tutorial Devices: Receivers: #1: Front Transformer - Landscape Lights Plug In Relay Module #2: Front Transformer – Trees Plug In Relay Module #3: Rear Transformer – Landscape Lights Plug In Relay Module #4: Rear Transformer – Trees Plug In Relay Module #5: Front Door Sconces 600 Watt Dimmer #6: Front Porch Lights 600 Watt Dimmer #7: Garage Sconces 600 Watt Dimmer #8: Flood Lights 600 Watt Dimmer Notes: A sample project ….
Desktop Timer Tutorial Devices: Receivers: #1: Front Transformer - Landscape Lights Plug In Relay Module #2: Front Transformer – Trees Plug In Relay Module #3: Rear Transformer – Landscape Lights Plug In Relay Module #4: Rear Transformer – Trees Plug In Relay Module #5: Front Door Sconces 600 Watt Dimmer #6: Front Porch Lights 600 Watt Dimmer #7: Garage Sconces 600 Watt Dimmer #8: Flood Lights 600 Watt Dimmer Our Project will need: 1 Each ControlScape Desktop Time 4 Each Plug In Relay Modules (CS-APP) 4 Each 600 Watt Dimmers (CS-600-WH) 1 Each Phase Coupler Notes: A sample project ….
Programming Desktop Timer Tutorial Notes: The screen will change to “Set Time / Date?” upon entering programming mode. To Enter “Programming Mode”, Press and hold the NEXT/SET button for about 3 seconds. Programming … Entering “Programming Mode”
Time/Date Desktop Timer Tutorial Notes: If you have previously done this part of the setup, you may skip this section by pressing “NO” or the “Next/Set” button.. Upon enteringthe “Programming Mode”, the first option will be to set the current Time and Date. Press the “Yes” button. Programming … Do you wish to set the current Time and Date?
Desktop Timer Tutorial Time/Date Notes: The time is “Military Time”. This means that the hour for 11:15 am would be entered as “11”, whereas the hour for 11:15 pm would be entered as “23”. Use the – and + buttons to select the current HOUR. Press the NEXT/SET buttonwhen finished. Programming … Setting the “Current Hour”.
Desktop Timer Tutorial Time/Date Notes: Use the – and + buttons to select the current MINUTE. Press the NEXT/SET button when finished. Programming … Setting the “Current Minute”.
Desktop Timer Tutorial Time/Date Notes: Use the – and + buttons to select the current DAY. Press the NEXT/SET button when finished. Programming … Setting the “Current Day”.
Desktop Timer Tutorial Time/Date Notes: Use the – and + buttons to select the current MONTH. Press the NEXT/SET button when finished. Programming … Setting the “Current Month”.
Desktop Timer Tutorial Time/Date Notes: Use the – and + buttons to select the current DATE. Press the NEXT/SET button when finished. Programming … Setting the “Current Date”.
Desktop Timer Tutorial Time/Date Notes: Use the – and + buttons to select the current YEAR. Press the NEXT/SET button when finished. Programming … Setting the “Current Year”.
Desktop Timer Tutorial Time/Date Notes: Use the – and + buttons to select the TIME ZONE that you are in. Press the NEXT/SET button when finished. Programming … Setting the “Time Zone”.
Desktop Timer Tutorial Time/Date Notes: Most areas in the United States and Canada observe Daylight Saving Time. There are, however, a few areas that do not. If “Yes” is selected, the clock will automatically advance the one hour on the appropriate day in the spring and revert back to “Standard Time” on the appropriate day in the fall. These dates are different each year and have been preprogrammed into the ControlScape Desktop Timer. If “No” is selected, the time clock will ignore Daylight Saving Time and remain on Standard Time, all year long. Does the area you are in observe DAYLIGHT SAVING TIME? Press the YES or NO button to select. Programming … Set for “Daylight Saving Time”.
Location Desktop Timer Tutorial Notes: This section of programming tells the clock “where it is” so that it may calculate sunrise and sunset times which will be used later. Set the Longitude and Latitude? Press the YES or NO button to select. Programming … Setting the “Longitude and Latitude”.
Desktop Timer Tutorial Location Notes: Most people have no idea what the longitude and latitude of their house is. The Time Clock makes this easy. Just enter the Zip Code, and the Clock will find the global co-ordinates. Generally, use the YES option here, unless you are outside of the US. It is also not necessary to use the exact Zip Code of the installation. The sun rises and sets at the same time pretty much everywhere in your city or town. Just try to be close. The difference between downtown and a suburb 40 miles away, is just measured in seconds. This is close enough for turning lights on and off at sunset and sunrise. Set the Longitude and Latitude by entering a Zip Code? Press the YES (or NO)button to select. Programming … Setting the “Longitude and Latitude by Zip Code”.
Desktop Timer Tutorial Location Notes: As an example…. To enter the Zip Code “37205” … Press the + button 3 times The display will read “30000”. Press -> once to move one digit to the right. Press the – button 3 times. The display will read “37000”. Press -> once to move to the right. Press the + button 2 times. The display will read “37200”. The next digit as a “0” is correct. Press -> twice to move to the right two positions. Press the + button 5 times. The display will read “37205”. Press the NEXT/SET button to finish. Numbers down or up Position left or right Set the Zip Code by using the – or + buttons to change the numbers, and the <- and -> buttons to change the position. When done, press the NEXT/SET button. Programming … Setting the Zip Code.
Desktop Timer Tutorial Location Notes: In the unlikely event that the co-ordinates are not found, you may go back and enter the co-ordinates manually. You will need to know the co-ordinates. The screen will flash “Lon/Lat found!” and display the co-ordinates for 3 seconds. (The co-ordinates shown are for our example of Zip Code 37205) Programming … Finding the “Longitude and Latitude”.
UPB Desktop Timer Tutorial Notes: Each “Receiver” or “Device”(switch, relay module, etc.) needs to be given a distinct “Address”, and all items at the installation need to have a common “Network I.D.” This is where you will Setup the Network I.D. and Addresses. Setup UPB? Press the YES to begin addressing UPB devices (modules, switches, etc.). Press NO to go to Timers. Programming … Setting up “UPB”.
Desktop Timer Tutorial UPB Notes: UPB communication is very powerful. If the neighboring house has UPB installed, and is on the same “Network I.D.”, the two houses could potentially control each others lighting. During this function, the Timer will seek any Networks in its range and avoid using that Network I.D. This assures that the Timer will not interfere with other UPB systems in the area. Only Scan a new installation!!! Do not scan on an existing setup, as the timer will find the devices that are already installed and try to use a different Network ID. Instead, select “NO” and set the “Network I.D.” manually to the same Network ID that was established during the original setup. Scan for an open Network? Press YES to scan for an open UPB Network. Select NO to set the Network ID manually. Programming … Scan for an open “Network”.
Desktop Timer Tutorial UPB Notes: SETTING THE ID MANUALLY. If you answer “Scan for Open Net” with NO, the screen will ask if you wish to set the Network manually. If you answer YES, you be asked to set the Network I.D. Use the - and + buttons to select the Network ID. When finished, press the NEXT/SET button. If you answered “Scan for Open Net” with YES, the screen will show the time clock scanning for an open network. It will stop at the first unused network it finds and set that number as the project “Network I.D.” To set manually, see notes at right. Programming … Scanning for an open “Network”.
Desktop Timer Tutorial UPB Notes: A REPEATER IS NOT THE SAME AS A PHASE COUPLER! A UPB Repeater is similar to a Phase Coupler in that it will couple the electrical phases, but has one distinct difference. The Repeater actually regenerates a fresh signal of everything it hears. A Phase Coupler simply provides a path to the other phase for existing signals. Repeaters are not usually required unless the home is extremely large (ie: over 15,000 SF) or there is an outbuilding fairly far away. The system wants to know if there is a UPB Repeater (not the same as a Phase Coupler) is installed. Press YES if using a repeater, otherwise press NO. Programming … Use a UPB Repeater?
Desktop Timer Tutorial UPB Notes: The system is capable of controlling up to 16 devices. If your install only has 6 devices, set the number to 6. This will stop the clock from asking you any further setup questions about devices that you are not installing (ie: 7 – 16). If you decide to add a device at a later time, you can just increase this number and those functions will become available. Use the – and + buttons to change the number of devices. Press the NEXT/SET button when complete. Programming … Number of UPB Devices
Desktop Timer Tutorial UPB Notes: Each device must be programmed to respond to the clock. Each device gets an address so that when we want just Device #1 to come on, we have a way to send it a command that all other devices will ignore. In our sample project, we had Device #1 as the Front Landscape Lights. The Device is a Plug In Relay Module (CS-APP). Devices range from switches, plug in relay modules, hard wired relays, dimmers, etc. If you wish to program Device 1, press YES or NO to skip. Programming … Programming Device 1
Desktop Timer Tutorial UPB Notes: Placing a Device in Setup …. The general rule is to tap the button 5 times quickly. The LED will start to flash quickly while in programming mode. Click the examples below. Place Device#1 in setup, when the clock finds the device in setup mode, it will issue it the Network I.D. and Address 1. Programming happens automatically. When successful, the module will flash the light load, step out of programming mode and the clock will move on to the next step. Programming … Programming Device 1
Desktop Timer Tutorial UPB Notes: Dimming …Yes or No? Relays are not dimmable. They are on/off only. So…Non Dimmable devices are: Hard Wire Relays, Plug In Relay, Modules,15 Amp Relays Dimmers, of course, are dimmable. If “YES”. If the device is dimmable, the next step will ask for the Turn On intensity. This is in percent that the light load will come on when the manual button on the clock is pressed. Does Device#1 dim? Our Device was a Plug In Relay Module, so the answer would be NO. Use the – or + to set the desired intensity and press the NEXT/SET button. Programming … Programming Device 1
Desktop Timer Tutorial UPB Notes: From Our Sample Project: Device #1: Front Transformer - Landscape Lights Plug In Relay Module (CS-APP) Device #2: Front Transformer – Trees Plug In Relay Module (CS-APP) Device #3: Rear Transformer – Landscape Lights Plug In Relay Module (CS-APP) Device #4: Rear Transformer – Trees Plug In Relay Module (CS-APP) Device #5: Front Door Sconces 600 Watt Dimmer (CS-600-WH) Device #6: Front Porch Lights 600 Watt Dimmer (CS-600-WH) Device #7: Garage Sconces 600 Watt Dimmer (CS-600-WH) Device #8: Flood Lights 600 Watt Dimmer (CS-600-WH) Continue to program the rest of the devices just as we did the first device. Programming … Programming the rest of the devices.
Timers Desktop Timer Tutorial Notes: Press YES to setup timers. Programming … Setting up the timers
Desktop Timer Tutorial Timers Notes: From Our Sample Project: Device #1: Front Transformer - Landscape Lights Plug In Relay Module (CS-APP) Device #2: Front Transformer – Trees Plug In Relay Module (CS-APP) Device #3: Rear Transformer – Landscape Lights Plug In Relay Module (CS-APP) Device #4: Rear Transformer – Trees Plug In Relay Module (CS-APP) Device #5: Front Door Sconces 600 Watt Dimmer (CS-600-WH) Device #6: Front Porch Lights 600 Watt Dimmer (CS-600-WH) Device #7: Garage Sconces 600 Watt Dimmer (CS-600-WH) Device #8: Flood Lights 600 Watt Dimmer (CS-600-WH) Lets step back for a moment as this part can be quite simple or quite complex. The ControlScape Time Clock has 8 internal timers or events. These can be set for actual time, dusk, dawn, offsets of dusk/dawn, and day of week masks (ie: only on Friday and Saturday. It is always a good idea to write down before you begin. Lets do a fairly simple schedule of timers events. Timer 1: Runs every day 20 minutes before Dusk. It will turn ON devices 1,2,3,4,7. Timer 2: Runs Sunday to Thursday at 10:30 pm. It will turn OFF 1,2,3,4,7 and turn ON 5,6,8 Timer 3: Runs Friday and Saturday at 12:00 pm. It will turn OFF 1,2,3,4,7 and turn ON 5,6,8 Timer 4: Runs Everyday at Dawn. It will turn OFF 5,6,8 Programming … The schedule
Desktop Timer Tutorial Timers Notes: Timer 1: Runs every day 20 minutes before Dusk. It will turn ON devices 1,2,3,4,7. Timer 2: Runs Sunday to Thursday at 10:30 pm. It will turn OFF 1,2,3,4,7 and turn ON 5,6,8 Timer 3: Runs Friday and Saturday at 12:00 pm. It will turn OFF 1,2,3,4,7 and turn ON 5,6,8 Timer 4: Runs Everyday At Dawn. It will turn OFF 5,6,8 Press YES to set up Timer #1. Programming … Setting up the timers
Desktop Timer Tutorial Timers Notes: Timer 1: Runs every day 20 minutes before Dusk. It will turn ON devices 1,2,3,4,7. Timer 2: Runs Sunday to Thursday at 10:30 pm. It will turn OFF 1,2,3,4,7 and turn ON 5,6,8 Timer 3: Runs Friday and Saturday at 12:00 pm. It will turn OFF 1,2,3,4,7 and turn ON 5,6,8 Timer 4: Runs Everyday At Dawn. It will turn OFF 5,6,8 Press YES as Timer #1 runs everyday. Programming … Setting up the timers
Desktop Timer Tutorial Timers Notes: Timer 1: Runs every day 20 minutes before Dusk. It will turn ON devices 1,2,3,4,7. Timer 2: Runs Sunday to Thursday at 10:30 pm. It will turn OFF 1,2,3,4,7 and turn ON 5,6,8 Timer 3: Runs Friday and Saturday at 12:00 pm. It will turn OFF 1,2,3,4,7 and turn ON 5,6,8 Timer 4: Runs Everyday At Dawn. It will turn OFF 5,6,8 Press DUSK for … Dusk. Programming … Setting up the timers
Desktop Timer Tutorial Timers Notes: Timer 1: Runs every day 20 minutes beforeDusk. It will turn ON devices 1,2,3,4,7. Timer 2: Runs Sunday to Thursday at 10:30 pm. It will turn OFF 1,2,3,4,7 and turn ON 5,6,8 Timer 3: Runs Friday and Saturday at 12:00 pm. It will turn OFF 1,2,3,4,7 and turn ON 5,6,8 Timer 4: Runs Everyday At Dawn. It will turn OFF 5,6,8 Use the “-” button to scroll down to –20 minutes. This means “Dusk minus 20 minutes” or “20 Minutes before Dusk” Press the NEXT/SET button when finished. Programming … Setting up the timers
Desktop Timer Tutorial Timers Notes: Timer 1: Runs every day 20 minutes before dusk. It will turn ON devices 1,2,3,4,7. Timer 2: Runs Sunday to Thursday at 10:30 pm. It will turn OFF 1,2,3,4,7 and turn ON 5,6,8 Timer 3: Runs Friday and Saturday at 12:00 pm. It will turn OFF 1,2,3,4,7 and turn ON 5,6,8 Timer 4: Runs Everyday At Dawn. It will turn OFF 5,6,8 Use the “-” or “+” button set Device 1 to “ON”. If the load is dimmable. The On/Off will be 0% –100%, with 0% being Off and 100% being full brightness. “NoCh” being “No Change” Press the NEXT/SET button when finished. Programming … Setting up the timers
Desktop Timer Tutorial Timers Notes: Timer 1: Runs every day 20 minutes before dusk. It will turn ON devices 1,2,3,4,7. Timer 2: Runs Sunday to Thursday at 10:30 pm. It will turn OFF 1,2,3,4,7 and turn ON 5,6,8 Timer 3: Runs Friday and Saturday at 12:00 pm. It will turn OFF 1,2,3,4,7 and turn ON 5,6,8 Timer 4: Runs Everyday At Dawn. It will turn OFF 5,6,8 Use the “-” or “+” button set Device 2 to “ON”. Press the NEXT/SET button when finished. Programming … Setting up the timers
Desktop Timer Tutorial Timers Notes: Timer 1: Runs every day 20 minutes before dusk. It will turn ON devices 1,2,3,4,7. Timer 2: Runs Sunday to Thursday at 10:30 pm. It will turn OFF 1,2,3,4,7 and turn ON 5,6,8 Timer 3: Runs Friday and Saturday at 12:00 pm. It will turn OFF 1,2,3,4,7 and turn ON 5,6,8 Timer 4: Runs Everyday At Dawn. It will turn OFF 5,6,8 Use the “-” or “+” button set Device 3 to “ON”. Press the NEXT/SET button when finished. Programming … Setting up the timers
Desktop Timer Tutorial Timers Notes: Timer 1: Runs every day 20 minutes before dusk. It will turn ON devices 1,2,3,4,7. Timer 2: Runs Sunday to Thursday at 10:30 pm. It will turn OFF 1,2,3,4,7 and turn ON 5,6,8 Timer 3: Runs Friday and Saturday at 12:00 pm. It will turn OFF 1,2,3,4,7 and turn ON 5,6,8 Timer 4: Runs Everyday At Dawn. It will turn OFF 5,6,8 Use the “-” or “+” button set Device 4 to “ON”. Press the NEXT/SET button when finished. Programming … Setting up the timers
Desktop Timer Tutorial Timers Notes: Timer 1: Runs every day 20 minutes before dusk. It will turn ON devices 1,2,3,4,7. Timer 2: Runs Sunday to Thursday at 10:30 pm. It will turn OFF 1,2,3,4,7 and turn ON 5,6,8 Timer 3: Runs Friday and Saturday at 12:00 pm. It will turn OFF 1,2,3,4,7 and turn ON 5,6,8 Timer 4: Runs Everyday At Dawn. It will turn OFF 5,6,8 Next is Device 5. It is not in our “ON” list, so we need to decide, “Do we want to be sure it is OFF, or just leave it in whatever state it is currently in (No Change)”. Use the “-” or “+” or “NoCh” button. It is a 600Watt dimmer so its values are in % of intensity. Press the NEXT/SET button when finished. Programming … Setting up the timers
Desktop Timer Tutorial Timers Notes: Timer 1: Runs every day 20 minutes before dusk. It will turn ON devices 1,2,3,4,7. Timer 2: Runs Sunday to Thursday at 10:30 pm. It will turn OFF 1,2,3,4,7 and turn ON 5,6,8 Timer 3: Runs Friday and Saturday at 12:00 pm. It will turn OFF 1,2,3,4,7 and turn ON 5,6,8 Timer 4: Runs Everyday At Dawn. It will turn OFF 5,6,8 Device 6 is like Device 5. It is not in our “ON” list, so we need to decide, “Do we want to be sure it is OFF, or just leave it in whatever state it is currently in (No Change)”. Press the NEXT/SET button when finished. Programming … Setting up the timers
Desktop Timer Tutorial Timers Notes: Timer 1: Runs every day 20 minutes before dusk. It will turn ON devices 1,2,3,4,7. Timer 2: Runs Sunday to Thursday at 10:30 pm. It will turn OFF 1,2,3,4,7 and turn ON 5,6,8 Timer 3: Runs Friday and Saturday at 12:00 pm. It will turn OFF 1,2,3,4,7 and turn ON 5,6,8 Timer 4: Runs Everyday At Dawn. It will turn OFF 5,6,8 Device 7 is in our “ON” list, so we just need to set it’s ON Intensity. Use the “-” or “+” to set it to 100%. Press the NEXT/SET button when finished.45 Programming … Setting up the timers
Desktop Timer Tutorial Timers Notes: Timer 1: Runs every day 20 minutes before dusk. It will turn ON devices 1,2,3,4,7. Timer 2: Runs Sunday to Thursday at 10:30 pm. It will turn OFF 1,2,3,4,7 and turn ON 5,6,8 Timer 3: Runs Friday and Saturday at 12:00 pm. It will turn OFF 1,2,3,4,7 and turn ON 5,6,8 Timer 4: Runs Everyday At Dawn. It will turn OFF 5,6,8 Device 8 is like Devices 5 and 6. It is not in our “ON” list, so we need to decide, “Do we want to be sure it is OFF, or just leave it in whatever state it is currently in (No Ch)”. Let’s use ON at 80%. Press the NEXT/SET button when finished. Programming … Setting up the timers
Desktop Timer Tutorial Timers Notes: Timer 1: Runs every day 20 minutes before Dusk. It will turn ON devices 1,2,3,4,7. Timer 2: Runs Sunday to Thursday at 10:30 pm. It will turn OFF 1,2,3,4,7 and turn ON 5,6,8 Timer 3: Runs Friday and Saturday at 12:00 pm. It will turn OFF 1,2,3,4,7 and turn ON 5,6,8 Timer 4: Runs Everyday At Dawn. It will turn OFF 5,6,8 We are finished with Timer#1 so Press YES to set up Timer #2. Programming … Setting up the timers
Desktop Timer Tutorial Set Timer 2 with the following steps….. Timers Notes: Timer 1: Runs every day 20 minutes before Dusk. It will turn on devices 1,2,3,4,7. Timer 2: Runs Sunday to Thursdayat 10:30 pm. It will turn off 1,2,3,4,7 and turn on 5,6,8 Timer 3: Runs Friday and Saturday at 12:00 pm. It will turn off 1,2,3,4,7 and turn on 5,6,8 Timer 4: Runs Everyday At Dawn. It will turn off 5,6,8 Select NO as it only runs Sunday to Thursday. The SMTWTFS indicates the days it will operate. Use the “-” or “+” to skip ahead to Friday Select DEL as it does not run on Friday. The “F” for Friday disappears. Press “+” to move to Saturday. Select DEL as it does not run on Saturday. The “S” for Saturday disappears. This is now showing Sunday to Thursday, which is correct. Press the NEXT/SET button. Select TIME as this timer runs at 10:30 PM Use the “-” or “+” to set the hour to 22. This military time and 10:30 pm is 22:30. Press the NEXT/SET button when done. Use the “-” or “+” to set the minute to 30. Press the NEXT/SET button when done. The rest of the programming uses the same method Timer1. Just set the state for each device when the timer runs. When all the timers are complete, we can move on to View Settings. Programming … Setting up the timers
View Settings Desktop Timer Tutorial Notes: This is your opportunity to check your setup and make sure that you have the programming correct. Press YES to view settings. Programming … View Settings
Desktop Timer Tutorial View Settings Notes: Press NEXT/SET to step through the settings. Press any other button to exit “View Settings”. Programming … View Settings - Instructions