HRMS End User Training
HRMS End User Training. HRMS Financial Reporting Training Guide. X. Financial Reporting. HRMS Payroll and Reports. Classroom Introductions. Welcome to Financial Reporting. Building Evacuations Messages Cell Phones Computers. Security Restrooms Participant Lounge.


HRMS End User Training
E N D
Presentation Transcript
HRMS End User Training HRMS Financial Reporting Training Guide X
HRMS Payroll and Reports Classroom Introductions Welcome to Financial Reporting • Building Evacuations • Messages • Cell Phones • Computers • Security • Restrooms • Participant Lounge • Agency • Goal(s) for class • Name • Role
Course Objectives • Upon completion of this course, you will be able to: • Define new terms and concepts specific to Financial Reporting. • Identify the financial reports available in HRMS. • Understand how to manipulate reports using the Automated List Viewer (ALV). • Define how to create variants, and how to access Statewide variants. • Identify the Financial reports available in the Business Intelligence.
Training Tools • HRMS On-line Quick Reference (OLQR): On-line help that provided you with step-by-step instructions designed to help you complete tasks in HRMS. Website address: http://www.dop.wa.gov/payroll/HRMS/OnLineQuickReference/Pages/default.aspx
Job Aids Website address: http://www.dop.wa.gov/payroll/HRMS/OnLineQuickReference/Pages/JobAids.aspx
Financial Reporting Overview
Financial Reporting Overview Upon completion of this section, you will be able to: • Define new terms related to Financial reports. • List the key features and benefits of reporting in HRMS. • Describe roles as they relate to the course.
Key Terms • Automated List Viewer – (ALV) Tool which allows users to modify data to fit their needs. • Business Area – A specific agency in the State of Washington. This is associated with each Employer Identification Number (EIN). • In-Period- The current payroll period. • For- Period- The prior period that was processed in the current payroll because of a retro calculation in that period. • Period – The pay period for which the report, transaction, or program is being run.
Key Terms cont’d. • Personnel Area – A specific agency or sub-agency in the State of WA that is organized according to aspects of personnel, time management, and payroll. It divides the organization administratively. • Organizational Unit – A department, division, region or unit within an Agency. • Variant – A customized version of a report with specific, individually pre-selected criteria. Used for reports which must be repetitively run. • Wage Type – An object which stores amounts or time units that are used to calculate pay and deductions. Used to separate amounts and time units for various business processes.
Reporting in HRMS • HRMS integration provides the capability to run reports within Personnel Areas (agencies or sub-agencies) • Generating reports allows you to process information quickly to support decision making • Display data and filter data to be unique to each agency or sub-agency. • View the report online or print immediately. • Ability to export and manipulate “real-time” data.
HRMS Role Based Security • Human Resource Management System (HRMS) has role-based security • A “role” is defined as a major grouping of activities that reflect a specific aspect of a person’s job • While a role may have several activities aligned to it, an activity can only be aligned with one role. A person may be assigned one or more roles, and roles can be assigned to one or more persons. • Your assigned HRMS role dictates the information that you can create, change and display • Your agency assigned your role based on what tasks you perform • Financial Reporting Processor: Responsible for running financial reports within HRMS to view the data for their agencies.
Financial Information Process Flow Agency End Users Input information into HRMS PayrollOutputs Pre-Payroll Analysis Pre-PayrollAnalysis Payroll Processing Payroll Exits Accounting Load Payroll Accounting
Section Overview • Upon completion of this section, you will be able to: • Define the Automated List Viewer (ALV) toolbar • Access reports available to Financial Processors • Describe how to use the ALV to manipulate data of reports.
The Automated List Viewer (ALV) • The Automated List Viewer (ALV) is a tool for displaying and formatting reports in HRMS • While some reports are easily viewed and printed, others can be large and harder to manage (potentially as wide and as long as a table). • For these reports, the ALV, enables you to visually manipulate how data is viewed in table form.
ALV Function Options Include: Selecting/Deselecting Multiple and Single Rows, Columns and Cells Swapping and Hiding Column Locations and Altering Widths Sorting in Ascending and Descending Orders Setting and Deleting Filters Selecting and Maintaining Filter Options Changing Filter Sequences Displaying and Deleting Totals Calculating and Deleting Averages, Maximums and Minimums Creating, Displaying and Deleting Subtotals for one or more columns Saving ALV List Layouts Selecting ALV Layout Options Displaying Lists Graphically Freezing Columns Choosing Details
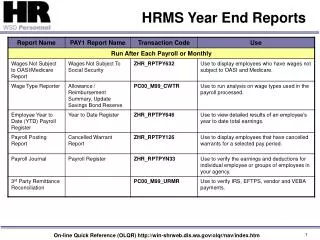
Financial Reports Overview • Payroll Threshold Report (ZHR_RPTPYN09) • Payroll Posting Report (ZHR_RPTPY126) • Wage Type Reporter (PC00_M99_CWTR) • Wage Type Assignment - Display G/L Accounts (PC00_M99_DKON) • Federal Employer Identification Numbers (EIN) (ZHR_RPTPY061) • Negative Federal Tax Per Federal EIN Report (ZHR_RPTPY600) • Negative Summary Records (ZHR_RPTPY455) • Payroll Journal Voucher Report (ZHR_RPTPY376) • Accrued & Mandatory Payroll Deduction Report (ZHR_RPTPY010) • Remittance Detail Report (PC00_M99_URMR) • Quarterly: • Medical Aid Detail Report (ZHR_RPTPY394)
HRMS Reporting - Transaction Code Map The Transaction Code used for this example is the Payroll Threshold Report Functional Area HR = Human Resources Functional Areas: PY – Payroll PA – Personnel Administration OM – Organizational Management TM – Time Management BN - Benefits Z HR _ RPT PY NO9 “RPT” = Report Report GAP # “Z” = Custom
Personalize your Favorites Folder • To personalize your favorites folder: • Right click on the folder • Select options • You can: • Add sub-folders • Add common transaction codes • Add commonly viewed websites
Payroll Threshold Report • Run this report after payroll has been run by DOP in simulation mode on days 2 and 3. • The report checks the accuracy of payroll run by displaying issues that have arisen after payroll has been processed. • Refer to the OLQR User Procedure: Payroll Threshold Report • To access this report, enter the transaction code: ZHR_RPTPYN09 into the command field
Accessing the Payroll Threshold Report • Click to access the screen shown to the right • Enter the Payroll Area. • Choose to search by: • Current period • Other periods
Accessing the Payroll Threshold Report Fields to complete: Personnel number (s) Personnel area Personnel subarea Employee group Employee Subgroup Under the Infotype selection choose an infotype to validate by clicking the checkbox. Click (Execute) to generate report. Refer to Variants_Create and Retrieve in the OLQR
Saving a Variant- Payroll Threshold Report • To save the report with your selected criteria, on the Menu Bar click Goto Variants Save as Variant Note: You can also use [Ctrl + S] or click (Save) to save a variant.
Saving a Variant- Payroll Threshold Report • Complete the Variant name and Meaning fields • Click (Enter) to validate the data • Click (Save) to save the data • You’ll then be taken back to the report page Tip: Clicking the ‘Protect Variant’ box will help ensure that no one will save over your variant. This is optional.
Payroll Threshold Report Click (Execute) to generate report. Refer to Variants_Create and Retrieve in the OLQR
Viewing Results: Payroll Threshold Report Note: Select the row and choose (Details) to display details of the row
Selecting Multiple Rows, Cells or Columns • To select Adjacent Columns: • Select a column, choose shift select the first and last of the desired column • To select Non Adjacent Columns: • Select a column, choose control, and select the desired columns
Hiding Unwanted Columns • Select unwanted column headers • Right click your mouse and select hide
Sorting in Ascending and Descending Orders • First select column to sort- options on how to sort: • Select the (Ascending) or the (Descending). • Right click the column to sort. • Use Edit on the menu bar.
Sorting in Ascending and Descending Orders • The column displays the sort. For this screen shot, ascending was selected. • Note columns headers with a red triangle in the upper right corner indicate a sort
Adding Totals & Subtotals • Select column header to total, then click (Total) to add the total to the column • Select column header to subtotal, then click (subtotal) to add the subtotal to the column
Adding maximums and minimums • Select column: • Edit • Calculate • Mean Value • Minimum • Maximum
Saving a layout • Click (save layout) • Use the keyboard shortcut Ctrl + F10 • From the menu bar select: Settings Layout Save
Review Questions • 1. True of False?All reports within HRMS have the ALV functions available? • 2. True or False?When creating a variant there is no minimum or maximum to the criteria selection? • 3. What are the three ways an end user can save a Layout?
HRMS Activity Run and View the Payroll Threshold Report (ZHR_RPTPYN09)
Payroll Posting Report • The Payroll Posting Report displays all General Ledgers and the Cost Coding. • This report reads payroll posting data after it has been processed through payroll. • Refer to the OLQR User Procedure: Payroll Posting Report
Payroll Posting Report Statewide Variants OLQR Web address: http://www.dop.wa.gov/payroll/HRMS/OnLineQuickReference/Pages/HRMSReports.aspx
Accessing Variants • Enter the transaction code: ZHR_RPTPY126 into the command field. • To access a variants: • Click (Get Variant). • Clear the created by field • Click the Variant name you are selecting. • Click (Choose).
Payroll Posting Report • Fields to complete: • Pay period • Business Area • Use the (Multiple selection) to include or exclude search criteria • Click (Execute) to generate the report.
Payroll Posting Report • To display the data double click on the (rollup) icon
Using the Change Layout- Payroll Posting Report • Select the (Change Layout) to change the report layout, set filters, to gather the data needed.
Using the Change Layout icon- Displayed Columns Tab • Displayed Columns • Column headers listed will display on the report • To re-order the columns, select the column and use one:
Using the Change Layout icon- Displayed Columns Tab • Column Set • Available columns for the report, but not displayed on the report. • To move columns from the Column Set to Displayed Columns or from Displayed Columns to Column Set use the: (hide selected fields, or display selected fields)
Using the Change Layout icon- Sort Order Tab • Allows user to Add sorts to reports • From the Column Set select the column to first sort by • Use the (Add sort criterion) to add • Use the (Remove sort criterion to) to remove
Using the Change Layout icon - Filter Tab • Two step process: • 1. Select column to filter- use the (Add Filter Criterion) to Filter criteria • 2. Click the (filter) to set • Enter filter criteria • Click (Execute/Enter) to return to Change Layout • Click (transfer ) to view results
Using the Change Layout icon – Display Tab • Check box next to Printout with date, Title and Page number to add page numbers and titles to report print outs. • Select the (Transfer) to return back to the report with layout changes