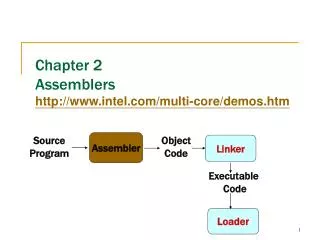
NEW MULTI-STAGE TOUCHSCREENS Features & Programming
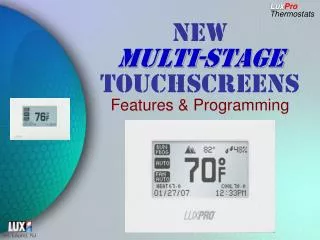
NEW MULTI-STAGE TOUCHSCREENS Features & Programming. NEW MULTI-STAGE TOUCHSCREENS. PSPU721T – 2H/1C PSPU732T – 3H/2C 7 Day Programmable OR Non Programmable (Simple Mode) Dual Fuel Capable w/optional Outdoor Wireless Remote Temp Transmitter.

NEW MULTI-STAGE TOUCHSCREENS Features & Programming
E N D
Presentation Transcript
NEW MULTI-STAGE TOUCHSCREENS • PSPU721T – 2H/1C • PSPU732T – 3H/2C • 7 Day Programmable OR Non Programmable (Simple Mode) • Dual Fuel Capable w/optional Outdoor Wireless Remote Temp Transmitter. • Manual or Auto Humidity and De-Humidity Control (PSPU732T only) • Installer Message • Energy Watch – Calculates Usage and Dollar Amount. • Screen Lockout • Much, Much, Much More….. VERY COMPETITIVE PRICING
NEW TOUCHSCREENFEATURES/PROGRAMMING • On power up, to use the PSPU721 or 732 as a simple non programmable thermostat, touch the screen. • To switch from programmable mode to simple mode, remove the faceplate, press & release the reset button on the bottom right. When “Touch For Simple Thermostat” comes up on the screen touch the screen and the t-stat will switch to “Simple” mode. TOUCH FOR SIMPLE THERMOSTAT
NEW TOUCHSCREENFEATURES/PROGRAMMING • Simple Mode puts the thermostat into non programmable mode where only temperature set point, cool/heat/auto mode, or fan operation can be changed. 46% 72F AUTO FAN AUTO - 72.0 +
NEW TOUCHSCREENFEATURES/PROGRAMMING • For Programmable Mode, touch the screen. Now you can use all of the extensive programmable features to configure the thermostat the way you or the consumer wants it. TOUCH FOR PROGRAMMABLE THERMOSTAT
NEW TOUCHSCREENFEATURES/PROGRAMMING • Home screen shows temp set points, date, time, room temp, humidity, and outdoor temp if using optional wireless temp transmitter. • Touch the Screen anywhere to advance to Control Screen. Run Program or Hold Outdoor Temp* Room Humidity Mode Setting Fan Setting Heat Set Point Cool Set Point Current time & date * With Use of Wireless Remote Transmitter
NEW TOUCHSCREENFEATURES/PROGRAMMING • The Control Screen is for the consumer to • make Temp changes, • set Humidity to Auto or Manual, • set Dehumidifcation • set Fan mode • put t-stat in Hold or Run Mode • access Installers Message. • Press Home Screen button to go back to Home Screen. • Press MENU to go to Main Programming Screen. Run Program or Hold Auto or Manual Installers Message Home Screen Auto, Cool Heat, Emerg Heat or Off RUN PROG HUMIDITY MANUAL Current room temp & humidity AUTO 46% Fan Auto, Fan Intermittent or Fan On. 70.0 FAN AUTO - + DHUM 45 MENU HEAT - 68.0 72.0 + COOL Main Programming Adjust temp and dehumidification settings Current Mode Blinks
NEW TOUCHSCREENFEATURES/PROGRAMMING • Main Menu Programming Screen allows owner to make adjustments, settings and programming choices. • Push Date / Time Settings DATE / TIME SETTINGS ADVANCED SETTINGS PROGRAM SETTINGS VACATION SETTINGS ENERGY WATCH FILTER MONITOR CLEAN SCREEN SET SCREEN DEHUMIDIFY
NEW TOUCHSCREENFEATURES/PROGRAMMING DATE / TIME SETTINGS • Set date & time by pressing each button individually. • Press MENU to go back to Main Programming Screen 12 24 CLOCK SET TIME / DATE 12 33 PM H M MENU 07 20 08 H D Y
NEW TOUCHSCREENFEATURES/PROGRAMMING • Push “Program Settings” to set daily temperature and fan settings. DATE / TIME SETTINGS ADVANCED SETTINGS PROGRAM SETTINGS VACATION SETTINGS ENERGY WATCH FILTER MONITOR CLEAN SCREEN SET SCREEN DEHUMIDIFY
NEW TOUCHSCREENFEATURES/PROGRAMMING PROGRAM SETTINGS • Press day of week • 4 on/off periods per day. • Each day can be programmed differently. • Fan can be set differently for each period. • Each day can be copied to the next. MO TU WE TH FR SA SU 1 FAN AUTO EVENT 07 30 AM START MENU HEAT COOL - 68.0 72.0 +
NEW TOUCHSCREENFEATURES/PROGRAMMING PROGRAM SETTINGS • After completing each day’s program, when you push the next day, the user is asked if they want to copy to the next day. • If YES, then you will continue to the following day and be asked the question again, etc. • If NO, then you program that day as you wish and proceed on to all the days of the week. • Press MENU when complete to go back to the Main Programming Screen. COPY MONDAY SETTINGS YES NO
NEW TOUCHSCREENFEATURES/PROGRAMMING • Push “Energy Watch” to see HVAC energy consumption and cost to date. DATE / TIME SETTINGS ADVANCED SETTINGS PROGRAM SETTINGS VACATION SETTINGS ENERGY WATCH FILTER MONITOR CLEAN SCREEN SET SCREEN DEHUMIDIFY
NEW TOUCHSCREENFEATURES/PROGRAMMING ENERGY WATCH • Energy Watch shows energy consumption for up to 255 days based on parameters set in “Advanced Settings”. • Owner can see energy usage and cost at anytime. • Hit the RESET button to zero out. LAST 30 DAYS • HRS COMP. • 20 HRS FURN. • HRS FAN • HRS TOTAL • COST $20.30 RESET MENU
NEW TOUCHSCREENFEATURES/PROGRAMMING CLEAN SCREEN • By touching the Clean Screen button, you freeze the screen for 15 seconds so that you can wash/wipe it w/o changing any settings. DATE / TIME SETTINGS ADVANCED SETTINGS PROGRAM SETTINGS VACATION SETTINGS ENERGY WATCH FILTER MONITOR CLEAN SCREEN SET SCREEN DEHUMIDIFY Consult owners manual for maintenance & care
NEW TOUCHSCREENFEATURES/PROGRAMMING • Push “Set Screen” to change screen settings. DATE / TIME SETTINGS ADVANCED SETTINGS PROGRAM SETTINGS VACATION SETTINGS ENERGY WATCH FILTER MONITOR CLEAN SCREEN SET SCREEN DEHUMIDIFY
NEW TOUCHSCREENFEATURES/PROGRAMMING SET SCREEN • Backlight – Can be set to Constant Light or Auto (touch the screen). • Reverse – Change from B/W to W/B. • Night Reverse - Set for Auto screen reverse (chgs at 9PM and 6AM). BACKLIGHT REVERSE NIGHT REVERSE CONTRAST AUTO ON ON MENU 07
NEW TOUCHSCREENFEATURES/PROGRAMMING • Push “Vacation Settings” to set parameters for time & temperature while away from the home. DATE / TIME SETTINGS ADVANCED SETTINGS PROGRAM SETTINGS VACATION SETTINGS ENERGY WATCH FILTER MONITOR CLEAN SCREEN SET SCREEN DEHUMIDIFY
NEW TOUCHSCREENFEATURES/PROGRAMMING VACATION SETTINGS • Input leave (BEGIN) date, return (END) date and heat/cool temp settings. VACATION SETTINGS 09 20 08 BEGIN 09 30 08 END HEAT COOL - 65.0 80.0 +
NEW TOUCHSCREENFEATURES/PROGRAMMING • Push “Filter Monitor” to see filter usage in days and to reset after changing filter. DATE / TIME SETTINGS ADVANCED SETTINGS PROGRAM SETTINGS VACATION SETTINGS ENERGY WATCH FILTER MONITOR CLEAN SCREEN SET SCREEN DEHUMIDIFY
NEW TOUCHSCREENFEATURES/PROGRAMMING FILTER MONITOR • Filter Monitor Screen shows how many days current filter has been used (based on fan run time). • Reset button will set back to zero. FILTER USED 15 DAYS RESET MENU
NEW TOUCHSCREENFEATURES/PROGRAMMING HUMIDITY SETTINGS • Push this button to toggle between “Humidify” or “Dehumidify” mode. • More detailed settings for humidity control are available in Advanced Settings. (Installer settings) DATE / TIME SETTINGS ADVANCED SETTINGS PROGRAM SETTINGS VACATION SETTINGS ENERGY WATCH FILTER MONITOR CLEAN SCREEN SET SCREEN DEHUMIDIFY
NEW TOUCHSCREENFEATURES/PROGRAMMING ADVANCED SETTINGS • Push & hold the Advanced Settings button for 5 seconds and the installer will be allowed to make additional and more detailed program settings. • The following screen will appear when entering Advanced Settings: DATE / TIME SETTINGS ADVANCED SETTINGS PROGRAM SETTINGS VACATION SETTINGS ENERGY WATCH FILTER MONITOR CLEAN SCREEN SET SCREEN DEHUMIDIFY CAUTION: Altering the system properties in the ADVANCED SETTINGS may affect the performance of the HVAC system and should be performed only by a qualified installer.
NEW TOUCHSCREENFEATURES/PROGRAMMING ADVANCED SETTINGS • Advanced Settings Screen allows installer to set: • Daylight Savings On/Off • Filter Days • Energy Usage Parameters • Celsius or Fahrenheit • Security level • Installers message • Press FILTER to set Filter Monitor to Off/On & number of days to monitor. DAYLIGHT TIME OFF NEXT PAGE FILTER ENERGY WATCH F SECU-RITY INSTALL MESSAGE MENU
NEW TOUCHSCREENFEATURES/PROGRAMMING ADVANCED SETTINGS FILTER MONITOR • Turn Filter Monitor Off or ON. • An icon appears on the Home Screen when the Filter monitor is set to ON. FILTER MONITOR OFF MENU
NEW TOUCHSCREENFEATURES/PROGRAMMING ADVANCED SETTINGS FILTER MONITOR • When you turn THE Filter Monitor ON, screen will then ask for the number of months (up to 6), based on fan run time, to notify consumer to change filter. CHANGE FILTER AFTER 2 MONTH MENU Return to Advanced Settings Screen
NEW TOUCHSCREENFEATURES/PROGRAMMING ADVANCED SETTINGS • Push “Energy Watch” to set parameters for tracking HVAC energy usage and cost. DAYLIGHT TIME OFF NEXT PAGE FILTER ENERGY WATCH F SECU-RITY INSTALL MESSAGE MENU
NEW TOUCHSCREENFEATURES/PROGRAMMING ADVANCED SETTINGS ENERGY WATCH • Set consumption KW parameters for compressor, furnace & fan, and per hr KW cost. • This allows consumer to watch on going HVAC energy costs by pushing the “Energy Watch” button on the Main Menu Screen. COMPRESSOR KW FURNACE KW FAN KW C / KWHr 5 5 1 MENU 13 Return to Advanced Settings Screen
NEW TOUCHSCREENFEATURES/PROGRAMMING ADVANCED SETTINGS • Push “Security” to set level of screen lock preferred. DAYLIGHT TIME OFF NEXT PAGE FILTER ENERGY WATCH F SECU-RITY INSTALL MESSAGE MENU
NEW TOUCHSCREENFEATURES/PROGRAMMING ADVANCED SETTINGS SECURITY • To turn Security on to FULL Lock or PARTIAL Lock, push OFF button. • You will be asked for a Pin #. The default Pin # is 1111. • To change your Pin # push Change Pin and follow the prompts. SECURITY OFF CHANGE PIN MENU FULL LOCK
NEW TOUCHSCREENFEATURES/PROGRAMMING ADVANCED SETTINGS SECURITY • Push the Lock button to toggle between FULL Lock and PARTIAL Lock • FULL Lock completely locks out the thermostat from unauthorized use w/o the Pin # • PARTIAL Lock only allows the changing of the temperature setpoint. SECURITY OFF CHANGE PIN MENU FULL LOCK Return to Advanced Settings Screen
NEW TOUCHSCREENFEATURES/PROGRAMMING ADVANCED SETTINGS • Push “Install Message” to input installer message and set frequency of display. DAYLIGHT TIME OFF NEXT PAGE FILTER ENERGY WATCH F SECU-RITY INSTALL MESSAGE MENU
NEW TOUCHSCREENFEATURES/PROGRAMMING ADVANCED SETTINGS INSTALL MESSAGE • Message of up to 42 characters. • Message can be programmed to appear on a monthly basis. • Message can also be accessed by consumer by pushing the icon button on the Control Screen. For Service Call ABC Htg at 777-555-4321 1 ABC 2 DEF 3 GHI 4 JKL 5 MNO 6 PQR 7 STU 8 VWX 9 YZ 0 :/- MENU OK
NEW TOUCHSCREENFEATURES/PROGRAMMING ADVANCED SETTINGS • Push “Next Page” to access Advanced settings for system type, cycles rates, staging temps, dual fuel, humidity and more… DAYLIGHT TIME OFF NEXT PAGE FILTER ENERGY WATCH F SECU-RITY INSTALL MESSAGE MENU
NEW TOUCHSCREENFEATURES/PROGRAMMING ADVANCED SETTINGS • Heat Pump • 2 Stg HP • A/C • No Compressor • Electric Furnace • Gas Furnace • 2 Stg Gas Furn. • Oil Furnace • Select type of HVAC system. • Set Max Compressor Cycle Rate per Hr. (2 - 9)* • Auto Change is minimum temp (dead band) difference between Heat/Cool set points. (1 – 5 )* * factory settings are recommended HEAT PUMP 9 CYCLE RATE NEXT PAGE ELECTRIC FURNACE 3 AUTO CHNGE PREV PAGE HP CUT OFF ON MENU CUT TEMP + 40 PUSH NEXT FOR FURTHER SETTING
NEW TOUCHSCREENFEATURES/PROGRAMMING ADVANCED SETTINGS DUAL FUEL • Heat Pump Cut Off is for Dual Fuel applications. By turning the HP CUT OFF to ON, and setting the CUT TEMP (outside), the HP will shut down at that CUT TEMP and the gas furnace will take over. • Press NEXT PAGE for further settings HEAT PUMP 9 CYCLE RATE NEXT PAGE ELECTRIC FURNACE 3 AUTO CHNGE PREV PAGE HP CUT OFF ON MENU CUT TEMP + 36
NEW TOUCHSCREENFEATURES/PROGRAMMING ADVANCED SETTINGS DUAL FUEL • Allows heat pump to operate with the furnace by changing to the ON position. • Press NEXT PAGE for further settings HP WHEN OFF NEXT PAGE FURNACE ON PREV PAGE MENU
NEW TOUCHSCREENFEATURES/PROGRAMMING ADVANCED SETTINGS MULTI-STAGE DIFFERENTIAL SETTINGS • 1st Stage Differential is the temp difference from set point that the heat or cool initiates. • 2nd Stage Differential is the temp difference from 1st stg set point & 2nd stg start-up. • 3rd Stage… • Set the reversing valve to energize in Heat or Cool depending on unit design 1ST STAGE DIF 2ND STAGE DIF 2 NEXT PAGE 2 PREVPAGE 2 3RD STAGE DIF OB ENERGIZED MENU COOL Consult equipment manufacturer’s operation/installation manuals before setting these temperature settings. PUSH NEXT FOR FURTHER SETTING
NEW TOUCHSCREENFEATURES/PROGRAMMING ADVANCED SETTINGS MULTI-STAGE DIFFERENTIAL SETTINGS • This time setting brings on 2nd stage (heat or cool) if system has not been able to reach the 2nd stage temperature setpoint. • This avoids excessive compressor run time by bringing on the 2nd stage and full system capacity to meet setpoint. IF STAGE 1 RUNS NEXT PAGE 0 MINUTES PREV PAGE TURN ON STAGE 2 MENU Consult equipment manufacturer’s operation/installation manuals before setting these temperature settings. PUSH NEXT FOR FURTHER SETTING
NEW TOUCHSCREENFEATURES/PROGRAMMING ADVANCED SETTINGS HUMIDITY CONTROL • Humidity Fan – When set to ON the fan will run when there is an independent call to humidify. When set to OFF, fan only runs during heating or cooling cycles. • De-Humidity Fan – Same as above. HUM FAN DH FAN OFF NEXT PAGE OFF PREVPAGE OFF DH REVERSE DHCONTCOMP MENU OFF
NEW TOUCHSCREENFEATURES/PROGRAMMING ADVANCED SETTINGS HUMIDITY CONTROL • DH REVERSE: • ON - DH relay is normally closed when relative humidity is above DH set point. • OFF - DH relay is normally open when relative humidity is below DH set point. HUM FAN DH FAN OFF NEXT PAGE OFF PREVPAGE OFF DH REVERSE DHCONTCOMP MENU OFF
NEW TOUCHSCREENFEATURES/PROGRAMMING ADVANCED SETTINGS HUMIDITY CONTROL • DH CONTROL COMPRESSOR: • ON - Thermostat will turn off the air conditioning if either the dehumidify set point or the temperature set point is reached, whichever comes first, both DH relay and compressor will turn off. • OFF - DH relay is independent of compressor activity (DH becomes a spare relay and can be used for a variable speed fan or separate dehumidifier or air exchanger) HUM FAN DH FAN OFF NEXT PAGE OFF PREVPAGE OFF DH REVERSE DHCONTCOMP MENU OFF
NEW TOUCHSCREENFEATURES/PROGRAMMING ADVANCED SETTINGS • This screen allows you to calibrate temperature or relative humidity if found to be off. • Temperature accuracy is set at +/-1 degree. It can be adjusted +/- 9.5. • Humidity accuracy is +/- 4%. It can be adjusted +/- 20%. • Press NEXT PAGE for further settings HUM + 0 TEMP + 0 0 PREV PAGE MENU
NEW TOUCHSCREENFEATURES/PROGRAMMING De-humidification options for increasing comfort and efficiency • HRV/ERV units can be controlled by simply connecting the DH terminal on the thermostat to the terminal DH of the HRV/ERV. Most HRV/ERV units will control properly with the DH REVERSE feature turned off (contact normally open). • OPTION 1: In Advanced Settings choose DH ControlComp, set to ON then lower the temperature to a minimum safe set point, then set the desired de-humidity level. De- humidify will control the compressor (unless minimum temperature set point is reached) whichever comes first.
NEW TOUCHSCREENFEATURES/PROGRAMMING De-humidification options for increasing comfort and efficiency • OPTION 2: Connect terminal DH to Y1 and set thermostat to de-humidify mode. Then regardless of temperature the de-humidification setting will have priority. Caution: This method will run the compressor until the de-humidification level is reached and may cause overcooling.
NEW TOUCHSCREENFEATURES/PROGRAMMING De-humidification options for increasing comfort and efficiency • OPTION 3: Connect the DH terminal to a variable speed fan control, (set DH REVERSE to control the fan so that low speed is activated to de-humidify). This method provides maximum comfort while maintaining the temperature in cooling mode.
NEW TOUCHSCREENWireless Remote Temp Transmitter Mounting Bracket • Optional Wireless Remote Outdoor Temperature Transmitter for PSPU7 multi-stage touchscreens. Used for DUAL FUEL & AUTOMATIC HUMIDITY CONTROL of central humidifier. Indoor Receiver (plugs in at bottom of t-stat and mounts under t-stat cover) Optional Outdoor Wireless Remote Temp Transmitter Kit #WTR064
NEW TOUCHSCREENWireless Remote Indoor Receiver PSPU Thermostat Screen Plug antenna wire from Indoor Receiver into plug located at bottom right of PSPU t-stat Push Reset button on Indoor Receiver to initiate communication between Outdoor transmitter and Inside Receiver. Plug Indoor Receiver into plug located at bottom of PSPU t-stat Indoor Receiver Unit installed
WIRING LEGEND 12 11 RC DH H C Y2 RH OBW W2 G Y1 TERMINALEQUIPMENTSTANDARD COLOR Y1 First Heat Pump Yellow and/or AC G Fan Green W2 First Stage Furnace White OBW Reverse Valve or Orange Second Stage Furnace RH 24v Heat Transformer Red Y2 Second Heat Pump Unknown and/or AC C Common Blue H Humidity Control Unknown DH Dehumidify Control Unknown Variable Fan Control RC 24v Cool Transformer Unknown 11 and 12 Not Used NOTE: The above colors are standard in HVAC industry. The wiring should be confirmed before installation
TECHNICAL SUPPORT • For more information, tech sheets, submittals, please refer to the Instruction or Engineering Manuals, or access the LuxPro web site at www.luxproproducts.com. • Problems with installation or troubleshooting, please call our Technical Support team at (856) 234-8803 Ext. 7 (5:30AM –2PM PST) It is best if contractor is on jobsite when calling Tech Support