Download
1 / 35
360 likes | 670 Vues
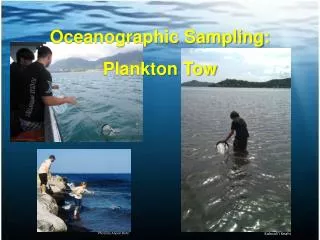
Oceanographic Sampling: Plankton Tow. Photo by Alyson Bahr. Kahoali’i Keahi. Plankton Tow. Aiea High School students aboard the Honu Kai. Plankton Tow Video from Big Rapa. Oceanographic Sampling: Plankton Tow Safety. Sampling near/on/in water: KNOW YOUR ABILITY When in doubt, get out

E N D
Oceanographic Sampling: Plankton Tow Photo by Alyson Bahr Kahoali’iKeahi
Plankton Tow Aiea High School students aboard the Honu Kai
Oceanographic Sampling: Plankton Tow Safety • Sampling near/on/in water: KNOW YOUR ABILITY • When in doubt, get out • Be Mindful of ocean conditions • Never attach the net to yourself • Never wrap line around hands, arms, body, etc. • Watch for rocks, coral, and other stuff in water • Oceanographic research ship mantra: Anything you put over the side and actually want to get back – tie it to the boat!
Oceanographic Sampling: Plankton Tow • Where to sample: • From shore (dock, bridge, etc.) • In the water (wading, swimming) • On the water (kayak, canoe, surfboard, SUP, boat)
Oceanographic Sampling: Plankton Tow • Where to sample: • From shore (dock, bridge, etc) • Wear safety gear • Watch for obstacles in water • Let drift in current, walk and drag net, or vertical up-downs • Be mindful of the net • Be mindful of conditions • Tie net to shore
Oceanographic Sampling: Plankton Tow www.britannica.com • Where to sample: • In the water (wading, swimming) • Hazardous Do Not Attempt • Location important • (i.e. DO NOT sample Sandy’s) • Get past shore break • Watch for rocks, coral • Net adds a LOT of drag • Know your ability!!! Cory Lum for The New York Times
Oceanographic Sampling: Plankton Tow • Where to sample: • On the water (kayak, canoe, surfboard, SUP, boat) • Hazardous Do Not Attempt • Always have net attached to boat • Tow slow < 1 knot • Lots of drag, could pull you in • Watch for rocks, coral, propeller • Always ask boat captain first!
Oceanographic Sampling: Plankton Tow • What to bring: • Net • Line, long or short • Sample bottle • Rinse bottle • Sample Jar • Bucket • Timer • Bottle for seawater Remember the mantra?
Oceanographic Sampling: Plankton Tow Attaching line to net: The bowline
Oceanographic Sampling: Plankton Tow Attaching line to net: The bowline Step 1: 1. Make a loop near the end of the line
Oceanographic Sampling: Plankton Tow Attaching line to net: The bowline Step 2: 2. Pull the end through the loop
Oceanographic Sampling: Plankton Tow Attaching line to net: The bowline Step 3: 3. Tuck the end under the main line
Oceanographic Sampling: Plankton Tow Attaching line to net: The bowline Step 4: 4. Pull the end back through the loop in the main line
Oceanographic Sampling: Plankton Tow Attaching line to net: The bowline Step 5: 5. Pull the end and main line in opposite directions to tighten
Oceanographic Sampling: Plankton Tow Attaching line to net: The bowline Now retie so that the tow ring on the net is in the loop!
Oceanographic Sampling: Plankton Tow • Sampling procedures: • Double check that equipment is ready and safe to deploy • Carefully ease the net into the water, start the clock • Record any relevant information on a data sheet if you are planning analytical study • Walk, wade, swim, paddle, or throttle so that water is flowing through mouth of net • Tow for 15-30 minutes, be mindful of conditions • Periodically check sample • When sampling complete, carefully prepare your sample for transport • Clean up • Rinse net thoroughly with fresh water and allow to dry before storing
Next Step: Viewing Plankton Microscopy
Parts Included: Frosted Stage plate Calibration slide Dust Cover, light filter, C-wrench Eyecups
Cables Included: USB Power:
Setting up the microscope: • Check the packing list to make sure that everything is included • Carefully remove all of the plastic coverings • Attach the camera cable to the vertical pole (Only goes one way!) • Turn to page 21 and 22 and familiarize yourself with the • parts of the microscope
Setting up the microscope: • Check the packing list to make sure that everything is included • Carefully remove all of the plastic coverings • Attach the camera cable to the vertical pole (Only goes one way!) • Turn to page 21 and 22 and familiarize yourself with the • parts of the microscope • Plug in and focus the microscope (p. 23)
Setting up the microscope and computer: • Install Motic Images Plus Software • DO NOT USE MOTIC CD! • Restart computer • Move help files to help folder • Connect microscope and computer via USB cable • Wait until driver installs • Open Motic images plus and try to get image on screen (p. 24)
Setting up the microscope and computer: • If you plan to record video, install the Xvid codec • If you plan to use the measurement feature, calibrate the microscope (25) • Else view plankton and try to identify If you need to connect to wireless: Username: cmore.education@gmai Password: Cmore@1203
Lesson Ideas: • Identify and draw at least 6 different organisms (try now) • Create your own plankton guide • Conduct plankton studies: (science fair projects) • Are plankton same different times of day? • Does plankton community change after event (rain, big wind, spill, etc)? • Add math to study • Calculate the volume of water sampled during a tow • V = open area of net x distance towed • distance towed = speed x time
Lesson Ideas: • Install Motic software on multiple computers and have students work with • saved images • Use measurement tool to make scale drawings or models of plankton • Have a picture of the week • zoom in on object and have student make hypothesizes based on observations. • Have students bring in objects to look at and share (as long as related to lessons). • Creature features
End of the Workshop, but not the end of training: • Share the resources with other teachers at school • Follow up webinars for additional training • can schedule for department meetings • Technical support • Hawaii plankton network? • Be one of our STARS
End of the Workshop, but not the end of training: • Evaluation – Help us improve for the next workshop • & expect a follow up evaluation sometime next year


![[PDF] Free Download The Velvet Hours By Alyson Richman](https://cdn4.slideserve.com/8070915/slide1-dt.jpg)