Download
1 / 32
320 likes | 537 Vues
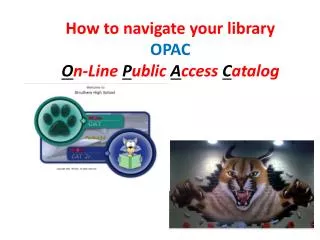
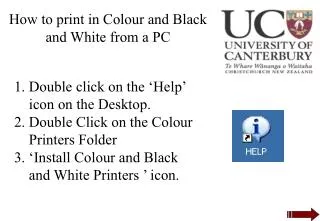
OPAC stands for: O nline P ublic A ccess C atalog Look for this icon on the Library Webpage. Click on it to access the card catalog. When OPAC first opens up you will find a screen that looks like this. Type in your title, author, subject or keyword in the white text box

E N D
OPAC stands for: Online Public Access Catalog Look for this icon on the Library Webpage. Click on it to access the card catalog.
When OPAC first opens up you will find a screen that looks like this. Type in your title, author, subject or keyword in the white text box and select the icon that fits your search.
When doing research, it is best to use the “Keyword” or “Power” selections. “Power” is a keyword Boolean search option. You should compile a list of keywords before you start your research.
For example, if you are looking for a book about dogs for a research paper, type the word “dogs” in the text box and selected “Keyword.” A list of available items will be displayed. (To go back a screen at any time press the “ESC” key on the computer keyboard.)
The small icon of a book means this title is a book. There are pictures of CD’s, maps, microphones, videos, newspapers, etc. Each represents a type of material in the library.
This is the Title column. This is the Author column. This is the Year of publication.
This is the Call Number column. It tells you where to find the item in the library. All non-fiction books have Dewey numbers. All fiction books are marked as “F” and the first three letters of the author’s last name.
Other call numbers are: “REF” for Reference “B” for Biography “PER” for Periodicals “ARCHIVE” for Archives
“CD” is for CD-ROM “VIDEO” or “AC” are media items “TXT” is for textbook You have to ask for these items at the Circulation Desk. “PC” is for professional material that only teachers can check out.
The last column is labeled “Status.” This will have either an “Out,” meaning the book is checked out, or “In,” meaning the book is on the shelf.
You can move from title to title by using the arrow bars on the right side of the screen. The small arrow bar on the top and bottom will move the blue line (cursor) up and down one title at a time. The large arrow bar will move the the screen up or down one page at a time.
This screen is called the first page. It gives you a lot of information, but you will need more if you are doing research. From this page you can either double- click on the blue line to find more information on the book, or click on the “Select” button in the lower right corner of the screen...
I would like to learn more about the book Blissful Joy and the SATs: A Multiple Choice Romance. I have highlighted the title and will open up the next page of the card catalog.
This is the second page of cataloging. The word “dogs” is highlighted because that is where the catalog found the keyword we asked it to search for. This page provides you with a lot of additional information.
This page will provide the bibliographic information. (Title, Author, Publisher and Date, edition, and # of Pages.) In the “Notes” section you may find a summary of what the book is about.
Subject headings are very useful when researching. Use them to narrow or broaden your research. The call number is listed in the upper right hand side of the screen and the lower left part of this screen.
Anything highlighted in blue is a direct link to another part of the catalog. I would like to narrow my search to only fiction books about dogs. By double-clicking on the subject heading “Dogs – Fiction”, the catalog will go to a list of all of the books the library has that are fiction books about dogs.
This screen tells me that there are 57 fiction books about dogs in the library. To find out what the titles are, double-click on the blue line or click “Select” in the lower left corner.
This is the list of titles of fiction books about dogs. Notice that they are not all books. I can create a list of books I want to look at by creating a “Bookbag”.
To create a Bookbag, highlight the title you want and click on the “Add to Bookbag” button in the lower left hand corner, or…
Click on the “Add to Bookbag” button on the right of the second page of the catalog.
After you have added all of the titles you are interested in to your Bookbag, select the “Bookbag” icon at the top and a pop-up window will appear with a list of the books you selected.
You can name your Bookbag. For example, this one is named “Books about Dogs.” You can print the list of titles in your Bookbag to use for your Works Cited.
This is what a Bookbag printout looks like. It has all of the bibliographic information on it, as well as a summary of your book. Use the information to create the Works Cited page for your paper.
If you want a book that is checked out of the library you can “Reserve” it. When it becomes available, you will be notified through your homeroom that the book is ready for you to pick up. To place a hold on a book, highlight the title and select the “Hold/Reserve” button in the lower left corner corner, or…
Click on the “Hold/Reserve” button on the right of the second page of the catalog.
Once you have selected the “Hold/Reserve” button, this pop-up window will appear. You can get your barcode number from a librarian. The password is your last name. You must type in both to continue.
Once you have added your barcode and password, this window will appear. Review the information, make your selections, and select the “Save” button. You have now reserved your book.
Another special features of the OPAC that you should be familiar with is the “My Info” icon.
Clicking on the “My Info” icon will bring up this pop-up window. Get your barcode number from a librarian. The password is your last name.
In this window, you can view your checkouts, due dates, and holds. Important! Once you have closed this window you must click on the “Log Out” icon or your information will be available for other students to view.
You have now learned how to use the OPAC! If you have any questions ask: Mrs. Pillar or Mrs. Jamison