Comprehensive Guide for Installing and Using SSH/SFTP in QA Environments
This guide covers the essentials of setting up SSH/SFTP software in Quality Assurance (QA) environments. It includes basic UNIX commands for file management, such as `ls`, `cp`, `rm`, `cat`, and `pwd`, as well as instructions for setting up environment variables such as `JAVA_HOME` and `ANT_HOME`. The document also details the entire build process using CVS for code checkout, application building with Ant, and deployment on JBoss servers. Lastly, it highlights performance and API testing methodologies using tools like Selenium and JMeter.

Comprehensive Guide for Installing and Using SSH/SFTP in QA Environments
E N D
Presentation Transcript
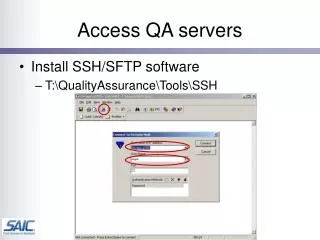
Access QA servers • Install SSH/SFTP software • T:\QualityAssurance\Tools\SSH
Basic UNIX Commands • ls, ls -l (dir in dos) • cp (copy in dos) • rm (del in dos) • cat or more (type in dos) • pwd (cd in dos) • tail
Basic QA Environment • more .profile export JAVA_HOME=/usr/jdk1.5.0_10 export ANT_HOME=/usr/local/apache-ant-1.6.5 export PATH=$JAVA_HOME/bin:$ANT_HOME/bin:$PATH export ANT_OPTS=-Xmx640m export CVSROOT=:pserver:wuye@cbiocvs2.nci.nih.gov:/share/content/gforge/caadapter
Basic Build Process • Step 1: Check out code from cvs • Step 2: Build the application • Step 3: Deploy application
Step 1. Check Out Code from CVS • First time • Cvs login • Build.xml <target name="checkout-tag"> <cvs cvsRoot=":pserver:wuye@cbiocvs2.nci.nih.gov:/share/content/gforge/caadapter" dest="${basedir}" command="checkout -A -r ${tag} caadapter"/> </target>
Step 2: Build Application ant build-all -Dwebserver=http://caadapter-dev.nci.nih.gov -Dgenerate-keys=yes -Dadd-license=yes
Step 3: Deploy Application • Jboss location • /usr/local/jboss405 • Start and Shutdown Jboss • Goto /usr/local/jboss405/server/ncicb-X/bin • Start_jboss • Stop_jboss • Deployment location • /usr/local/jboss405/server/ncicb-x/deploy
Test • API Testing • Web Testing • Selenium • T:\QualityAssurance\QA_Documents • T:\QualityAssurance\QA_Seminar • Performance Testing • JMeter
Install JDK 5 or 6 • Download JDK from • http://java.sun.com/javase/downloads/index.jsp • Run jdk-6u3-windows-i586-p.exe (JDK 6 Update 3) • Set up the Java Home and path
Install Eclipse • Download Eclipse • http://www.eclipse.org/downloads/ • Eclipse IDE for Java Developers or • Eclipse IDE for Java EE Developers • Unzip the download jar files. • Start eclipse by click on the eclipse.exe