Getting To Know Your Camera
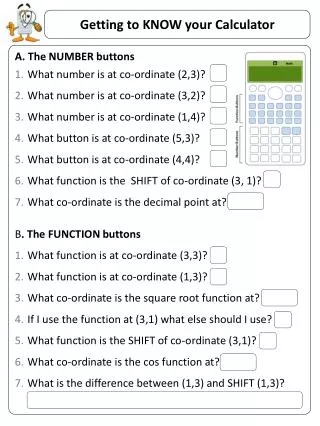
Getting To Know Your Camera. DSLRs In General. If You Have A Nikon…. Most have same settings/general concepts being that they are within the same family. Controls. Playback button – allows you to see the photos that you have taken.

Getting To Know Your Camera
E N D
Presentation Transcript
If You Have A Nikon… • Most have same settings/general concepts being that they are within the same family
Controls Playback button – allows you to see the photos that you have taken. Menu button – this is where you format your card, reset settings Zoom Out/Help button – zooms out of photos when in playback mode. Or offers help when a [?] is displayed Zoom In/ Information button (there is sometimes a separate button for information depending on the camera) – zooms in to photos when in playback mode. Or shows you the information & settings (shutter speed, aperature, focus mode, etc) and is where you can change them.
AE-L/AF-L button – Locks your exposure (AE-L) or locks your focus (AF-L) when held down. You can change whether you want both to lock or just one in your MENU. This is good for when the camera compensates exposure for the background rather than the subject. Dial – Use to scroll through photos in playback mode, or to change your exposure & shutter speed (essentially an alternative to the multi-selector) Multi-Selector – moves around zoomed-in photos, moves around controls, and can be used to change your area of focus Delete Button – used to delete images. ** I do NOT recommend using this button to delete images. It is harmful to your memory card. You are better off to reformat you card in the MENU (but this will delete ALL images)**
MENU Here you can control everything -sounds your camera makes -rotating photos -formatting memory card* -revert to default settings -white balance -ISO sensitivity -timer/remote shooting
Mode Dial P, S, A, & M Modes P – Programmed: Camera sets shutter speed & aperture for best results (good for when you don’t have a lot of time to set up) S – Shutter-Priority: You pick the shutter speed & the camera picks the aperture A – Aperture-Priority: You pick aperture & camera picks shutter speed (use to blur background or to make both foreground & background in focus) M – Manual: You select the shutter speed, then press the +/- button and change the aperture. Auto Mode- With Flash: camera chooses all settings & the flash will fire Auto Mode –Without Flash: same, but without the flash firing. *On some cameras, there will be a GUIDE dial between the “P” and the “Auto”. The GUIDE is key for set up, because here you can change your file size, see how many photos you have remaining, etc.
Portrait – use for portraits with soft, natural tones Landscape – vivid landscape shots in daylight Child – snapshots of active children. Brightens clothing & background while keeping skin tones soft Sports – Fast shutter speeds to freeze motion Close-Up – close up of small objects, flowers, etc. Night Portrait – creates a balance between subject & background in low light
Info Display Shooting Mode Aperture Display – This is what your lens actually looks like. Shows how much light you are letting in AF-Area Mode- Auto-focus. Where is is focusing. Change with the multi-selector. *This may be displayed above your shutter speed/aperture depending on the camera. Help Flash mode Flash Compensation – you can change how bright/strong your flash is Exposure Compensation – changes how bright/dark photo is. Positive comp. is good for when subject is darker than background. Negative comp. is good for when subject is brighter.
Image Quality Image Size White Balance ISO Sensitivity Focus Mode – Manual, Auto AF-Area Mode – normal, wide, you choose, tracking, etc. Metering – determines where the camera determines the exposure from. Movie Frame Size Frames Remaining
If You Have A Canon… • Controls generally have same functions, but they look different, are in different spots, or can do more/less with that function
A Word of Advice… • USE YOUR MANUAL! • EXPERIMENT!