AFOPro Spatial
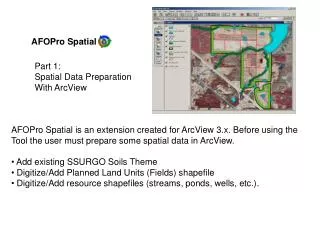
AFOPro Spatial. Part 1: Spatial Data Preparation With ArcView. AFOPro Spatial is an extension created for ArcView 3.x. Before using the Tool the user must prepare some spatial data in ArcView. Add existing SSURGO Soils Theme Digitize/Add Planned Land Units (Fields) shapefile

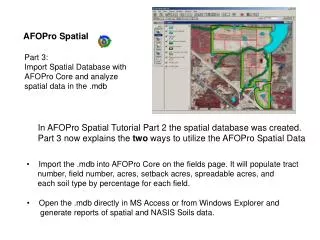
AFOPro Spatial
E N D
Presentation Transcript
AFOPro Spatial Part 1: Spatial Data Preparation With ArcView • AFOPro Spatial is an extension created for ArcView 3.x. Before using the • Tool the user must prepare some spatial data in ArcView. • Add existing SSURGO Soils Theme • Digitize/Add Planned Land Units (Fields) shapefile • Digitize/Add resource shapefiles (streams, ponds, wells, etc.).
Getting Started • 1. Open ArcView with a new View 2. Add appropriate image themes 3. Zoom to the farm 4. From View Menu select Properties. Set Map and Distance Units.
Turning on the AFOPro Spatial Extension From the File menu select Extensions
Turning on the AFOPro Spatial Extension Click the check box next to AFOPro Spatial
Turning on the AFOPro Spatial Extension Four new buttons appear in the ArcView toolbar
AFOPro Spatial Tools Runs the AFOPro Spatial wizard which creates an .mdb file that easily imports into AFOPro
AFOPro Spatial Tools Attributes existing fields shapefile with Tract Number, Field Number, Acres, and Land Use to become a CST Planned Land Units Theme
AFOPro Spatial Tools Creates setback shapefile at a specified distance from selected features in existing shapefiles.
AFOPro Spatial Tools Launches the AFOPro Spatial Help Files
Spatial Data Prep: Step 1 Add the SSURGO Soils shapefile for the area if it exists. To add an existing soils theme click the “Add Theme” Button and browse to the desired shapefile.
Spatial Data Prep: Step 1 Add the SSURGO Soils shapefile for the area if it exists.
Spatial Data Prep: Step 2 Add or create a shapefile with all fields required for the CNMP. To add an existing fields theme click the “Add Theme” Button and browse to the desired shapefile.
Spatial Data Prep: Step 2 Add a shapefile with all fields required for the CNMP. The existing fields theme now appears in the View
Spatial Data Prep: Step 2 Create a shapefile with all fields required for the CNMP. 2 In the Window that appears select Polygon as the Feature type 1 From the View menu select New Theme 3 Browse to the location where the shapefile will be saved and name it.
Spatial Data Prep: Step 2 Create a shapefile with all fields required for the CNMP. The new shapefile appears in the theme list with a dashed line around the checkbox indicating that the theme is being edited.
Spatial Data Prep: Step 2 Create a shapefile with all fields required for the CNMP (Planned Land Units). Click on the white rectangle in the ArcView Toolbar. A choice list of draw tools will drop down.
Spatial Data Prep: Step 2 Digitize Planned Land Units Shapefile Click and hold down on the white rectangle. Choose the Draw Polygon Tool (4th from bottom) from the drop down list.
Spatial Data Prep: Step 2 Digitize Planned Land Units Shapefile Zoom into the tract or fields to be digitized. With the Polygon Draw Tool selected, click on a corner of the tract or group of fields and let go.
Spatial Data Prep: Step 2 Digitize Planned Land Units Shapefile Move the cursor to the next corner. Click and release the mouse.
Spatial Data Prep: Step 2 Digitize Planned Land Units Shapefile Repeat this until the cursor is over the final corner and double click.
Spatial Data Prep: Step 2 Digitize Planned Land Units Shapefile To make the foreground transparent double click on the rectangle underneath the Planned Land Units theme
Spatial Data Prep: Step 2 Digitize Planned Land Units Shapefile In the Legend Editor double click on the rectangle underneath the word Symbol.
Spatial Data Prep: Step 2 Digitize Planned Land Units Shapefile In the Polygon Fill Palette make the outline thicker by choosing 2 from the drop down list.
Spatial Data Prep: Step 2 Digitize Planned Land Units Shapefile Click on the Paint Brush to bring up the Color Palette
Spatial Data Prep: Step 2 Digitize Planned Land Units Shapefile Choose the “X” to make the theme transparent
Spatial Data Prep: Step 2 Digitize Planned Land Units Shapefile Now change from Foreground to Outline to select the color of the field boundaries.
Spatial Data Prep: Step 2 Digitize Planned Land Units Shapefile Select a color for the field boundaries
Spatial Data Prep: Step 2 Digitize Planned Land Units Shapefile Close the Palette
Spatial Data Prep: Step 2 Digitize Planned Land Units Shapefile In the Legend Editor the symbol should reflect the changes made in the Palette. If the symbol is correct click the Apply button
Spatial Data Prep: Step 2 Digitize Planned Land Units Shapefile Close the Legend Editor
Spatial Data Prep: Step 2 Digitize Planned Land Units Shapefile The theme list will now reflect changes made in the Legend Editor
Spatial Data Prep: Step 2 Digitize Planned Land Units Shapefile Now split the large tract polygon into separate field polygons
Spatial Data Prep: Step 2 Digitize Planned Land Units Shapefile Click and hold down on the white rectangle. Choose the Split Polygon Tool (2nd from bottom) from the drop down list.
Spatial Data Prep: Step 2 Digitize Planned Land Units Shapefile Click With the Split Polygon Tool selected click outside of the polygon that will be split.
Spatial Data Prep: Step 2 Digitize Planned Land Units Shapefile Double Click Pull the cursor across the polygon following the field boundary Bring the cursor outside of the polygon and double click
Spatial Data Prep: Step 2 Digitize Planned Land Units Shapefile The Planned Land Units Theme now contains two polygons
Spatial Data Prep: Step 2 Digitize Planned Land Units Shapefile Click Double Click Repeat the process until all fields are delineated
Spatial Data Prep: Step 2 Digitize Planned Land Units Shapefile Click Click Click Click Double Click
Spatial Data Prep: Step 2 Digitize Planned Land Units Shapefile The Planned Land Units Theme now contains four polygons
Spatial Data Prep: Step 2 Digitize Planned Land Units Shapefile When the Planned Land Units theme is complete go to the Theme menu and select Stop Editing.
Spatial Data Prep: Step 2 Digitize Planned Land Units Shapefile Click Yes to Save Edits
Spatial Data Prep: Step 3 Create Shapefiles for Resources Requiring Setbacks A shapefile should be created for each resource that requires a regulatory manure application setback. Examples include streams, ditches, ponds, residence/dwellings, wells, and property lines.
Spatial Data Prep: Step 3 Create Shapefiles for Resources Requiring Setbacks This example operation requires setbacks for streams and ponds. So create a line theme for streams and a polygon shapefile for ponds. Create the streams shapefile first…
Spatial Data Prep: Step 3 Create Shapefiles for Resources Requiring Setbacks 2 In the Window that appears select Line as the Feature type 1 From the View menu select New Theme 3 Browse to the location where the shapefile will be saved and name it streams.
Spatial Data Prep: Step 3 Create Shapefiles for Resources Requiring Setbacks The new shapefile appears in the theme list with a dashed line around the checkbox indicating that the theme is being edited.
Spatial Data Prep: Step 3 Create Shapefiles for Resources Requiring Setbacks Select the Line Draw tool and digitize the course of the stream. Double click at the end of the course or when outside of the area of concern.
Spatial Data Prep: Step 3 Create Shapefiles for Resources Requiring Setbacks Click once at each change in direction of the stream. Remember that a curve is just a series of short line segments
Spatial Data Prep: Step 3 Create Shapefiles for Resources Requiring Setbacks When the streams theme is complete go to the Theme menu and select Stop Editing. Then click Yes to save edits.
Spatial Data Prep: Step 3 Create Shapefiles for Resources Requiring Setbacks Now create the shapefile for ponds