Download
1 / 23
230 likes | 406 Vues
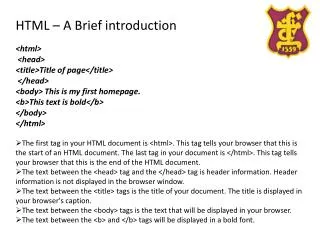
HTML – A Brief introduction <html> <head> <title>Title of page</title> </head> <body> This is my first homepage. <b>This text is bold</b> </body> </html>

E N D
HTML – A Brief introduction • <html> • <head> • <title>Title of page</title> • </head> • <body> This is my first homepage. • <b>This text is bold</b> • </body> • </html> • The first tag in your HTML document is <html>. This tag tells your browser that this is the start of an HTML document. The last tag in your document is </html>. This tag tells your browser that this is the end of the HTML document. • The text between the <head> tag and the </head> tag is header information. Header information is not displayed in the browser window. • The text between the <title> tags is the title of your document. The title is displayed in your browser's caption. • The text between the <body> tags is the text that will be displayed in your browser. • The text between the <b> and </b> tags will be displayed in a bold font.
Headings Headings are defined with the <h1> to <h6> tags. <h1> defines the largest heading. <h6> defines the smallest heading. <h1>This is a heading</h1> <h2>This is a heading</h2> <h3>This is a heading</h3> <h4>This is a heading</h4> <h5>This is a heading</h5> <h6>This is a heading</h6> HTML automatically adds an extra blank line before and after a heading. Paragraphs Paragraphs are defined with the <p> tag. <p>This is a paragraph</p> <p>This is another paragraph</p> HTML automatically adds an extra blank line before and after a paragraph.
Don't Forget the Closing Tag You might have noticed that paragraphs can be written without end tags </p>: <p>This is a paragraph <p>This is another paragraph The example above will work in most browsers, but don't rely on it. Future version of HTML will not allow you to skip ANY end tags. Closing all HTML elements with an end tag is a future proof way of writing HTML. It also makes the code easier to understand (read and browse) when you to mark both where an element starts and where it ends.
Line Breaks The <br> tag is used when you want to break a line, but don't want to start a new paragraph. The <br> tag forces a line break wherever you place it. <p>This <br> is a para<br>graph with line breaks</p> The <br> tag is an empty tag. It has no end tag like </br>, since a closing tag doesn't make any sense. <br> or <br /> More and more often you will see the <br> tag written like this: <br /> Because the <br> tag has no end tag (or closing tag), it breaks one of the rules for future HTML (the XML based XHTML), namely that all elements must be closed. Writing it like <br /> is a future proof way of closing (or ending) the tag inside the opening tag, accepted by both HTML and XML.
Comments in HTML The comment tag is used to insert a comment in the HTML source code. A comment will be ignored by the browser. You can use comments to explain your code, which can help you when you edit the source code at a later date. <!-- This is a comment --> Note that you need an exclamation point after the opening bracket, but not before the closing bracket.
Recap on HTML Elements • Each HTML element has an element name (body, h1, p, br) • The start tag is the name surrounded by angle brackets: <h1> • The end tag is a slash and the name surrounded by angle brackets </h1> • The element content occurs between the start tag and the end tag • Some HTML elements have no content • Some HTML elements have no end tag
HTML Tag Attributes HTML tags can have attributes. Attributes provide additional information to an HTML element. Attributes always come in name/value pairs like this: name="value". Attributes are always specified in the start tag of an HTML element. Attributes Example 1: <h1> defines the start of a heading. <h1 align="center"> has additional information about the alignment. Attributes Example 2: <body> defines the body of an HTML document. <body bgcolor="yellow"> has additional information about the background color. Attributes Example 3: <table> defines an HTML table. <table border="1"> has additional information about the border around the table.
The Anchor Tag and the Href Attribute HTML uses the <a> (anchor) tag to create a link to another document. An anchor can point to any resource on the Web: an HTML page, an image, a sound file, a movie, etc. The syntax of creating an anchor: <a href="url">Text to be displayed</a> The <a> tag is used to create an anchor to link from, the href attribute is used to address the document to link to, and the words between the open and close of the anchor tag will be displayed as a hyperlink. This anchor defines a link to W3Schools: <a href="http://www.w3schools.com/">Visit W3Schools!</a> The line above will look like this in a browser: Visit W3Schools!
The Anchor Tag and the Href Attribute HTML also uses <a> to link to another part of the same document. Example: For the destination point in the document where you want to link to – you set up an anchor: Top <a name=“top”></a> And at the actual link itself you put – which in this case would be somewhere way down the page: <a href =“#top”>Click here for top of page</a>
Forms A form is an area that can contain form elements. Form elements are elements that allow the user to enter information (like text fields, textarea fields, drop-down menus, radio buttons, checkboxes, etc.) in a form. A form is defined with the <form> tag. <form> <input> <input> </form> Input The most used form tag is the <input> tag. The type of input is specified with the type attribute. The most commonly used input types are explained below.
Text Fields Text fields are used when you want the user to type letters, numbers, etc. in a form. <form> First name: <input type="text" name="firstname"> <br> Last name: <input type="text" name="lastname"> </form> Radio Buttons Radio Buttons are used when you want the user to select one of a limited number of choices. <form> <input type="radio" name="sex" value="male"> Male <br> <input type="radio" name="sex" value="female"> Female </form>
Checkboxes Checkboxes are used when you want the user to select one or more options of a limited number of choices. <form> I have a bike: <input type="checkbox" name="vehicle" value="Bike"> <br> I have a car: <input type="checkbox" name="vehicle" value="Car"> <br> I have an airplane: <input type="checkbox" name="vehicle" value="Airplane"> </form>
The Form's Action Attribute and the Submit Button When the user clicks on the "Submit" button, the content of the form is sent to another file. The form's action attribute defines the name of the file to send the content to. The file defined in the action attribute usually does something with the received input. <form name="input" action="html_form_action.asp" method="get"> Username: <input type="text" name="user"> <input type="submit" value="Submit"> </form>
Images To include an image on a web page use <imgsrc=“image.gif” alt=“First Image” width=“70” height=“70”/> Alt is used for text only browsers. Width and height are measured in pixels.
Lists To create a list in HTML you can use the following syntax <html> <body> <ol> <li> Task 1 </li> <li> Task 2 </li> <li> Task 3 </li> <li> Task 4 </li> </ol> </body> </html> Using <ul> instead of <ol> creates an unordered list which will use bullet points instead of numbering.
Cascading Style Sheets • HTML was not originally designed for creating all different styles, colours and presentation visual effects as this makes the code very complicated. • The solution for this to ease the burden on the HTML document was to use Cascading Style sheets. • CSS allows designers to control how a web pages will display in a web browser and separates this presentational information from the web page content and its logical structure • One CSS may be written and apply to all the pages in a website. This is in the form of an external style sheet. It can also be embedded into the top of the HTML document itself – this is an embedded style sheet.
Cascading Style Sheets - Selectors • Elements of an HTML page can be selected to follow a specific style. The syntax is as follows. • Selector {property : value} • The Selector is normally a HTML Tag. The property is an attribute you wish to change. E.g. • h1 {color : red} • P {font-family : “sans serif”} • P {text-align : center; color : blue} • h1,h2,h3,h4,h5,h6 {color : red}
Cascading Style Sheets - Embedded • In an embedded style sheet these style rules are placed in the head part of the html document. • <html> • <head> • <title>HTML Example</title> • <style type=“text/css”> • p { color : navy; • font-family : “courier new”; • font-weight : bold; • font-size : 24pt; • background-color : yellow; • } • </style> • </head> • <body> • <p>Hello World!</p> • </body> • </html>
Cascading Style Sheets - External • The best way is to use an external style sheet. Create the following file as MyStyles.css • h1 { font-size : 16pt; • color : orange; • } • h2 { margin : lin; • color : red; • font-family : arial; • font-size : 10pt; • } • h3 { margin-left : 2in; • color : navy; • font-size : 2em; • }
Cascading Style Sheets - External • In a separate file write the following HTML and see how it makes use of your external style sheet. • <html> • <head><title>CSS Sample</title> • <link rel="stylesheet" type="text/css" • href="MyStyles.css" /> • </head> • <body> • <h1>This is going to be a headline.</h1> • <h2>Hello World!</h2> • <h3>This will be another headline.</h3> • <h4>Hello world Again!</h4> • </body> • </html>
Class Selectors. • Class selectors can be used to select an HTML element that has a class attribute. Here is the declaration for a class selector to embolden and colour text red. • .boldred {color : red; font-weight : bold} • It can be applied to web page tags e.g. • <h1 class = boldred>Hello world!</h1> • <p class = boldred>Hello World!</p> • To make it more specific to more particular tags you and use as follows: • p.boldRed {color : red; font-weight : bold}
ID Selectors • ID Selectors are very similar to classes except that they can only be used once per page. They are declared with a # e.g. • #header {font : bold 130% Veranda} • And used like so: • <div id=“header”> • Block-level Elements • Block level elements mark divisions in page structure such as <div>, <p>, <h#>, <ol>, <ul> and <li> • <div> Element is used in good web page design to divide a web page into distinct sections and can be used in conjuntion with the CSS class attribute.
Block-level Elements <html> <head> <title>Styles in context</title> <style type = “text/css”> .german {font-family : fantasy; font-size : 32pt; color : green} .french {font-family : cursive; font –size : 36pt; color : blue} </style> </head> <body> <p> Hello World </p> <div class = “german”> <p> Hallo Welt </p> </div> <div class=“french”> <p>Bonjour Monde</p> </div> </body> </html>