Download
1 / 9
90 likes | 345 Vues
Additivity of Heats of Reaction: Hess’s Law

E N D
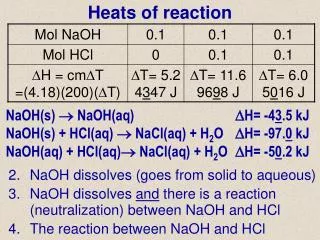
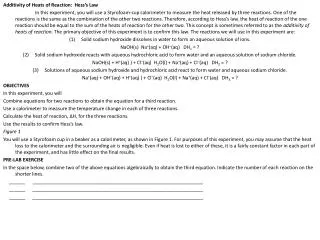
Additivity of Heats of Reaction: Hess’s Law In this experiment, you will use a Styrofoam-cup calorimeter to measure the heat released by three reactions. One of the reactions is the same as the combination of the other two reactions. Therefore, according to Hess’s law, the heat of reaction of the one reaction should be equal to the sum of the heats of reaction for the other two. This concept is sometimes referred to as the additivity of heats of reaction. The primary objective of this experiment is to confirm this law. The reactions we will use in this experiment are: (1) Solid sodium hydroxide dissolves in water to form an aqueous solution of ions. NaOH(s) Na+(aq) + OH–(aq) DH1 = ? (2) Solid sodium hydroxide reacts with aqueous hydrochloric acid to form water and an aqueous solution of sodium chloride. NaOH(s) + H+(aq) ) + Cl–(aq) H2O(l) + Na+(aq) + Cl–(aq) DH2 = ? (3) Solutions of aqueous sodium hydroxide and hydrochloric acid react to form water and aqueous sodium chloride. Na+(aq) + OH–(aq) + H+(aq) ) + Cl–(aq) H2O(l) + Na+(aq) + Cl–(aq) DH3 = ? OBJECTIVES In this experiment, you will Combine equations for two reactions to obtain the equation for a third reaction. Use a calorimeter to measure the temperature change in each of three reactions. Calculate the heat of reaction, ΔH, for the three reactions. Use the results to confirm Hess’s law. Figure 1 You will use a Styrofoam cup in a beaker as a calorimeter, as shown in Figure 1. For purposes of this experiment, you may assume that the heat loss to the calorimeter and the surrounding air is negligible. Even if heat is lost to either of these, it is a fairly constant factor in each part of the experiment, and has little effect on the final results. Pre-lab exercise In the space below, combine two of the above equations algebraically to obtain the third equation. Indicate the number of each reaction on the shorter lines. ______ ________________________________________________________________ ______ ________________________________________________________________ ______ ________________________________________________________________
Figure 1 MATERIALS Computer 100 mL of water Vernier computer interface 4.00 g of solid NaOH Logger Pro ring stand Temperature Probe utility clamp 50 mL of 1.0 M NaOH stirring rod 50 mL of 1.0 M HCl Styrofoam cup 100 mL of 0.50 M HCl 250 mL beaker
PROCEDURE Reaction 1 1. Obtain and wear goggles. 2. Connect the probe to the computer interface. Prepare the computer for data collection by opening the file “18 Hess’s Law” from the Chemistry with Computers folder. 3. Place a Styrofoam cup into a 250 mL beaker as shown in Figure 1. Measure out 100.0 mL of water into the Styrofoam cup. Lower the Temperature Probe into the solution. 4. Use a utility clamp to suspend a Temperature Probe from a ring stand as shown in Figure 1. 5. Weigh out about 2 grams of solid sodium hydroxide, NaOH, and record the mass to the nearest 0.01 g. Since sodium hydroxide readily picks up moisture from the air, it is necessary to weigh it and proceed to the next step without delay. CAUTION: Handle the NaOH and resulting solution with care. 6. Click on to begin data collection and obtain the initial temperature, t1. It may take several seconds for the Temperature Probe to equilibrate at the temperature of the solution. After three or four readings at the same temperature have been obtained, add the solid NaOH to the Styrofoam cup. Using the stirring rod, stir continuously for the remainder of the 200 seconds or until the temperature maximizes. As soon as the temperature has begun to drop after reaching a maximum, you may terminate the trial by clicking . 7. Examine the initial readings in the table to determine the initial temperature, t1. To determine the final temperature, t2, click the Statistics button, The maximum temperature is listed in the statistics box on the graph. Record t1 and t2 in your data table. 8. Rinse and dry the Temperature Probe, Styrofoam cup, and stirring rod. Dispose of the solution as directed by your instructor.
PROCEDURE Reaction 1 1. Obtain and wear goggles. 2. Connect the probe to the computer interface. Prepare the computer for data collection by opening the file “18 Hess’s Law” from the Chemistry with Computers folder. 3. Place a Styrofoam cup into a 250 mL beaker as shown in Figure 1. Measure out 100.0 mL of water into the Styrofoam cup. Lower the Temperature Probe into the solution. 4. Use a utility clamp to suspend a Temperature Probe from a ring stand as shown in Figure 1. 5. Weigh out about 2 grams of solid sodium hydroxide, NaOH, and record the mass to the nearest 0.01 g. Since sodium hydroxide readily picks up moisture from the air, it is necessary to weigh it and proceed to the next step without delay. CAUTION: Handle the NaOH and resulting solution with care. 6. Click on to begin data collection and obtain the initial temperature, t1. It may take several seconds for the Temperature Probe to equilibrate at the temperature of the solution. After three or four readings at the same temperature have been obtained, add the solid NaOH to the Styrofoam cup. Using the stirring rod, stir continuously for the remainder of the 200 seconds or until the temperature maximizes. As soon as the temperature has begun to drop after reaching a maximum, you may terminate the trial by clicking . 7. Examine the initial readings in the table to determine the initial temperature, t1. To determine the final temperature, t2, click the Statistics button, The maximum temperature is listed in the statistics box on the graph. Record t1 and t2 in your data table. 8. Rinse and dry the Temperature Probe, Styrofoam cup, and stirring rod. Dispose of the solution as directed by your instructor.
PROCEDURE Reaction 1 1. Obtain and wear goggles. 2. Connect the probe to the computer interface. Prepare the computer for data collection by opening the file “18 Hess’s Law” from the Chemistry with Computers folder. 3. Place a Styrofoam cup into a 250 mL beaker as shown in Figure 1. Measure out 100.0 mL of water into the Styrofoam cup. Lower the Temperature Probe into the solution. 4. Use a utility clamp to suspend a Temperature Probe from a ring stand as shown in Figure 1. 5. Weigh out about 2 grams of solid sodium hydroxide, NaOH, and record the mass to the nearest 0.01 g. Since sodium hydroxide readily picks up moisture from the air, it is necessary to weigh it and proceed to the next step without delay. CAUTION: Handle the NaOH and resulting solution with care. 6. Click on to begin data collection and obtain the initial temperature, t1. It may take several seconds for the Temperature Probe to equilibrate at the temperature of the solution. After three or four readings at the same temperature have been obtained, add the solid NaOH to the Styrofoam cup. Using the stirring rod, stir continuously for the remainder of the 200 seconds or until the temperature maximizes. As soon as the temperature has begun to drop after reaching a maximum, you may terminate the trial by clicking . 7. Examine the initial readings in the table to determine the initial temperature, t1. To determine the final temperature, t2, click the Statistics button, The maximum temperature is listed in the statistics box on the graph. Record t1 and t2 in your data table. 8. Rinse and dry the Temperature Probe, Styrofoam cup, and stirring rod. Dispose of the solution as directed by your instructor.
PROCEDURE Reaction 1 1. Obtain and wear goggles. 2. Connect the probe to the computer interface. Prepare the computer for data collection by opening the file “18 Hess’s Law” from the Chemistry with Computers folder. 3. Place a Styrofoam cup into a 250 mL beaker as shown in Figure 1. Measure out 100.0 mL of water into the Styrofoam cup. Lower the Temperature Probe into the solution. 4. Use a utility clamp to suspend a Temperature Probe from a ring stand as shown in Figure 1. 5. Weigh out about 2 grams of solid sodium hydroxide, NaOH, and record the mass to the nearest 0.01 g. Since sodium hydroxide readily picks up moisture from the air, it is necessary to weigh it and proceed to the next step without delay. CAUTION: Handle the NaOH and resulting solution with care. 6. Click on to begin data collection and obtain the initial temperature, t1. It may take several seconds for the Temperature Probe to equilibrate at the temperature of the solution. After three or four readings at the same temperature have been obtained, add the solid NaOH to the Styrofoam cup. Using the stirring rod, stir continuously for the remainder of the 200 seconds or until the temperature maximizes. As soon as the temperature has begun to drop after reaching a maximum, you may terminate the trial by clicking . 7. Examine the initial readings in the table to determine the initial temperature, t1. To determine the final temperature, t2, click the Statistics button, The maximum temperature is listed in the statistics box on the graph. Record t1 and t2 in your data table. 8. Rinse and dry the Temperature Probe, Styrofoam cup, and stirring rod. Dispose of the solution as directed by your instructor.
PROCEDURE Reaction 2 9. Repeat Steps 3-8 using 100.0 mL of 0.50 M hydrochloric acid, HCl, instead of water. CAUTION: Handle the HCl solution and NaOH solid with care. Reaction 3 10. Repeat Steps 3-8, initially measuring out 50.0 mL of 1.0 M HCl (instead of water) into the Styrofoam calorimeter. In Step 5, instead of solid NaOH, measure 50.0 mL of 1.0 M NaOH solution into a graduated cylinder. After t1 has been determined for the 1.0 M HCl, add the 1.0 M NaOH solution to the Styrofoam cup. CAUTION:Handle the HCl and NaOH solutions with care.
PROCEDURE Reaction 2 9. Repeat Steps 3-8 using 100.0 mL of 0.50 M hydrochloric acid, HCl, instead of water. CAUTION:Handle the HCl solution and NaOH solid with care. Reaction 3 10. Repeat Steps 3-8, initially measuring out 50.0 mL of 1.0 M HCl (instead of water) into the Styrofoam calorimeter. In Step 5, instead of solid NaOH, measure 50.0 mL of 1.0 M NaOH solution into a graduated cylinder. After t1 has been determined for the 1.0 M HCl, add the 1.0 M NaOH solution to the Styrofoam cup. CAUTION: Handle the HCl and NaOH solutions with care.
Data and Calculations PROCESSING DATA 1. Determine the mass of 100 mL of solution for each reaction (assume the density of each solution is 1.00 g/mL). 2. Determine the temperature change, t, for each reaction. 3. Calculate the heat released by each reaction, q, by using the formula: q = Cp•m•t (Cp = 4.18 J/g°C) Convert joules to kJ in your final answer. 4. Find H (H = –q). 5. Calculate moles of NaOH used in each reaction. In Reactions 1 and 2, this can be found from the mass of the NaOH. In Reaction 3, it can be found using the molarity, M, of the NaOH and its volume, in L. 6. Use the results of the Step 4 and Step 5 calculations to determine H/mol NaOH in each of the three reactions. 7. To verify the results of the experiment, combine the heat of reaction (H/mol) for Reaction 1 and Reaction 3. This sum should be similar to the heat of reaction (H/mol) for Reaction 2. Using the value in Reaction 2 as the accepted value and the sum of Reactions 1 and 3 as the experimental value, find the percent error for the experiment.