Enhancing Learning with Visual Tools in the Classroom
Explore the benefits of visual tools in education for improved comprehension and independence. Learn how to create and utilize visual schedules effectively to support children's learning and development.

Enhancing Learning with Visual Tools in the Classroom
E N D
Presentation Transcript
Visual Supports Laura Graves, Ph.D., Helen T. Dainty, Ph.D., Amy Locke-Callender, EdS.
Rationale for Visual Tools in the Classroom • What are visual tools? • They are simply things that you can see. • Purposes for using visual tools: • Offer predictability, familiarity, and clarity • Reduce the amount of verbal information • How can visual tools help? • Introduce new concepts and vocabulary • Improve language skills • Improve memory • Teach time and sequence • Increase independence and autonomy
What tools do you use to help you remember? Why do you need the tools? Visual Supports
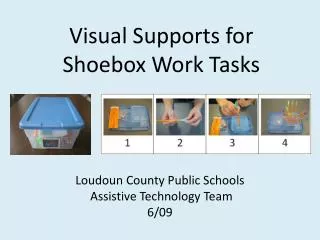
What is a visual schedule? • Pictures showing the order or sequence of activities • Can be for class or an individual student
Why use visual schedules? Predictable Organized Hands-on Available Helpful Hints: Refer to the schedule throughout the day Let children know when schedule will change Make sure all adults know how to use schedule Visual Schedules Willis, c. (2006). Teaching young children with Autism Spectrum Disorder. Beltsville, MD: Gyphon House.
Why use visual schedules? • To improve receptive language skills • To help provide structure, often decreasing negative behaviors • To use as a supplement with verbal directions to reinforce following a command • To increase understanding of new vocabulary • To aid in learning how to do a particular task • To help teach the concept of sequencing and ordinal terms (first, next, last…) • To promote INDEPENDENCE http://www.augresources,com/PictureScehduleIdeas.htm
Who benefits? • Children who have communication difficulties • Expressive and Receptive • Children with negative behaviors • Allows individual to visually see what happens next • Children who have difficulty following through on a task • Children learning sequencing skills • Children learning new vocabulary http://www.augresources,com/PictureScehduleIdeas.htm
Making Visual Schedules What are visual schedules? • A sequenced arrangement of what happens during the day Why make them visual? • Can be used to visually break down the school day, parts of the school day, a set of skills or expectations into manageable steps Hannah, L. (2001). Teaching young children with autistic spectrum disorders to learn: A practical guide for parents and staff in general education classrooms and preschools. Shawnee Mission: KS. AAPC.
Breaking Down a Targeted Skill How do I break down skill? • Task Analysis: • Identify target skill • List each specific behavior in performing the targeted task in sequence • Consider if the child has the prerequisite skills for each behavior • If not, the prerequisite skills must be taught first • Determine materials needed to teach targeted skills such as a visual schedule • Teach each specific behavior in sequence • Have child refer to visual schedule to complete task • Over time fade visual schedule from the child’s support system
Example of a Task Analysis for Setting the Table • Put the placemat down • Place the large plate in the center of the placemat • Put the small plate in the upper left had side of the placemat • Put the butter knife on the small plate • Place the napkin to the left of the large plate • Put the knife and spoon to the right of the large plate • Put the fork to the left of the large plate on the napkin • Put the dessert spoon and fork horizontally at the top of the large plate • Put the glass to the upper right of the large plate near the tip of the knife
Another Task Analysis Example of How to Blow Your Nose • Get a tissue • Blow nose • Wipe nose • Throw away tissue • Get hand sanitizer • Wash hands
On a piece of paper write out the steps for hand washing Compare the steps with a colleague Take the pictures out of the bag Put the pictures in the correct order by what happens first, second, third, etc. Place the pictures on the sentence strip The back of each picture should be placed on the Velcro side of the sentence strip Task Analyzing Activity
Helpful Hints for Individual Child • Make the visual schedule top to bottom or left to right • Reward child for following the visual schedule • Use same pictures consistently • Know the child • Digital pictures, clip art, line-drawings, or actual objects • Fade visual schedule over time as independence of skill is learned