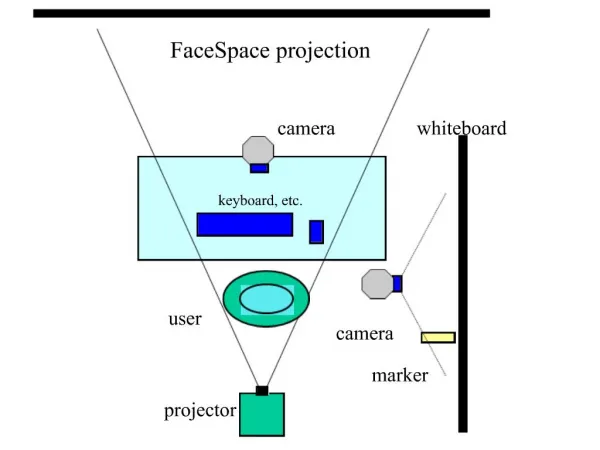
Camera Supports
Camera Supports. Tripods. Common Types of Supports. Bean Bags String Pods Monopods Tripods. The Bean Bag. The Bean Bag. Can be purchased or made as a DIY project from materials that are readily available and to the size that is preferred.

Camera Supports
E N D
Presentation Transcript
Camera Supports Tripods
Common Types of Supports • Bean Bags • String Pods • Monopods • Tripods
The Bean Bag • Can be purchased or made as a DIY project from materials that are readily available and to the size that is preferred. • The beanbag tripod is an excellent choice for outdoor photography. You place the beanbag down on the ground, on a rock, or wherever and it will conform to the shape of that surface. Then, you nestle your camera into the beanbag, adjusting it for the perfect angle. It's very easy to use, and provides a flexible, yet solid, surface from which to take your pictures.
The String Pod • Is constructed by connecting one end of a length of string to your camera, and the other end securely to the ground. Usually the ground end has a washer or nut on the end to step on with your foot. • When you pull the camera up and make the string taut, you've stabilized the camera. It's that easy! • A real tripod or monopod will always give you better results but this can aid in those places where other are types of camera support are not available or allowed.
The Monopod • The monopod is not considered a replacement for the tripod as the tripod will always be steadier for taking photographs. • The monopod is easier to carry, easier to move around, lighter than the tripod, less confining & quicker to set up. • They can easily be disguised as a walking stick & therefore taken into & used in more places than the tripod. • Can be used as a steady cam
The Monopod Using a Monopod • Option #1 • This is the weakest of all monopod options.
The Monopod • Option #2 • This is a very stable position. The rear knee is bent slightly with the monopod pressing against the inner thigh.
The Monopod • Option #3 • This is another stable option with the monopod again pressing against the rear inner thigh.
The Monopod • Option #4 • This is a monopod stabilizer pouch for those on the go.
The Tripod • When your camera is attached to a tripod, you get photos that are razor sharp because camera shake has been reduced and/or eliminated. • Shake is not eliminated when the tripod itself is not stable or the platform that the tripod is placed on is not stable or the tripod/camera assembly is not used correctly.
The Tripod • The general rule of thumb for handheld shots is: • Take the focal length of your lens and use the reciprocal (1 divided by focal length) to determine the maximum safe shutter speed. • For a 50mm lens, 1/60th should be safe, but for a 300mm telephoto, you should only take hand-held shots with a shutter speed quicker than 1/300th of a second (although even that will be risky in breezy conditions, with unsteady footing, or with a heavy lens that is hard to hold steady).
The Tripod • In thinking about this general rule of thumb and handheld shots there are some things to consider: • There are some people with steadier hands and better camera holding techniques that can achieve somewhat slower shutter speeds but not truly slow shutter speeds. • The newer lenses with vibration reduction technology also assist in getting sharp shots with slower shutter speeds for handheld shots. This feature should be turned off when mounted on a tripod.
The Tripod • Some added benefits and reasons to using a tripod: • Using a tripod enables taking shots with long exposure times. • Having the camera fixed on a tripod makes it more difficult to take a shot. That might not seem like a benefit at first glance – but it is. Every shot you take requires at least some deliberation, and thus consideration of the scene in front of you in terms of framing and composition. By taking the time to adjust the tripod height, angle or position, you are giving yourself time for reflection and decision making on the shot.
The Tripod • The tripod will assist in taking a series of photos: • At different angles to produce a panorama • At different exposures for a high dynamic range (HDR) picture • In time lapse to create an animation • To produce a composite image, such as including or excluding people in a crowd, or combining portions • Whenever you want precise control of composition • Setting up a shot prior to an occurrence such as a sporting event
The Tripod • How to use your tripod: • It is not as simple as some people think.
The Tripod • Find your composition before thinking about using the tripod. • It takes time to set up the tripod. Walk around and explore the subject from different angles. Look through the viewfinder and make note of the camera orientation when you have decided on the shot. Then begin to set up the tripod.
The Tripod • Extend the thickest legs first. • This gives you the strongest legs for the platform rather than the skinniest & weakest. • Adjust the height of the legs before spreading them. • This helps get them to the same length. • Use the minimum height required. • The higher you set the tripod the more wobbly it will be.
The Tripod • If the tripod has a center column it should only be used for fine adjustments it is the most unstable part of the tripod. • It should only be used as a last resort. • Always spread the legs fully apart from each other. • This gives the maximum stability. • Point one of the legs towards the subject. • This gives room to stand between the other 2 legs and helps prevent tripping over the tripod.
The Tripod • Keep the center post vertical and perpendicular to the ground. • This assists in keeping the top platform of the tripod level. • Use the tripod collar on longer & heavier lenses. • These lenses shift the center of gravity. Using the collar evenly balances the weight of the camera and lens. It also alleviates the stress that would be placed on the camera lens mount.
The Tripod • Place a weight or heavy object on the bottom of center post. • This adds stability in many conditions such as in wind. Many tripods come with a hook but one can usually be added if it did not. Be careful though if the bag is shaking or hitting the legs you could lose stability.
The Tripod • Now that the tripod is set up with the camera mounted here is are a couple of important camera settings: • Turn of the vibration reduction system for your camera. If it is left on it can cause some camera shake. • Use the mirror lock up setting to prevent mirror slap which can cause vibration.
The Tripod • Considerations in the purchase of a tripod are: • Sturdiness & Stability • This includes the number of leg sections, the material from which it is manufactured and how thick the leg units are. The length of the legs and whether a center column is required for use or included should also be considered. • Tripod Weight • One should think about whether it will only be for studio work or is it to be carried? If it is to be carried & is to heavy so as to cause fatigue it might be left behind and then will not available for use.
The Tripod • Ease of Use • It should not be too awkward, and should be quick & easy to use. This ease of use also includes the type of tripod head that is chosen. • Number of Leg Sections • More leg sections reduce the stability, but reduce the size when fully contracted. It also means that it might take longer to fully extend the tripod. • Maximum Tripod Height • This is important if you are tall because if the tripod is short you could in an uncomfortable crouched position for an extended period of time.
The Tripod • Minimum Tripod Height • This important for macro photographers and people who require low vantage points in their photographs. • Contracted Tripod Height • This is important to those persons who are required to fit their tripod into backpacks, suitcase or other small spaces.
The Tripod • Other Considerations Regarding The Tripod: • The type of leg lock flip lock vs screw lock preference.
The Tripod • Availability of spiked feet make a difference when in the outdoors for gripping on those challenging terrains.
The Tripod The type of head preferred. • Pan/tilt heads: • Are usually found on cheaper tripods and are slower & more difficult to use • The good ones are intended primarily for video
The Tripod • Ball swivel heads: • Are generally more sturdy and stable • Are preferred for general use & sports/action since aiming and leveling can be accomplished in on instinctive motion thus quicker to use
The Tripod • Joystick Head • Are versatile, quick and easy to use. Just grip the handle then you are able to position the camera anywhere in a 180 degree sphere.
The Tripod • The Gimbal Head • Balance camera and lens at the natural center of gravity. Balancing a large lens and camera on a ball head ends up fighting the natural tendency of the equipment to want to tip.
The Tripod • Virtual Reality and Panoramic Head
Camera Mounting System • More accessories for tripod efficiency and ease of use: • L-Brackets allows you to change from vertical and horizontal positions and maintain the pivot point.
The Tripod • Quick release camera plates allow you to work quickly and you can mount your camera very securely with less chance of slipping.
The Tripod • There are a variety of tripods available from large to hold heavy equipment at higher levels to small ones to hold lighter weights which can be placed almost anywhere.
The Tripod Much of the information in this presentation was obtained from research on the internet at these websites and you can obtain more in depth and excellent material by visiting them: • The string pod. Make the world’s cheapest tripod at: http://www.pcworld.com/article/145582/make_the_worlds_cheapest_tripod.html • How to use a monopod & the multi-purpose tripod at: http://www.outdooreyes.com/photo5.php3
The Tripod Using the tripod: • http://www.weatherscapes.com/techniques.php?cat=general&page=tripod • http://www.cambridgeincolour.com/tutorials/camera-tripods.htm • http://www.geofflawrence.com/photography_tutorial_tripods.php • http://www.digital-photography-school.com/how-to-use-your-tripod-its-not-as-simple-as-you-think • http://cameras.about.com/od/accessories/a/How-To-Use-A-Tripod.htm