MS Word Advanced Training
1.86k likes | 3.09k Vues
MS Word Advanced Training. Michael Sheyahshe (Cadd0) Chief Information Officer - aNm www.alternativemedia.biz. Section One: Tables. Section Goals Understand Tables Know how to create, edit, and use Tables Investigate ‘nesting’ Tables Be able to format Tables. Insert or create a table.

MS Word Advanced Training
E N D
Presentation Transcript
MS Word Advanced Training Michael Sheyahshe (Cadd0) Chief Information Officer - aNm www.alternativemedia.biz
Section One: Tables • Section Goals • Understand Tables • Know how to create, edit, and use Tables • Investigate ‘nesting’ Tables • Be able to format Tables
Insert or create a table • In Microsoft Office Word 2007, you can insert a table by choosing from a selection of pre-formatted tables — complete with sample data — or by selecting the number of rows and columns that you want. You can insert a table into a document, or you can insert one table into another table to create a more complex table.
Use table templates You can use table templates to insert a table that is based on a gallery of preformatted tables. Table templates contain sample data to help you visualize what the table will look like when you add your data. • Click where you want to insert a table. • On the Insert tab, in the Tables group, click Table, point to Quick Tables, and then click the template that you want. • Replace the data in the template with the data that you want.
Use the Table menu • Click where you want to insert a table. • On the Insert tab, in the Tables group, click Table, and then, under Insert Table, drag to select the number of rows and columns that you want.
Use the Insert Table command You can use the Insert Table command to choose the table dimensions and format before you insert the table into a document. • Click where you want to insert a table. • On the Insert tab, in the Tables group, click Table, and then click Insert Table. • Under Table size, enter the number of columns and rows. • Under AutoFit behavior, choose options to adjust the table size.
Create a table • Draw a tableYou can create a table by drawing the rows and columns that you want or by converting text to a table. • Click where you want to create the table. • On the Insert tab, in the Tables group, click Table, and then click Draw Table. • The pointer changes to a pencil. • To define the outer table boundaries, draw a rectangle. Then draw the column lines and row lines inside the rectangle. • To erase a line or block of lines, under Table Tools, on the Design tab, in the Draw Borders group, click Eraser. • Click the line that you want to erase. • When you finish drawing the table, click in a cell and start typing or insert a graphic.
Questions? • Creating Tables
Convert text to a table • Insert separator characters — such as commas or tabs — to indicate where you want to divide the text into columns. Use paragraph marks to indicate where you want to begin a new row. • For example, in a list with two words on a line, insert a comma or a tab after the first word to create a two-column table. • Select the text that you want to convert. • On the Insert tab, in the Tables group, click Table, and then click Convert Text to Table. • In the Convert Text to Table dialog box, under Separate text at, click the option for the separator character that you used in the text. • Select any other options that you want.
Place a table inside another table Tables that are inside other tables are called nested tables and are often used to design Web pages. If you think of a Web page as one big table that holds other tables — with text and graphics inside different table cells — you can lay out the different parts of your page. You can insert a nested table by clicking in a cell and then using any of the methods to insert a table, or you can draw a table where you want the nested table. Note You can also copy and paste an existing table into another table.
Add a cell, row, or column to a table • Add a cell • Click in a cell that is to the right of or above where you want to insert a cell. • Under Table Tools, on the Layout tab, click the Rows & Columns Dialog Box Launcher. • Click one of the following options.
Add a row above or below • Click in a cell above or below where you want to add a row. • Under Table Tools, on the Layout tab, do one of the following: • To add a row above the cell, click Insert Above in the Rows and Columns group. • To add a row below the cell, click Insert Below in the Rows and Columns group.
Add a column to the left or right • Click in a cell to the left or right of where you want to add a column. • Under Table Tools, on the Layout tab, do one of the following: • To add a column to the left of the cell, click Insert Left in the Rows and Columns group. • To add a column to the right of the cell, click Insert Right in the Rows and Columns group.
Delete a cell, row, or column from a table • Delete a cell • Select the cell that you want to delete by clicking its left edge. • Under Table Tools, click the Layout tab. • In the Rows & Columns group, click Delete, and then click Delete Cells. • Click one of the following options:
Delete a row • Select the row that you want to delete by clicking its left edge. • Under Table Tools, click the Layout tab. • In the Rows & Columns group, click Delete, and then click Delete Rows.
Delete a column • Select the column that you want to delete by clicking its top gridline or top border. • Under Table Tools, click the Layout tab. • In the Rows & Columns group, click Delete, and then click Delete Columns.
Merge or split cells in a table Merge cellsYou can combine two or more table cells located in the same row or column into a single cell. For example, you can merge several cells horizontally to create a table heading that spans several columns. • Select the cells that you want to merge by clicking the left edge of a cell and then dragging across the other cells that you want. • Under Table Tools, on the Layout tab, in the Merge group, click Merge Cells.
Split cells • Click in a cell, or select multiple cells that you want to split. • Under Table Tools, on the Layout tab, in the Merge group, click Split Cells.. • Enter the number of columns or rows that you want to split the selected cells into.
Move or copy a table Drag a table to a new location • In Print Layout view, rest the pointer on the table until the table move handle appears. • Rest the pointer over the table move handle until the pointer becomes a four-headed arrow, and then click the table move handle. • Drag the table to a new location.
Copy a table and paste it in a new location When you paste a table in a new location, you can copy the table or cut it. When you copy a table, the original table remains in place. When you cut a table, the original table is deleted. • In Print Layout view, rest the pointer on the table until the table move handle appears. • Click the table move handle to select the table. • Do one of the following: • To copy the table, press CTRL+C. • To cut the table, press CTRL+X. • Place the insertion point where you want the new table. • Press CTRL+V to paste the table in the new location.
Format a table After you create a table, Microsoft Office Word 2007 offers you many ways to format that table. If you decide to use Table Styles, you can format your table all at once, and even see a preview of what your table will look like formatted in a particular style before you actually apply the style. You can create a custom look for tables by splitting or merging cells, adding or deleting columns or rows, or adding borders. If you're working with a long table, you can repeat the table headings on each page on which the table appears. To prevent awkward page breaks that disrupt the flow of your table, you can also specify just how and where the table should break across pages.
Use Table Styles to format an entire table After you create a table, you can format the entire table by using Table Styles. By resting your pointer over each of the preformatted table styles, you can preview what the table will look like. • Click in the table that you want to format. • Under Table Tools, click the Design tab. • In the Table Styles group, rest the pointer over each table style until you find a style that you want to use.Note To see more styles, click the More arrow . • Click the style to apply it to the table. • In the Table Style Options group, select or clear the check box next to each the table element to apply or remove the selected style.
Add or remove borders You can add or remove borders to format a table the way that you want. • Add table borders • Under Table Tools, click the Layout tab. • In the Table group, click Select, and then click Select Table. • Under Table Tools, click the Design tab. • In the Table Styles group, click Borders, and then do one of the following: • Click one of the predefined border sets. • Click Borders and Shading, click the Borders tab, and then choose the options that you want.
Remove table borders from the whole table • Under Table Tools, click the Layout tab. • In the Table group, click Select, and then click Select Table. • Under Table Tools, click the Design tab. • In the Table Styles group, click Borders, and then click No Border.
Add table borders to specified cells only • On the Home tab, in the Paragraph group, click Show/Hide. • Select the cells that you want, including their end-of-cell marks. • Under Table Tools, click the Design tab. • In the Table Styles group, click Borders, and then click the border that you want to add.
Remove table borders from specified cells only • On the Home tab, in the Paragraph group, click Show/Hide. • Select the cells that you want, including their end-of-cell marks. • Under Table Tools, click the Design tab. • In the Table Styles group, click Borders, and then click No Border.
Display or hide gridlines Gridlines show the cell boundaries of a table on the screen wherever the table doesn't have borders applied. If you hide the gridlines in a table that has borders, you won't see the change because the gridlines are behind the borders. To view the gridlines, remove the borders. Unlike borders, gridlines appear only on the screen; they are never printed. If you turn off gridlines, the table is displayed as it will be printed. Note: Gridlines are not visible when you view a document in a Web browser or in Print Preview.
Display or hide table gridlines in a document Under Table Tools, on the Layout tab, in the Table group, click View Gridlines.
Add a cell, row, or column • Click in a cell that is located just to the right of or above where you want to insert a cell. • Under Table Tools, on the Layout tab, click the Rows & Columns Dialog Box Launcher. • Click one of the following options:
Add a row • Click in a cell that is located just below or above where you want to add a row. • Under Table Tools, click the Layout tab. • Do one of the following: • To add a row just above the cell that you clicked in, in the Rows and Columns group, click Insert Above. • To add a row just below the cell that you clicked in, in the Rows and Columns group, click Insert Below.
Add a column • Click in a cell that is located just to the right or left of where you want to add a column. • Under Table Tools, click the Layout tab. • Do one of the following: • To add a column just to the left of the cell that you clicked in, in the Rows and Columns group, click Insert Left. • To add a column just to the right of the cell that you clicked in, in the Rows and Columns group, click Insert Right.
Delete a cell, row, or column • Do one of the following: • Under Table Tools, click the Layout tab. • In the Rows & Columns group, click Delete, and then click Delete Cells, Delete Rows, or Delete Columns, as appropriate.
Repeat a table heading on subsequent pages When you work with a very long table, it will be divided wherever a page break occurs. You can make adjustments to the table so that the table headings are repeated on each page. Repeated table headings are visible only in Print Layout view and when you print the document. • Select the heading row or rows. The selection must include the first row of the table. • Under Table Tools, on the Layout tab, in the Data group, click Repeat Header Rows. Note Word automatically repeats the table headings on each new page that results from an automatic page break. Word does not repeat a heading if you insert a manual page break within a table.
Control where a table is divided When you work with a very long table, it must be divided wherever a page break occurs. By default, if a page break occurs within a large row, Microsoft Word allows a page break to divide the row between the two pages. You can make adjustments to the table to make sure that the information appears as you want it to when the table spans multiple pages.
Prevent a table row from breaking across pages • Click in the table. • Under Table Tools, click the Layout tab. • In the Table group, click Properties, and then click the Row tab. • Clear the Allow row to break across pages check box.
Force a table to break across pages at a particular row • Click in the row that you want to appear on the next page. • Press CTRL+ENTER.
Sort the contents of a table • In Print Layout view, move the pointer over the table until the table move handle appears. • Click the table move handle to select the table that you want to sort. • Under Table Tools, on the Layout tab, in the Data group, click Sort. • In the Sort dialog box, select the options that you want.
Sort a single column in a table • Select the column that you want to sort. • Under Table Tools, on the Layout tab, in the Data group, click Sort. • Under My list has, click Header row or No header row. • Click Options. • Under Sort options, select the Sort column only check box. • Click OK.
Sort by more than one word or field inside a table column To sort the data in a table that is based on the contents of a column that includes more than one word, you must first use characters to separate the data — including data in the header row. For example, if the cells in a column contain both last and first names, you can use commas to separate the names. • Select the column that you want to sort. • Under Table Tools, on the Layout tab, in the Data group, click Sort. • Under My list has, click Header row or No header row. • Click Options. • Under Separate fields at, click the type of character that separates the words or fields that you want to sort, and then click OK. • Under Sort by, in the Using list, select which word or field you want to sort by. • In the first Then by list, enter the column that contains the data that you want to sort by, and then in the Using list, select which word or field you want to sort by. If you want to sort by an additional column, repeat this step in the second Then by list.
Move or copy a table Drag a table to a new location • In Print Layout view, rest the pointer on the table until the table move handle appears. • Rest the pointer over the table move handle until the pointer becomes a four-headed arrow, and then click the table move handle. • Drag the table to a new location.
Copy a table and paste it in a new location When you paste a table in a new location, you can copy the table or cut it. When you copy a table, the original table remains in place. When you cut a table, the original table is deleted. • In Print Layout view, rest the pointer on the table until the table move handle appears. • Click the table move handle to select the table. • Do one of the following: • To copy the table, press CTRL+C. • To cut the table, press CTRL+X. • Place the insertion point where you want the new table. • Press CTRL+V to paste the table in the new location.
Move or copy items in a table • On the Home tab, in the Paragraph group, click Show/Hide. • Select the item that you want to move or copy. • Do one of the following: • To move the selected item, drag it to the new location. • To copy the selected item, hold down CTRL while you drag it to the new location.
Questions? • Extra formatting…
Practice • You can place one table inside another to further separate information, visually. This can be referred to as nesting. Practice placing an entire table inside a particular cell of another table.
Section Review • What is a Table; what does it look like? • What sort of data can a Table present? • How do you create a Table? • What is one way to edit the Table? • What does it mean to ‘nest’ a Table? • Describe one way to format Tables .
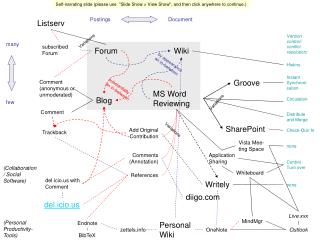
Section Two: Reviewing Word Documents • Section Goals • Understand what Track Changes means • Know how to turn this function ON • Identify and create Comments • Accept or delete the Changes • Know Merge and Compare documents
Track changes while you edit • You can easily make and view tracked changes and comments while you work in a document. By default, Microsoft Office Word 2007 uses balloons to display deletions, comments, formatting changes, and content that has moved. If you want to see all of your changes inline, you can change settings so that tracked changes and comments display the way you want. Balloons show formatting changes, comments, and deletions. Note To prevent you from inadvertently distributing documents that contain tracked changes and comments, Word displays tracked changes and comments by default. Final Showing Markup is the default option in the Display for Review box.
Track changes while you edit • Open the document that you want to revise. • On the Review tab, in the Tracking group, click the Track Changes image. • To add a track changes indicator to the status bar, right-click the status bar and click Track Changes. Click the Track Changes indicator on the status bar to turn track changes on or off. • Make the changes that you want by inserting, deleting, moving, or formatting text or graphics. You can also add comments. Note If you use change tracking and then save your document as a Web page (.htm or .html), tracked changes will appear on your Web page.
Turn off change tracking On the Review tab, in the Tracking group, click the Track Changes image. If you customized the status bar to include a track changes indicator, clicking Track Changes in the Tracking group will also turn off the indicator in the status bar. Note Turning off change tracking does not eliminate the tracked changes in your document. To ensure that there are no more tracked changes in your document, be sure that all changes are showing, and then use the Accept or Reject commands for each change in the document.