Adding approval levels to a new requisition or a modified requisition.
50 likes | 219 Vues
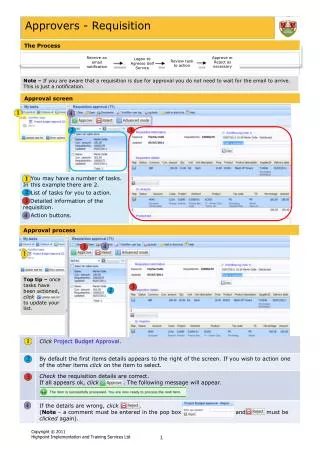
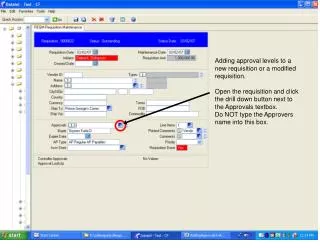
Adding approval levels to a new requisition or a modified requisition. Open the requisition and click the drill down button next to the Approvals textbox. Do NOT type the Approvers name into this box.

Adding approval levels to a new requisition or a modified requisition.
E N D
Presentation Transcript
Adding approval levels to a new requisition or a modified requisition. Open the requisition and click the drill down button next to the Approvals textbox. Do NOT type the Approvers name into this box.
In the Next Approvals screen, type the last name followed by the first and middle initials of the first level approver. In the example we have typed "hillte" for Toni Hill. You can also type ... to get an Approver selection screen. Then hit ENTER. NOTE: The Next Approvals list is NOT a sequential list. This is a list of people that have the authorization to approve at the next level. When one of the Approvers on the list sees this requisition and approves it, the requisition will disappear from the other approver's list. Whoever approves it is responsible to add the next level approvers name to the list.
When you hit ENTER the program will automatically recognize the approver and post their full name in the first level approval. By default the program will drop to the second line of approvals. As noted in the previous screen, this would be someone with the same approval access as is listed in line 1, NOT the next level. Follow the same process as above for any additional approval names. If you do not have any further approvals click the SAVE button.
Click the UPDATE button to update the file. This will return you to the REQM page for this requisition.
Approval names and dates will not show up in the approvals textbox until approval has taken place. You can click the drill down button to see the list of approvers.