Microsoft Word
125 S. Clark St., 4 th floor, Chicago, Illinois 60603 Telephone 773.553.6260 Fax 773.553.6261. Microsoft Word. Launch MS Word. Click on Start. Highlight Programs. Select Microsoft Word. Menu Bar. Standard Toolbar. Formatting Toolbar. Previous, Next Page Buttons.

Microsoft Word
E N D
Presentation Transcript
125 S. Clark St., 4th floor, Chicago, Illinois 60603 Telephone 773.553.6260 Fax 773.553.6261 Microsoft Word
Launch MS Word • Click on Start. • Highlight Programs. • Select Microsoft Word.
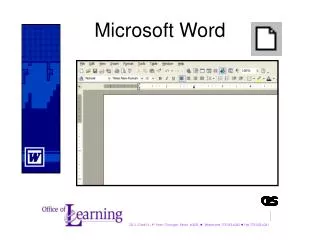
Menu Bar Standard Toolbar Formatting Toolbar Previous, Next Page Buttons View Choices Word Overview
Missing Toolbars If your screen does not display certain toolbars, click on View then Toolbars to select any missing toolbars.
Menus Menus display lists of commands. The main menus appear in the menu bar at the top of the screen. • Click on the words in the main menus to explore the drop-down menus. • If the entire menu does not display, hold the mouse over the double arrows to display the rest of the menu.
Create a Document • Choose File and then New from the menu bar. • Notice the icon to the left of New… in the drop-down menu resembles a piece of paper.
Work-Related Letter • Begin to write a letter to that applies to your current work. This is one way to use MS Word for your productivity. Can you think of any other ways you could use it?
Cursor Typing and Inserting Text To enter text, just start typing! The text will appear to the right of the blinking cursor. To move the cursor through the text, point the mouse to a new location in the text and click. You can also use the arrow keys on the lower right corner of the keyboards. Continue typing your letter.
Navigate within Documents To move through documents, use the arrow keys, the mouse, or keyboard shortcuts.
Save a Document • Select File and then Save from the menu bar. • Choose the drive and folder in which you want to save the document. • Make sure your file name is brief and understandable, such as: myletter • Click Save.
Save Often • Remember to save often! • Once you have used the Save As function, you can use File and then Save to save your document in the same location. • You can also click the Save button on the toolbar.
Close your Document • Close your document (in this case, you letter) document by selecting File and then Close • Alternatively click the lower X in the upper right corner of your screen
Open an Existing Document • Choose File and then Open from the menu bar. Alternatively click the open icon in the tool bar. • Browse to the letter you created and click Open.
Select (Highlight) Text You need to highlight text before performing certain actions in word, such as formatting text and moving text. • Any amount of text Click and Drag over the text. • A word Double-click the word. Deselect the text by clicking anywhere outside of the selected text.
Delete Text • Use the Backspace and Delete keys on the keyboard to delete text. • Backspace will delete text to the left of the cursor and • Delete will erase text to the right. • To delete a large selection of text, highlight it and press the Delete key. r
Undo/Redo • On the Standard toolbar, click the arrow next to Undo. • Microsoft Word displays a list of the most recent actions you can undo. • Click the action you want to undo. If you don't see the action, scroll through the list. • When you undo an action, you also undo all actions above it in the list. • If you later decide you didn't want to undo an action, click Redo on the Standard toolbar.
Font Dialog Box The Font dialog box allows you to choose from a larger selection of formatting options. • Select Format and then Font from the menu bar to access the box. • Experiment with changing the font and font effects.
Create More Documents • Choose File and then New from the menu bar. Or: • Click the New Document button on the toolbar. • Create two new documents that relate to your current work. Spend some time creating the documents • Make sure to save the documents.
Working on Multiple Documents • You can work on several documents at the same time. • All open documents are listed under the Window menu. The current document displays a checkmark beside the file name. • The documents also appear in the task bar. • Practice selecting your documents using the Window menu or the task bar.
Edit: Cut & Paste • Highlight the text you want to move. • Choose Edit, then Cut from the Edit menu. • Position your cursor to the desired location in the text. • Choose Edit, then Paste from the Edit menu.
Edit: Copy & Paste • Highlight the text you want to copy and place somewhere else in the document. • Choose Edit, then Copy from the Edit menu. • Position your cursor to the desired location in the text. • Choose Edit, then Paste from the Edit menu.
Copy & Paste Among Documents The Copy & Paste functions save time because you can copy and paste text from one document to another, for example a class list, a list of schools, or other information that you might otherwise have to type repeatedly. • Highlight some text from one of the documents you created. • Copy the text to the clipboard by selecting Edit, then Copy. • Move to another document using the Windows menu or the task bar. • Position the cursor in the desired location of the text. • Select Edit, then Paste. • Spend some time copying and pasting among documents
Page Margins • You can change page margins using the ruler or the page setup window. • Spend some time adjusting the margins of one of your documents.
Page Orientation Use the Page Setup window to adjust page orientation to landscape or portrait.
Print Preview • Preview a page before printing. • On the File menu, click Print Preview. • Use the buttons on the toolbar to look over the page or make adjustments before printing.
Printing • Print a document. • You can print the active document by clicking Print on the Standard toolbar. • You can also click on the icon in the toolbar to open the print window.
Printing Details • Print all or part of a single document • On the File menu, click Print • In the Print box: • Print a range of pages • Print only odd or even pages • Print a specific page