Download
1 / 7
70 likes | 104 Vues
Learn to sit with proper posture and use correct typing technique to reduce stress on your body and improve typing speed. Practice the touch method, keep eyes on the copy, and use special keys efficiently. Master the layout of the keyboard for faster typing.

E N D
01.00 Use the touch method in operating the keyboard and numeric keypad Objectives 1.01 Implement proper keyboarding techniques
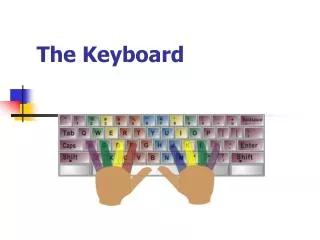
Sit up straight Feet flat on the floor Body centered in front of the computer, body is back in the chair with your back straight. Elbows naturally by side Your fingers will be curved Wrists low, but not touching the keyboard Quick, snappy strokes Having proper posture and using proper technique will reduce the amount of stress on your body – thus, it will protect your body from injury. Form and style is called technique Proper Postureand Technique
Proper Posture and Technique--continued • Fingers begin on the HOME ROW • Quick down and in motion of the thumb • Right pinky (semicolon finger) used for the enter key; other fingers remain on the home row – the right pinky will return to the semicolon key. • Use the appropriate pinky for each shift key • Examine the keyboard carefully to form a mental picture of the layout. (You will memorize the entire keyboard.)
Proper Posture and Technique--continued • Keep your eyes on the copy (what you are typing from, not the keyboard and your fingers). Your copy should be placed on the right side of your keyboard. • Place your fingers on the center of each key with the fingers slightly curved – they should start on the home row • Keep hand and arms relatively stationary or still. • Strike keys firmly and release them quickly – quick snappy strokes. • Do not worry about correcting errors when working on building speed
Special Keys • Shift Key– used as a short-cut to capitalize letters or to enter the top symbol on a 2 symbol key. Press left shift with the A finger and the right shift with the semicolon finger. • Caps Lock Key– used when whole words are to be capitalized. • Enter Key– Used to move the cursor down a line when typing. • Backspace Key– Deletes text to the left of cursor • Delete Key– Deletes text to the right of cursor
Additional Information • A standard consists of any combination of 5 key strokes (letters, numbers, symbols, and spaces) • GWAM – Gross Words A Minute – Tells you how fast you type. • To find GWAM…divide total strokes by 5 • 100 total key keystrokes = 100/5 = 20 GWAM • QWERTY – Most common used keyboard
Additional Information • There are 5 parts to the keyboard • Function Keys – They execute commands • Alphabetic Keys – Letters, numbers, and symbols • Editing Keys • Arrow Keys – Moves the cursor in the direction of the arrow. • Numeric Keypad – Numbers and math operations