Triangulated Hexagon Tutorial
Triangulated Hexagon Tutorial. By Joseph Dalla Tezza/ Lazytowner.

Triangulated Hexagon Tutorial
E N D
Presentation Transcript
Triangulated Hexagon Tutorial By Joseph Dalla Tezza/Lazytowner
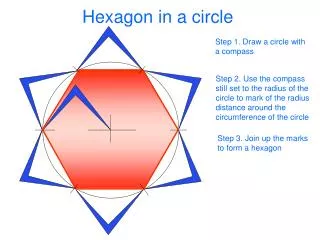
You start out with the hexagon shape in the 32 panel template found at http://www.footbag.org/footbags/patterns . You’re gonna modify this into that “triangulated” shape in the hexagons found on almost all pro-stitched footbags.
One side of the hexagon, if printed out at the right size “the ONCE INCH line exactly one inch”, should measure out at around ¾’s of an inch. ¾ in.
Go in a 1/4th of an inch from both sides of the side, and mark the points. ¼ in. ¼ in.
Do this for the other two sides shown in this pic on the left. ¼ in. ¼ in.
Draw a line from point to point…..I think you can see the shape by now eh? ¼ in. ¼ in. Easy, no? Well that’s it for this tutorial, good luck on your stitching, and email me at lazytowner@gmail.com if you’ve got any questions for me.
!EDIT! If you’re sewing skillz are shyte like mine, you might wanna draw some sewing guidelines, so we cut one of them out of the hexagon notch shape in the footbag.org template You’ll be cutting out the circled area to trace it onto your new “triangulated” hexagon.
!EDIT! I hope you’re understanding where I’m putting the piece I cut out from the notched hexagon thingy. Well anyways you trace the part in red onto each corner of the piece.
!EDIT! This is what it’ll look like after you’ve traced your little notch piece onto each corner of your tri-hex shape. Tie off at each point, and try to keep a straight line from point to point “DUR”.
!EDIT! If you want to go a step further and make sure your seams are completely straight, draw a line from point to point. Also, those inside lines are not for CUTTING, just in case somebody gets confused, you already did that – these lines, again, are just for accurate sewing lines “seams”.