
PCR Gel Template Instructions for Cloning Analysis
This document outlines the procedure for filling in the PCR gel template, which is essential for documenting cloning analysis results. Users are instructed to replace placeholders with specific data points and clone names, detailing the various insert sizes calculated from PCR results. Proper formatting of the gel image is emphasized, and instructions for saving and uploading the final image to a school album are provided. This template ensures clarity in presenting experimental results and facilitates collaboration in the research process.

PCR Gel Template Instructions for Cloning Analysis
E N D
Presentation Transcript
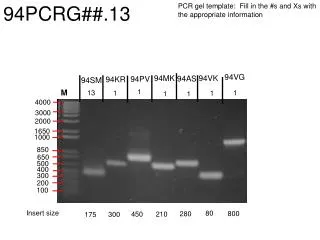
94PCRG##.13 PCR gel template: Fill in the #s and Xs with the appropriate information 94VG 94VK 94MK 94AS 94PV 94KR 94SM 1 M 13 1 1 1 1 1 4000 3000 2000 1650 1000 850 650 500 400 300 200 100 Insert size 80 800 280 210 450 300 175
94PCRG##.13 PCR gel template: Fill in the #s and Xs with the appropriate information 94AK 94RB 94PS 94PP 94SN 94SP 94RS 13 1 M 1 1 1 1 1 4000 3000 2000 1650 1000 850 650 500 400 300 200 100 Insert size 680 500 750 570 700 550 320
Delete the gel picture in this slide. Paste/import cropped gel here and resize to fit markers (note: some markers and lanes may need to be moved to fit the gel image). Label lanes with the proper clone names and add student names (e.G. Change #XX to 20WS and the # to your clone number 1, 2, or 3). Indicate the calculated size of the insert by pcr at the bottom of the gel (e.G. ### To 500 bp). Note: remember to subtract the vector length 200 bp. Save file as a .Jpeg with the proper pcrg name i.E. 20pcrg1.11 Upload file to your school’s PCRG album on picasa. Link the image of the file to your clones on the google docs clone report sheet