Complete Guide to Using Mortgage Tracker for Efficient Client Management
680 likes | 827 Vues
Welcome to the Mortgage Tracker tutorial. This guide will help you navigate the software's main features, including user management, client tracking, and security settings. You'll learn how to set user permissions, change passwords, and add new clients or advisers. Follow each step of the tutorial to become proficient in using Mortgage Tracker effectively. Don't forget to view the entire presentation before starting the software, as it will enhance your overall experience and ensure secure access to your database.

Complete Guide to Using Mortgage Tracker for Efficient Client Management
E N D
Presentation Transcript
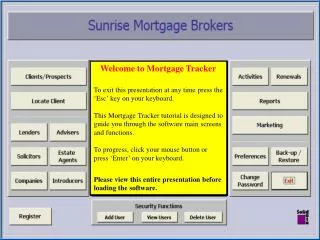
Welcome Welcome to Mortgage Tracker To exit this presentation at any time press the ‘Esc’ key on your keyboard.This Mortgage Tracker tutorial is designed to guide you through the software main screens and functions.To progress, click your mouse button or press ‘Enter’ on your keyboard. Please view this entire presentation before loading the software.
Password Name is Manager Password is Manager
Main Menu The opening screen is the main menu from where you will navigate to the various screens within the database. The licensee name you are prompted to enter on loading the program will appear across the top of the main menu, enter either your name or the company name. Currently showing as ‘Sunrise Mortgage Brokers’ When the program is first installed you will need to decide who can have full control of the database with regard to adding new users and backing up your data. If you want to allow an adviser to view only his own clients/prospects and their mortgages the authority can be set using these security buttons Click the view users button The program is initially set up with one Manager who has the authority to allocate permissions
Security WARNING Once you have changed the password only you will know it. Make a note of it somewhere safe because you will not be able to get into the database with full permissions again if you forget it.WARNING Type in the old password which is ‘Manager’ Then type in a new password and then again to confirm it.When you are finished click the ‘Done’ button Initially there are no users. We will add an adviser in a moment. But first, it would be a good idea to change the managers password so that only you know it. Click the ‘Change Password’ button.
New Manager The login name cannot have gaps in it. Alison is OKAlisonWheatley is OKAlison Wheatley Is Not The password can be up to 14 characters long and is case sensitive Click the Add User button once the details have been entered.Alison should write her password down somewhere safe. The new user is to have full permissions as the Office Manager Let’s add a new user to the system.Click ‘Add User’
Manager Confirm A message to confirm that Alison has been added with Manager access to the system.Click OK to confirm
Adviser Access The adviser David Foggerty has a login name of ‘Foggy’ and has been given a password The adviser button gives ‘Foggy’ permission to view/add/edit only his own clients and prospects. Any other adviser who works for the company will need to be added separately with their own passwords. Click the Add User button once the details have been entered.Foggy should write his password down somewhere safe. Let’s add a new user to the system with adviser access.Click ‘Add User’
Adviser Confirm A message to confirm that ‘Foggy’ has been added with Adviser access to the system.Click OK to confirm
View Users The current users of the system and their level of access is listed Only someone logged on with Manager access will see these security buttons. When Foggy is logged in this section will be hidden from view. Foggy will not be able to perform a backup. Only Manager access has permission to perform this function.The button will be disabled for anyone with adviser access. This bar will always show who is logged in.If Alison or Foggy logged in, it would show their login name here. Click the view users button
Change Password He can enter his old password and then his new password. He must confirm it again. He should make a note of it somewhere in case he forgets it. Foggy is logged on and would like to change his password
Adviser Logged ..and the backup button has been disabled to prevent unauthorised use. As you can see from this bar, Foggy is logged in. The security button is no longer visible…
New Client Mr James To view the client/prospect database click this button. McDonald Jim Anywhere in the database where a date needs to be entered, double click for the calendar control or just type the date in. To add a new client or prospect to the database select ‘New’
Client Details To analyse where your clients/prospects came from or to track a campaign, enter an ‘Introducer’ name and it becomes part of the database thereafter or select from an existing list you have created. If this is a prospective client of the future put a tick here.We will have a look at what this does later. To process a mortgage for this client immediately, just leave it blank. The Introducer will have obtained this client from a particular ‘Source’ which can be selected from the list or added to if not in the list. To send an email to your client double click the address. The address will automatically be entered into your new email. Or you can click this button. This is the easiest route. You can either return to the main menu by clicking here. Now we have a client we need to add an adviser.
New Adviser Yes we do. Once the password has been entered and verified click the ‘Add User’ button to confirm. To add David Foggerty to the users list with ‘Adviser’ level security so he will see only his own cases, enter a login name. Position when they first joined the company. Position now if they have been promoted or changed job within the company. This is the screen where information about each of the advisers is stored. To add a new adviser to the database select ‘New’
Adviser Details Not a good idea to to delete this adviser with so many mortgages in the system. Make an adviser inactive rather than delete if they leave the company. Mortgages previously arranged will still be held in the database for future reference. ‘Total Cases’for the selected adviser are counted here. Select an adviser from the list and the details appear…. Plenty of room to add additional notes for each adviser …over on this side You can only delete an adviser if there are no mortgages assigned to them. Clicking the button will tell you if Mortgage Tracker cannot delete the adviser because there are mortgages or prospects assigned. Navigate to other screens using the buttons along the bottom.
Active Cases Not Proceeded With.Click to see mortgages that were cancelled part way through for whatever reason. The total with each lender is shown in the reports section. All prospects are listed by clicking this button. All clients with mortgages in progress are listed by clicking this button.Let’s try it All clients with completed mortgages since the database was created are listed by clicking this button. Any mortgage that has not been assigned to an adviser yet will be listed by clicking on this button. Alison Wheatley is currently selected. Lets select David Foggerty and see what further options there are on this screen to assist him with his Mortgage Tracking. You can print the contact details for all of the advisers entered on the database.
Active L Carrington We will look at this screen in more detail later in the tutorial. Next, let’s look at the Lenders screen. These are the nine in progress mortgages for David Foggerty.Double Click a client to view their mortgage process details.Let’s try Lindsay Carrington To view the Lenders click the button.
New Lenders To go to the Lenders website click the hyperlink to launch your browser. When you enter a new lender you will have to find out their website address and enter it in. Some Lenders have online tracking systems, allowing you to easily record the updated information into Mortgage Tracker. If a lender changes name, tick the Inactive box to retain mortgage details for previously arranged mortgages. Then use the ‘New’ button to add the new name they are using. Lenders are listed here.If the Lender isn’t in view use the scroll bars to move up and down the list or key in the first letter of the Lender name to move to that part of the list. Enter the contact information specific to the process centres you use. To add a new Lender to the database select ‘New’. You can print out the entire list of lenders and their contact numbers
Lender Active Cases The active cases list can be emailed to the lender if you want to ask them for an update on all of the active cases. Each lender has a running total of Active and Completed cases. Clicking the button will reveal the active cases. Click the ‘Show Details’ button to return to the lender details. In the same way as the adviser screen did, a double click on any of the client details will take you to that mortgage process screen
After changing the dates you click ‘Apply Filter’ to show completions for the specified date range. Lender Completed Cases Click the ‘Completed Cases’ button to view all completed cases with this lender This is now a list of completed mortgages between 01/01/02 and 25/09/02 Double clicking on any of the mortgages in the list will take you directly to the process screen for that client. By default the system finds the oldest and most recent completed mortgages for this lender. Double click on the dates will bring up the calendar control for you to choose any two dates you would like to see completed mortgages for with this particular lender. Let’s now have a look at the Solicitor database. Click the button
New Solicitors The list of active cases for this solicitor can be viewedby clicking here. Enter the contact information for the solicitors you use or ones nominated by the Lenders for re-mortgages. Plenty of room for notes. Enter the legal fees for Re-mortgage, Sell and Buy costs etc Any of these mortgages can be viewed in more detail by double clicking on a client. Estate Agents database is next. Click the Agents button to move on. To add a new Solicitor to the database select ‘New’.
New Estate Agent Enter the contact information for the estate agents you use. To add a new Estate Agent to the database select ‘New’. Next is a look at the Companies database.
New Company A list of active cases can be viewed by clicking this button. And completed cases between any two dates can be viewed by clicking this button. Enter the contact information for the companies you use. Next is a look at the Introducers database.
New Introducer Durham Advertiser is selected in this example. Let’s see what the Introducer ‘Referral’ looks like. The introducer database can be used to give you reports on how much business you are getting from a particular source.Some of the introducers, for example ‘Referrals’ will not need address details entered. The address and contact information would be useful to have for future reference. The Durham Advertiser, ‘Source’ is a list that can be added to and enables reports to be assembled on how much business was written from any particular source. For example, how did the business written from the 22nd April 2002 advert compare to business written from the previous adverts. To add an Introducer click ‘New’.
Referrals Address and contact information is not required for this ‘Introducer’. By listing the source of the introduction you can create reports to show how much business is coming from the people in your list. If someone new refers business to you simply add their name to the list here.
Main Menu 2 Most of the data in the Advisers, Lenders, Solicitors, Companies, Introducers and Estate Agents database won’t change much.The Clients/Prospects will be changed and added to more frequently. To get started with a new mortgage to process we need to either add a new client, process a new mortgage for an existing client in the database or convert a prospect into a client.Click the Client/Prospect button next.
Client to Process If there was more than one client with a surname of Hayes they would all be listed here. In this example Irene Hayes is the client we are after and her details will appear by clicking on her name. Enter the surname of the client and press the ‘Enter’ button on your keyboard. Irene Hayes details have been entered onto the database previously and you would like find her in your list of clients/prospects. You could either scroll down the list to find her or you could use the filter list. This client was introduced to us by an advert placed in the Durham Adviser on the 22nd April 2002. For each client there is a count of mortgages that are completed and in progress. To start a new mortgage process for Irene click the Add/Edit Mortgage button.
Yes we are Process Screen This screen now shows all of the fields ready for data input. The data is used to create many different reports and also allows you to keep contact notes and set the next contact date to process this mortgage through it’s various stages.From the drop down list select who is involved with this mortgage. There are no mortgages in the database for this client. Who is the adviser? The Lender? The Solicitor? The Estate Agent? To start a new mortgage process for Irene click ‘New’
Process Fields Select David Foggerty from the list. Select the Lender from the list. Select the Estate Agent from the list Select the Solicitor from the list
Double click in the compliance docs field to open the calendar control.The date you select will be entered in here. Process Fields Continued Select the repayment method from the list.If it’s not included just type a new method and it will be included in the list. Select the product from the list.If it’s not included just type a new product and it will be included in the list. Select the client classification from the list.If it’s not included just type a new product and it will be included in the list. Double Click for another calendar to select the date the application was submitted
Mortgage Details From the drop down list select the type of valuation chosen. If you want to contact one of the companies from the drop down lists here all you do is double click to view the pop up form. The valuation date. The LTV auto-calculates. The valuation. The completion date. The offer date. The proc fee paid date. The penalty expiry date. The penalty expiry date. Enter the term of the mortgage. Enter the Loan Size. Any arrangement fees that were payable. Enter the lender roll/account number.
Mortgage Details Continued During the mortgage process you will need to set yourself contact reminder dates. Double click to open the calendar. The contact date is entered and the reason why.
Product Drop The select process is still showing unassigned. We need to enter the new address details. This is done by selecting the Property/Fees tab. We can also enter how much we are earning from the various aspects of this mortgage.
Property-Fees Enter the fees and the associated companies from the drop down lists.The various fees will form part of the reports to show where your fees are coming from. The address of the new property is entered here. If it is a remortgage just click the ‘Copy Home Address’ button and it will be entered in for you. This is for the date the application was submitted. And this is for the date you were paid.
Property Address The new address is shown here. As this client moves or remortgages over the years the list of addresses will appear here, most recent mortgage at the top. When a new mortgage process is required then the ‘new’ button is selected.
Enter Contact Enter the initials of person who made the contact. First time initials are entered they form part of the drop down list thereafter The current date is always entered by default. Double Click if you need to change it. Details of your contact with client, lender, solicitor etc are noted in this section. Enter your notes then hit ‘enter’ on you keyboard. The method is selected from the list as shown below. T:V:L:F:E:C Solicitor confirms completion date of 3rd August
Next Contact By default the ‘Next Contact’ control is selected ready for your next prompt. 3rd August has been entered from the calendar control. Now enter some text to remind you why you have set that date. Contact solicitor to make sure completing today. Contact general insurers to put cover in force The note has been saved to your history list.
Proc Fee Also very important is the proc fee.If this is blank, a report can be generated to tell you which mortgages you are yet to be paid for. We will view the reports a little later. Today is the 3rd August and James McDonald’s mortgage has completed.The completion date has been entered and also the penalty expiry date.IMPORTANT The penalty expiry date is very important as it is part of the Marketing reports that will prompt you when this client should re-mortgage. During the mortgage process you can type a letter to your client. This tab takes you to to the letters screen. To find out if the client was happy with your service and to get some introductions to friends, family or colleagues, send the questionnaire. There is also a prompt to contact the lender on the 6th August.
Letters When the letter is complete, exit the memo pad here Also for each mortgage process is an extensive notes box for anything connected with this mortgage. Your letters are stored by the title. They can be retrieved and edited by selecting from the list. And the relevant information selected for addition to the letter.. You can format the text however you want. Standard letters you have in other software packages can be copied and pasted straight in to save re-typing. Leave the ‘Use Property Address’ blank to send to the current address. Put in a tick to use the new address. Double Click in the text box and a memo pad is launched. A new letter can be started here. Print the letter onto your headed paper
Notes Back to the mortgage details Use this box to make any notes about the current mortgage.For example you may want to detail the the interest rate, monthly payment and redemption penalty.Record employment details, income and any credit history that surfaced during this process.
Complete Mortgage The client has moved to their new property. We need to update the home address.
Copy Address The property address is now the home address. Click the ‘Copy Property Address’ button to complete the switch. Had this been a remortgage then the home address can be entered into this section by clicking the ‘Copy Home Address’ button As this client is a first time buyer, on completion of the mortgage you will need to update the property address to the home address A confirmation message asks if you want to proceed. Yes we do.
NPW Over the years that you use Mortgage Tracker you will build up a list of processes for each client. Over 25 years they could move and re-mortgage several times.The most recent process is always at the top of the list.You can revisit any process by clicking on the address. At any stage of the mortgage process there may be a problem that ends in termination of that process.Maybe the property was down valued or client was refused by this particular lender. All details of that process, however far it proceeded, can be stored on the database. If you are trying again with another lender, just start a new process. By clicking NPW (Not Proceeded With) the Lender and Adviser have a running total of cases against them. This makes it easier to identify, particularly against a lender, if they are failing at a particular stage. Put a tick in here to show it was NPW’d.Otherwise, leave this blank.
Archive But once you have arranged his remortgage you will start a new process on the system which will give you your ‘next contact’ prompts. Therefore you will need to archive this case so you don’t get any more prompts.Note: The reports for your statistics etc will not be affected by archiving the case – only the ‘next contact’ date is affected. At some point in the future you will need not need any prompts for this mortgage. For now there is a prompt date to give Jim a call a couple of months before the penalty expiry date. At this moment in time the answer is No because we need to be reminded that the penalty will expire in September 2003 Tick the Archive box and you receive a message asking you to confirm your action. Back to the Main Menu
Main Menu 3 As mentioned earlier, if you obtain an introduction to someone and they want to buy a property or re-mortgage when their penalty expires we still need to log the information so we don’t miss the opportunity.The Clients/Prospects button will take us to the same screen we used before but with slightly different options.
Prospect The main contact details have been entered the same as last time. From our notes we can see that we are not starting a new process until about November/December time So we click the prospect tag, then we can add a ‘Next Contact’ to the database. The source is a referral so we can track how effective we are at getting referrals Any data we have can be recorded in the ‘Prospect Info’ screen.
Prospect Info The screen is similar to the actual process screen. If it was a re-mortgage for example, you may want to record details of the current lender’s mortgage and property details.The redemption penalty date would also be useful to have. The notes tab is available for any other useful information. Whatever date you enter in here will appear on your prompt list when the day arrives. Enter a contact reason to remind you why you are calling. It could be 5 years from now. Even though these clients don’t have a mortgage currently and therefore no penalty, you can still put a date in here. There is a marketing letter generated from this date box.
Prospect Process All the information is entered and the time has arrived to convert this prospect into a client. 3rd November 2001 Back to Clients Create New Process
Prospect Convert Remove the tick from the Prospect tag Now you can start to process the new mortgage
Saved to Notes Whatever information you had relating to the prospects previous mortgage is stored here next to the relevant heading.Any contact history or next contact information is still held in the mortgage details tab. Back to the main menu