Header & Footer Inserting an Image Printing
90 likes | 183 Vues
Learn how to insert images in headers and footers in Word 2007 with step-by-step instructions. Enhance your documents with clip art and preview before printing.

Header & Footer Inserting an Image Printing
E N D
Presentation Transcript
Header & Footer Inserting an Image Printing Word 2007 Stacy Trujillo, CTE 433 NAU online
Header -Information that prints on the top of every page Footer- Information that prints on the bottom of every page. Open Word, then open 5A_Application_Letter_ To access the Header or Footer, you first need to click on the Insert tab.
Activity 5.10, pg 25 • Click on Footer button • At the bottom of the Footer Gallery, click Edit Footer • Notice – a new tab appears. This is called a contextual tab. This one is the Design tab for the Header & Footer. Think & Respond: What do you think would go in a Header or Footer?
Common Headers & Footers: Follow instructions 3 – 6 to complete the footer.
Insert an Image (Clip Art) • Click on the Insert tab • Click on Clip Art in the Illustrations group, a new window on the right side of the screen will open. • In the “Search for” box, type in Music • In the “Results should be” drop down box, only select Clip Art. • Click Go • Click on the Music Logo clip art image.
Inserting an image continued • You will notice the image covers the text. • Right click the image, click Format AutoShape • Click on the Layout tab • Under Wrapping Style, click In Line with text. (do not click ok yet!) • Now click on the Size tab. • Under Scale, click Lock aspect ratio check box. • In the Height box, reduce to 30% • Now click OK
Printing • Click on the Office Button • Let’s Print Preview first! Click on the Print Arrow, then click on Print preview. This helps you see how your document will print. • Click Close Print Preview • Click on the Office Button • Click Print • Select appropriate printer (Lab for this class) • Click OK
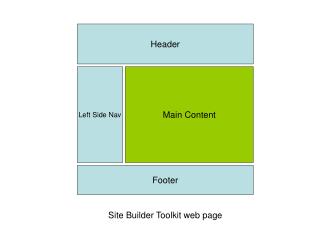
Concepts to remember: • A Header, prints on the top of every page, can be used for text such as a Company name • A Footer, prints at the bottom of every page, and can be used for page numbering. • Inserting Images (clip art) can add detail to your document. • Print Preview is helpful to see how your document looks before you actually print
Homework • Review Chapter 5 • Final project will be in class. You will follow detailed instructions to type a business letter.