Creating JSF/EGL Template Pages for Effective Web Site Design
190 likes | 223 Vues
Learn how to create custom template pages (JTPL and HTPL) using Page Designer software and integrate with EGL Server-Side UI logic for effective web design. Follow step-by-step instructions to build a customized template page with HTML tables, static graphics, text, and dynamic content. Enhance your web pages with consistent layout and elements.

Creating JSF/EGL Template Pages for Effective Web Site Design
E N D
Presentation Transcript
Creating JSF/EGL Template Pages This section describes how to create .JTPL (Java Template Pages) using the Page Designer software. And how to integrate with EGL Server-Side U.I. logic.
Effective Web Site Design with JSF and EGL • The elements of effective Web Site Design include: • .CSS file: • Covered earlier in this course, your shop’s .css will control all HTML text and color • Website-Navigation: • Covered in the EGL Foundation course, you will create a site-map for your application that provides an architect’s view of the user page-navigation experience. Note that you also may use the SiteMap to manipulate page/template assignment – and for prototypes, to create live page-links. • Template pages: • You will create your own .JTPL and .HTPL pages from scratch • Alternatively, you may want to start with the IBM template pages, just to learn some basic page design patterns
What is a Template Page? • A template is a special web page that allows you to create a customized page framework, that can consist of: .HTPL Template pages - Static text - Static graphics - HTML controls and a consistent page layout (typically through HTML tables and DIV tags) .JTPL Template pages - All of the above + - Dynamic text and graphics – available through EGL and JSF components - JSF Components • Once created, you may use Template pages to provide your EGL/JSF project web pages with: • A consistent look and feel • Boilerplate onConstruction processing – (.JTPL pages only) • Let’s have a look at a project Web Page that uses a custom .JTPL page
Our Target Web Page – with a Template Page Can you spot all the JSF and EGL elements here?
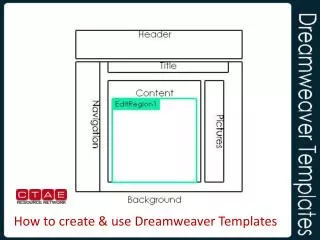
.JTPL Template Page Elements • HTML table 4 rows/3 columns • Top row: • Static Graphic • Static Text • EGL variable • 2nd row • Static text • Horizontal rule • 3rd row • An embedded HTML table – 3 rows/1 column • A custom menu • Static text • White background • 4th row • A boilerplate web footer Let’s follow the steps to build a custom template page like this!
Create a New Custom .JTPL Template Page • From Project Explorer, right-click over \WebContent\ and select: • New Web Page Template • Name the page template: • myTemplate • Note – do note type the .jsp extension you use on a web page (this is a template) • Check Design-time Template • Click Finish Note – you will get a warning to add a Content Area to the template. Which you will do, so just click OK to clear the warning and continue.
Create the JSFHandler for the Custom Template • Right-click over the template page and select Edit Page Code… • As you can see, you can add EGL to template pages to perform dynamic processing • Add the two statements shown here, to the boilerplate JSFHandler code: • Comments optional • Press Ctrl/S and close the JSFHandler (return to Page Designer)
Create a New Custom .JTPL Template Page – Add the HTML Table Your new template page will open in Page Designer, and you will get a warning to add a Content Area to the template. Content Areas are JSF tags that allow pages that use this template to add their own content (JSF components, EGL variables, etc.). All areas of a .JTPL outside of the Content Area will be “read-only” for pages that use the template. Add a 4X3 HTML table Width: 950 pixels
Create a New Custom .JTPL Template Page – Customize the Top Row In the top row of the HTML table (as shown below) add a: • Static Graphic (from the \WebContent\images\ folder) – (see notes on the File property) • Static text • Optionally customize the text size and font (we’re using Verdana) • An Enhanced Faces Component – Output text • Right-justify the right-hand cell
Create a New Custom .JTPL Template Page – Customize the 2nd Row In the second row of the HTML table (as shown below): • Select all three cells. Right-click and from the Table menu, join the selected cells • Make this new row’s vertical alignment top (from Properties) • From the Page Template drawer in the Palette, add a Content area • Modify the default text in the Content Area, and with the Static text shown below • Optionally customize the text size and font (we’re using Verdana) • Add a Horizontal Rule below the static text • Delete any superfluous blank links
Create a New Custom .JTPL Template Page – Customize the 3rd Row – 1 of 2 In the 3rd row of the HTML table (as shown below) do the following: • Select all three cells. Right-click and from the Table menu, join the selected cells • Make this new row’s alignment top (from Properties) • From the Page Template drawer in the Palette, add another Content area to the 3rd row • Inside the new Content Area add a 2nd HTML table: 1 row/2 columns, width: 100% • In the right-hand column of the row, add the text and line breaks as shown • The next slide details out how to build the vertical menu bar
Create a New Custom .JTPL Template Page – Customize the 3rd Row – 2 of 2 • In the left-hand column of the 3rd row: • Align top, and add a new Menu Bar component. From the menu’s Properties: The initial Orientation will be Horizontal. Select Vertical from the combo-box From -Items • Add 2 Output links. • Then add a Sub-panel with two more output links (you will need to click on the new sub-panels area to access -Items within the sub-panel). • When you’ve added the sub-panel, reselect the outer items area. • Add two more output links as shown in the screen capture • Select the “Non Showing Link” – and go to Properties/All Attributes. Specify the render property. Bind its value to the vis field in the JSFHandler (which will hide the Non Showing Link at run-time, when vis is false. • Add one more option (see picture below) • Note: you can customize the links as shown – make up your own link labels, etc. The details are not as important as having a menu on the page (and doing the rendered link is useful)
Create a New Custom .JTPL Template Page – Customize the Bottom Row In the bottom row of the HTML table (as shown below): • Select all three cells. Right-click and from the Table menu, join the selected cells • From some web site ( we’ve used IBM’s www.ibm.com ) copy down a graphic to insert into this new row. Note your \images\ folder may also have this graphic • Optionally center the graphic in the row
Customize the .JTPL Template Colors • Select the entire outer HTML table and specify: • Border: 0, Color: #E7E7E7 • Select the middle cell in the inner table, and make it white
Customize the .CSS Colors and Fonts It’s usually a good idea to get all of your page’s fonts and colors in agreement. Optionally do the following: • From \theme\ open stylesheet.css • Scroll down to find .headerClass • Change the fonts and colors to line up with your .JTPL’s • #E7E7E7 – background color • Verdana – font-family • Save your changes (Ctrl/S)
Create a New Web Page using the Custom .JTPL Template • Create a new Web Page, selecting myTemplate.jtpl
Create the JSFHandler for the Web Page • Right-click over the template page and select Edit Page Code… • Add the statements shown here, to the boilerplate JSFHandler code: • Note: Add the customers variable declaration • Press Ctrl/Shift/O – which resolves imports • Press Ctrl/S and close the JSFHandler (return to Page Designer)
Add the customers dataTable • From Page Designer/Page Data – drag and drop customers onto the page. • Create a read/only dataTable with only the first 5 columns • Optionally add a JSF Link to the LastName field *** SEE ADDITIONAL INSTRUCTIONS IN THE NOTES ***
Run the Page on the Server Note that none of the links will work, unless you’ve entered URL properties…