ISO/Motion
320 likes | 341 Vues
Learn what ISO is and how it impacts image quality. Discover the trade-offs of increasing ISO and how to choose the right setting for different shooting conditions. Explore techniques for freezing motion, panning, and creating subject blur.

ISO/Motion
E N D
Presentation Transcript
What is ISO? • ISO is the indication of how sensitive the image sensor (in the camera) is to light. • It is measured in numbers (you’ve probably seen them on films - 100, 200, 400, 800,1600, etc). The lower the number the less sensitive your camera is to light and the finer the grain. • Higher ISO settings are generally used in darker situations to get faster shutter speeds (for example an indoor sports event when you want to freeze the action in lower light) - however the cost is more pixilated shots.
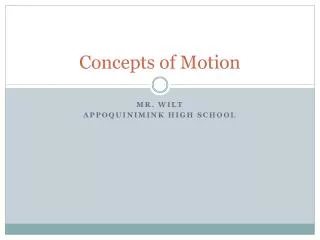
On the Left is 100 ISO/ On the right is 3200 ISO Notice how this photo is more pixilated?
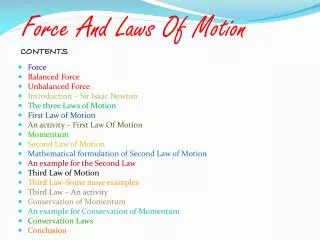
The photo to the left is using an ISO of 100. The bottom photo is an ISO of 800. These 2 photos are “Subject Blur” or “Ghost” photos. We will get to this in a moment… You can see how just by changing the ISO, and keeping the other settings the same, the photos get brighter or darker.
Choosing Your ISO • When choosing the ISO setting You need to ask yourself the following questions: • Light - Is the subject well lit to begin with? • Grain – Can you get by with a lower ISO and still get correct lighting? Less Grain? • Moving Subject - Is my subject moving or stationary?
Choosing Your ISO • If there is plenty of light and your subject is stationary you will generally use a pretty low ISO rating (100 – 400). • However if it’s dark and your subject is moving you might consider increasing the ISO as it will enable you to shoot with a faster shutter speed and still expose the shot well (800 – Hi1). • Of course the trade off of this increase in ISO will be noisier shots.
Situations where you might need to push ISO to higher settings include: • Indoor Sports Events - where your subject is moving fast yet you may have limited light available. • Concerts - also low in light and often ‘no-flash’ zones • Churches,etc- many churches or other establishments have rules against using a flash and of course being indoors are not well lit. • Hockey Games – The flash will reflect off the glass, therefore making it impossible to get good pictures. Change the ISO so you don’t have to use the flash.
Freezing the Motion • If you would like to freeze the motion of the subject along with the motion of the background, you should use a very high shutter speed (at least 250). • But there are other subjects you might find that will be moving unusually fast such as cars or thrown objects. If you would like to freeze a faster moving object you will probably need to use a shutter speed closer to 1,000 or faster. This shouldn't be a problem since you can go up to shutter speeds of up to 1/4000th of a second.
Panning/Implying Motion • Motion blur of just the background while the subject is clear. • This is a difficult technique that requires a lot of practice and skill. In this type of exposure the photographer uses a somewhat slower shutter speed and follows the subject with the camera at the same rate as the moving subject. Once the subject is directly in front of the photographer, you take the picture, and KEEP following with the subject. THEN after a bit slowly come to a stop.
Panning/ Implying Motion When done correctly, the subject is clearly in focus without blur while the background is blurred; giving the viewer the appearance of rapid motion. This is the most common method used by nature photographers and sports photographers when they want to show their subjects moving across a scene rapidly.
Subject Blur • If you would like to have a clear background while your subject blurs past with speed, you will have to use a tripod to keep the camera steady. Set your shutter speed to a VERY SLOW setting (SS: 1/15 or slower)! Remember that this will mean you need a higher F-Stop and probably a lower ISO. • Then simply take the picture while your subject either moves within the picture or across your picture. • If you don’t have a tri-pod, you just need something to steady your camera on (books, shelf, car hood, etc.).
Subject Blur • Again, this requires a tripod (or something to steady your camera on) and a very long shutter speed; probably multiple seconds long. • You can also set the self-timer so you don't have to hold the shutter button down and risk moving the camera. Then the camera takes the photo for you after 2 - 10 seconds so you don't have to hold it.
Subject Blur to make Ghosts! • One thing that is fun to do with Motion/Blur is make people look like ghosts! • The concept really isn’t that hard. You follow the same steps for Subject Blur (tri-pod, very slow shutter speed, background in focus, etc). Whatever your shutter speed is, have your subject sit or stand in the photo for half the time of the shutter speed. Then have them quickly get out of the photo. • If you are fast enough at leaving the photo, the camera will not be able to pick up the person leaving the photo. But it will have picked up the person standing/sitting for a few seconds.
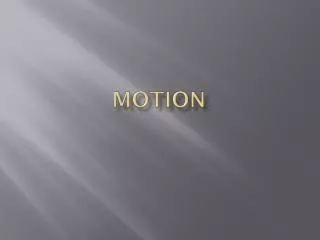
This ghost photo was taken out at a cemetery (my students were trying to make it scary). The shutter speed was at 5” (seconds), F-Stop – 22, and the ISO – 200. The girl stood in the photo for about 2 seconds, and then ran behind the tree. Since she was only in the photo for about 2 seconds, the camera couldn’t fully capture her. Thus, a GHOST PHOTO!
Motion/ISO Assignment • You are going to take 9 photos using the different types of motion in photography while seeing the changes in ISO settings: Freezing Motion, Panning Motion, and Motion Blur of Just the Subject. • Freezing: 200, 800, Hi1 Settings • Panning: 200, 800, Hi1 Settings • Blur the Subject: 200, 800, Hi1 Settings