
Erecting a Simple Scaffold: Step-by-Step Guide
This guide provides a detailed walkthrough for erecting a simple scaffold safely and efficiently. It covers the step-by-step process starting from measuring and setting up sole plates to erecting standards, ledgers, and transoms. Temporary supports are used initially, followed by the installation of proper braces for stability. The guide ends with the completion of the scaffold run. Following these steps ensures a sturdy and reliable scaffold structure, suitable for various construction tasks.

Erecting a Simple Scaffold: Step-by-Step Guide
E N D
Presentation Transcript
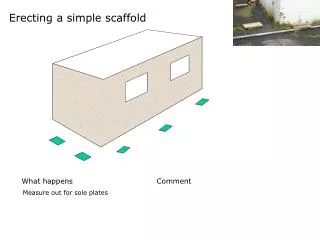
What happens Comment Erecting a simple scaffold Measure out for sole plates
Erecting a simple scaffold What happens Comment Erect two standards and a ledger. Brace into place with a temporary brace (light green in diagram).
Erecting a simple scaffold Erecting a simple scaffold What happens What happens Comment Comment Using the temporary brace (green) and a temporary standard (purple), erect two transoms and hang a new ledger from them
Erecting a simple scaffold Erecting a simple scaffold Erecting a simple scaffold What happens What happens What happens Comment Comment Comment The second ledger is put in in place and then new standards can be erected. After this stage, the temporary standard (purple) and brace (green) can be removed.
Erecting a simple scaffold Erecting a simple scaffold Erecting a simple scaffold What happens What happens What happens Comment Comment Comment Now with the temporary supports removed the proper braces are erected between the standards
Erecting a simple scaffold Erecting a simple scaffold Erecting a simple scaffold What happens What happens What happens Comment Comment Comment Finally, the extra standards and transoms are put in place to complete the first scaffold run.
Erecting a simple scaffold Erecting a simple scaffold Erecting a simple scaffold What happens What happens What happens Comment Comment Comment Going round the corner...