Download
1 / 13
130 likes | 211 Vues
This training presentation covers the properties of CO2 through hands-on experiments with dry ice, comparing it to water ice, observing fog formation, and testing acidity of water. It emphasizes safety precautions and engaging student participation in recording observations. The session includes demos on freezing water with dry ice and using CO2 as a fire extinguisher. Ideal for enhancing understanding of chemical reactions and physical changes.

E N D
Properties of CO2 Vanderbilt Student Volunteers for Science Training Presentation Spring 2013
Important!!! • Please use this resource to reinforce your understanding of the lesson! Make sure you have read and understand the entire lesson prior to picking up the kit! • We recommend that you work through the kit with your team prior to going into the classroom. • This presentation does not contain the entire lesson—only selected experiments that may be difficult to visualize and/or understand.
Before you begin… • One VSVS volunteer will fill the 16 6oz cups 1/3 full with water • Give each pair an instruction sheet (contains thermometer diagram back to back with instruction sheet). This is an outline of the lesson and includes the procedures students need to follow for their hands-on activities. You will still need to guide them through the procedures, and making sure they are completing the observation sheet. • SAFETY NOTE: Students should not hold pieces of dry ice. The temperature of dry ice is -78° C, and students could get frostbite burns if their skin is in contact with dry ice for more than a few seconds.
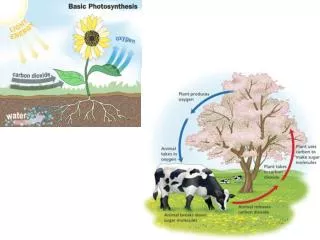
I. Introduction • What is CO2? • Discuss the cold temperature of dry ice • Discuss physical/chemical changes • Physical changes change the state or phase of the substance, not its chemical composition. • In chemical changes, a new substance is formed due to a chemical reaction • Demo: Put small pieces of dry ice in plastic dewar(wear gloves) • Place cup with ~5 mL water in dewar on dry ice, pack a few pieces around the cup - Wait until the end of the lesson to show results.
II. Comparing Dry Ice to Water Ice • Give a plate to each pair. • Using gloves, place a piece of Dry Ice in a small Ziploc bag for each pair and close the bag. • Also place a piece of water ice in a small Ziploc bag for each group, and close it. • Remind students that they should not touch the dry ice. • Ask students to describe the appearance of the two types of ice. • Ask students to observe both pieces of ice in the Ziploc bags for a few minutes. • Have students describe what happens and record their observations • Note: The Dry Ice Ziploc bag will inflate because of the CO2 gas being given off by the solid.
II. Comparing Dry Ice to Water Ice • Tell students to open the ziploc bags and carefully empty the pieces of Dry Ice and ice onto the plate. • Have one student in each pair push a small piece of Dry Ice and the piece of water ice around with a pencil. • Have students describe what happens. (Record observations on the Observation Chart.) • Compare the Dry Ice with the H2O ice. • Tell students to leave the two pieces of ice on the plate, do not move them, but observe them periodically to see what happens to the Dry Ice and the water ice over time.
III. Observation: Fog • Give each pair a clear plastic cup that is about one-third full of water. • Using gloves, a VSVS volunteer should place a small piece of Dry Ice into the cup. • Tell the students to start observing and recording their observations (as many as they can) as soon as the Dry Ice is added to the cup. • Have a VSVS volunteer ask each pair to share something they observed. Draw a picture of the cup on the board and recordthe observations.
III. Observation: Fog • Dry Ice gives off bubbles when it is added to water. • A white fog appears over the water in the top of the glass. • The white fog stays in the top of the glass and any white fog that leaves the glass goes down along the side of the glass rather than up into the air. • Fog that goes down along the glass disappears near the bottom of the glass.
IV. Carbon Dioxide and Water • Ask students to name some common acids and bases • Scientists can use indicators to test if something is acidic, basic, or neutral. • Hand out the Bromothymol blue color charts and tell the students to look at it. Basic Acidic Neutral
IV. Carbon Dioxide and Water • Tell the students you have bottles of water that are examples of rain water and distilled water • Pour the waters into the 2 labeled 10 oz. cups and add several drops of BTB indicator until there is an obvious color. • Ask students to look at the BTB color charts and label the waters as acidic, basic or neutral. • Ask the students: Can they guess why rainwater is more acidic than distilled water?
V. Finish Earlier Demo: Freezing Water with Dry Ice • Check cup of water in dry ice to see if it is frozen. Show students the frozen water in the cup.
VI. (Optional) Demo: CO2 as a Fire Extinguisher • Place a small candle on a safe surface (aluminum pan) and light the candle. (You may need to place a chair on a table so the candle will be visible to students.) Place a few pieces of dry ice in a cup. • Ask students to predict what will happen when CO2 gas from the Dry Ice touches the candle. • Hold the container of Dry Ice near the candle and let the CO2 gas float onto the candle to extinguish it. (You may need to tilt the container so the CO2 will float down to the candle.) • Ask students, Why did the flame go out? (CO2 is a good fire extinguisher because CO2 is heavier than air. The CO2 deprives the candle of the oxygen needed to keep it burning. This causes the flame to be extinguished.) • Have students record observations on their observation chart.
VII. Review • What is CO2? • What does CO2 look like? • What does sublimation mean? • What is dry ice? • What happens when dry ice is dropped into water?