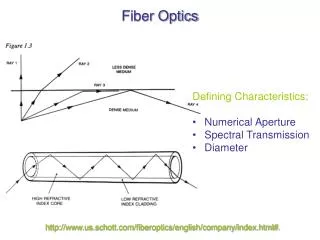
Fiber Optics
Fiber Optics. EPOXY/POLISH TERMINATIONS. Fiber Optics. A WORD OF CAUTION WHEN TERMINATING FIBER. THERE ARE SPECIFIC SAFETY PROCEDURES THAT NEED TO BE FOLLOWED. Fiber Optics. FIBER OPTIC SAFETY RULES : KEEP ALL FOOD AND DRINKS OUT OF THE WORK AREA ALWAYS WEAR SAFETY GLASSES .


Fiber Optics
E N D
Presentation Transcript
Fiber Optics EPOXY/POLISH TERMINATIONS
Fiber Optics • A WORD OF CAUTION WHEN TERMINATING FIBER. • THERE ARE SPECIFIC SAFETY PROCEDURES THAT NEED TO BE FOLLOWED.
Fiber Optics FIBER OPTIC SAFETY RULES: • KEEP ALL FOOD AND DRINKS OUT OF THE WORK AREA • ALWAYS WEAR SAFETY GLASSES. • DO NOT TOUCH YOUR EYES OR FACE WHILE WORKING WITH FIBER, ESPECIALLY DURING THE CLEAVING PROCESS.
Fiber Optics FIBER OPTIC SAFETY RULES: • PUT ALL CUT FIBER PIECES IN A SAFE PLACE, SUCH AS ON TAPE OR IN A CONTAINER. • THOROUGHLY CLEAN THE WORK AREA WHEN YOUR DONE. • BE CAREFUL TO NOT GET A SPLINTER. THESE SPLINTERS CAN TAKE MONTHS TO WORK THEM SELVES OUT.
Fiber Optics • Multimode connectors are usually terminated in the field. • Multimode fiber that is terminated in the field is 900um which means we can put a connector right on the fiber strand. • Singlemode (250um) connectors are usually factory installed and factory pigtails are field spliced using a fusion splicer..
Fiber Optics • EPOXY/POLISH: • Oven cured- uses an oven to cure the epoxy • UV cured- uses a UV light to cure the epoxy • 24 hour air cure
Fiber Optics • ANAEROBIC: • Uses an epoxy in the connector • The fiber strand is dipped into a curing agent then inserted into the connector. • The accelerant cures the epoxy in seconds and is then ready for polishing.
Fiber Optics • HOT MELT: • Similar to oven cure, it’s a 3m trademark. • The connectors are pre-loaded with epoxy. • They are heated then the fiber is pushed into the connector and polished.
Fiber Optics • ADVANTAGES of these methods: • Very reliable • Has the lowest loss <0.5db • Connectors are cost effective • THE DISADVANTAGE IS THAT THEY ARE LABOR INTENSIVE AND THE CONSUMABLES ARE EXPENSIVE.
Fiber Optics • The epoxy/polish, anaerobic and 3M hot melt termination methods are all very similar, they all require some type of epoxy and curing method. • All three also require a polishing/sanding procedure as well.
Fiber Optics • The epoxy polish fiber termination kit has everything needed to terminate indoor and OSP fiber. • It also has the oven for curing the epoxy, a glass plate to polish connectors, a scope to view the connector ends.
Fiber Optics • It should be noted that all these methods of terminations require a consumables kit. • Typically a consumables kit contains everything needed to terminate connectors……………..
Fiber Optics CONSUMABLES: • Fiber wipes • Alcohol wipes • Syringes • Needles • Epoxy or anaerobic adhesive • Polishing paper • Directions and MSDS sheets • Possibly a trash bin container for glass shards.
Fiber Optics • Of course you will also need the connectors. • You can not terminate fiber without a consumables kit. • You will also need alcohol and wipes. THE ALCOHOL MUST BE 91%, A RED LABEL IF BUYING IT AT A STORE.
Fiber Optics • The epoxy polish method is the oldest method of terminating fiber, there have been several advances in termination methods over the years which will be discussed in another lesson. • Interestingly enough the polishing method of terminating fiber has been making a come back because of the reliability and low loss it provides.
Fiber Optics • Getting started with the termination process: • Choose your connector type. SC ST
Fiber Optics • Gather consumables.
Fiber Optics • Set up the termination station, plug the oven in so it preheats.
Fiber Optics • When setting up it is very important to take a long strip of electrical tape and loop so that the sticky side is up, then stick it to the table. • When you cleave the fiber ends all of the waste glass shards are stuck to the electrical tape. • It is very important to retrieve all glass shards.
Fiber Optics • Prepare your fiber strand for termination. BE SURE TO SLIDE THE BOOT ON EXPOSE APPROXIMATELY ONE AND HALF INCHES OF STRIPPED FIBER . THE BUFFER MUST BE STRIPPED OFF, IT WILL LOOK LIKE YOU ARE SCRAPPING A RESIDUE OFF THE GLASS.
Fiber Optics • Prepare the two part epoxy, it comes in a foil package. Pull the plastic divider off (slip it off side ways). Use the plastic divider to knead the clear and blue epoxy together. Make sure it all turns blue and is well mixed.
Fiber Optics • Unscrew and remove the syringe cap and pull the plunger out, then screw a needle onto the syringe. Cut the corner of the epoxy package and squeeze epoxy into the syringe. Hold the syringe side ways to allow air in so the epoxy will flow to the end. Install the plunger back into the syringe and force the air out.
Fiber Optics • Insert the needle into the connector and fill it with epoxy. You should see a little bead of epoxy come out of the end of the ferrule. Then slowly back the needle out while still inserting epoxy into the connector. Try not to over fill the connector, you don’t want epoxy to come out of the end of the connector. A BEAD OF EPOXY SHOULD BE VISIBLE AT THE END OF THE FERRULE ( A LITTLE BEAD)!
Fiber Optics • Wipe the stripped fiber with alcohol and insert the fiber into the connector. NEVER BLOW ON THE END OF THE FIBER IT CONTAMINATES IT WITH VAPOR FROM YOUR BREATH.
Fiber Optics • When inserting the fiber into the connector, this may force a small amount of epoxy to come out of the end. Push the fiber in until it stops. You should have at least half an inch of fiber sticking out of the end of the connector. Slide the boot on and place it in the oven.
Fiber Optics • It will take approximately 15 minutes for the epoxy to cure, if the too much exposed fiber sticks out of the connector ferrule it may break when you place it in the oven.
Fiber Optics • After the epoxy is cured you will have to cleave the exposed fiber end. The key here is to lightly score it don’t try to cut it off. SCRIBE TOOL FIBER STRAND AFTER SCRIBING YOU SHOULD BE ABLE TO LIGHTLY PULL UP AND THE GLASS SHARD WILL COME OFF. IF IT DOESN’T SPIN THE CONNECTOR 180 DEGREES AND LIGHTLY SCRIBE IT AGAIN, IT WILL PROBABLY BREAK OFF. EPOXY CONNECTOR
Fiber Optics • When scribing the fiber end it is a good idea to keep your elbows on the table to steady your hands. • Be careful not to break the fiber off, if this happens it may cause a glass fracture to travel down into the connector which means you won’t be able to polish it out.
Fiber Optics • If your terminating fiber using the anaerobic method the process is the same except after you load the connector with epoxy you simply dip the cleaned fiber end into the curing solution and insert the fiber into the connector. • If you are too slow it will cure before you get the fiber all the way thru, which means you will have to start over.
Fiber Optics • Before actually polishing the fiber end it is a good idea to air polish the fiber to get the rough cut end down to the epoxy bead. • Doing this eliminates glass fractures.
Fiber Optics • Set up the glass polishing plate and place the polishing film on it. Locate the polishing puck and insert the ferrule into the puck.
Fiber Optics • The next step is to polish the fiber. This will be done on a glass plate (it provides a perfectly flat surface). You will place the coarsest polishing film on the plate and lightly start polishing in a figure 8 pattern. THE SHINNY SIDE OF THE POLISHING FILM FACES DOWN, YOU POLISH ON THE NON SHINNY SIDE. POLISH THE CONNECTOR UNTIL THE BLUE BEAD IS ALMOST GONE. DO NOT OVER POLISH.
Fiber Optics • You will replace the coarse film with a smoother film and polish in a figure 8 pattern for another 6 figure 8s and then onto the third polishing film the least coarsest and polish for another 6 figure 8s. • Clean the end of the ferrule in between each polishing film.
Fiber Optics • You will use the scope to see how your progress is developing from the polishing process.
Fiber Optics • If everything went right your connector will look like the one in the photo. What you’re seeing is the core and the cladding, the cladding does not get stripped off. VIEW THRU A FIBER SCOPE
Fiber Optics • If there is still epoxy on the connector it will be noticeable and you will have to carefully polish the connector some more. YOU SHOULD SEE A BLUE EPOXY COLOR
Fiber Optics • If the connector is cracked or fractured you can try to polish it out but once you no longer see any epoxy at the end of the ferrule and you still have a crack or fracture then the connector is lost, due over.
Fiber Optics • Once you have both ends polished and looking good it is time to move on to testing the fiber optic strands. • Testing will be covered in another lesson. • The end caps that come with the connector should be placed back on to protect the polished end
Fiber Optics • All manufactures and vendors provide information on how to use their equipment to terminate different types of optical fiber cabling. • YOU SHOULD SAVE THE TERMINATION SHEETS FOR YOUR REFERENCE LIBRARY.