Download
1 / 38
390 likes | 519 Vues
This guide covers the three essential elements of exposure in photography: ISO, aperture, and shutter speed. ISO measures the sensor's sensitivity to light, aperture controls the amount of light entering the lens, and shutter speed dictates how long the sensor is exposed. Additionally, it discusses color temperature and white balance, along with types of lighting, including ambient, artificial, diffuse, and direct light. Learn how to manipulate light and exposure creatively to achieve stunning photographic results, and the importance of mood and lighting direction in setting the scene.

E N D
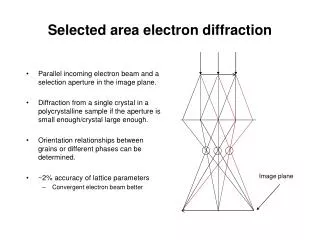
There are three elements to exposure: ISO, aperture, and shutter. • ISO in digital cameras is the measure of the digital sensor’s light sensitivity; in film cameras it is the film speed. • Aperture is the hole in the lens that allows light through. The larger the hole, the less depth of field you will have. Aperture is measured in F-Stops, where the smaller the number, the bigger the opening. • Shutter speed is how fast the shutter opens and closes to create an image. The longer it is open, the more light that is let into the lens.
Units called Kelvin are a standard method of describing colour temperatures in any situation. • The “warmer” the colour looks, the lower its number on the Kelvin Scale
The process of removing unrealistic color casts so that objects which appear white in person are white in a photo • Proper camera white balance has to take into account the "color temperature" of a light source, which refers to the relative warmth or coolness of white light
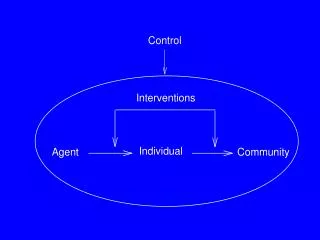
Ambient Light The available natural light completely surrounding a subject. Light already existing in an indoor or outdoor setting that is not caused by any illumination supplied by the photographer i.e. not by artificial light source.
Artificial Light Light from a man-made source, usually restricted to studio photo lamp and domestic lighting.
Diffuse Lighting Lighting that is low or moderate in contrast, such as on an overcast day.
Direct Light Light that is shown on the subject could be natural or artificial.
Fill Light Light that is bounced into a scene.
Light Direction Above left right and bottom, and backlit.
The main difference between straight and artistic lighting is mood. Mood-setting moves beyond technical photo terms and into creative light design. It's not hard to do if you know how to control three basic lighting components: key, contrast and color. First you need to be clear about exactly which mood you're after: sunny, dreamy, desolate, scary, etc. For instance, midnight lighting is equally dark, blue and contrasted for both strolling lovers and lurking vampires.
Hard Light: You create hard lighting primarily with a spotlight type source. The outcome of the light is highly directional and the light rays are almost parallel. Because the light beams are somewhat parallel, they can be interrupted by lighting equipment like a “barn door” or a flag (a large black rectangle held in place by a stand). This creates a relatively sharp, straight shadow where the light path is interrupted.
Soft Light: All soft light sources are large, ranging from somewhat large to extremely large and their light is not aimed by anything precise. Soft light is a light that gives the illusion of wrapping around the object of focus, and it creates a very soft edge. Soft light depends on 2 main factors; distance and the size of the light source. The closer and larger the light source, the softer the edges. The softness of the light can also be depicted on the angle of the light. The larger the angle, the softer the light.
Snoots- metal cylinders with open ends, usually painted black, are used to limit the size of the circular area projected. Short, wide snoots give a large circle of light; long, narrow snoots give a small circle of light.
Umbrellas - working as reflectors on flood lights, they convert harsh light into soft, diffused light. Metalized umbrellas throw a somewhat directional light, but the light is softer and spread over a larger area than the light emitted by the original light source.
Diffusers - similar to umbrellas, these are made of translucent or mesh materials that, when placed in a light beam, break up or diffuse and soften the light.
Barn Doors - made for spotlights and floodlights, these accessories can be positioned to block or feather a portion of light.
Lens Hoods - these prevent lens flare from happening, which happens when a direct light source, such as sun or strobe, is present.
Built into the camera • Small and not very powerful • Point light sources, which means a very harsh light quality • Adequate light for 15 feet
More powerful and used for bigger distances • Colour temperature is the same colour of daylight’s temperature • Has ability to tilt and swivel which gives it flexibility bouncing the light from the flash
Cameras can continuously measure the light reflecting from a subject • This reading can help to automatically set a shutter speed and aperture for the correct exposure in that lighting situation when you press the shutter button halfway down
When shooting outdoors, you must pay special attention to the lighting since you can’t control it. You must position your subject according to the direction of light, so that the subject doesn’t appear washed out and to prevent unwanted shadows. There are three directions of light: • Front Lighting - when the sun is behind the photographer; this often makes the photo appear flattened, doing nothing to bring out detail or show depth • Back Lighting - when the sun is in front of the photographer; this technique is suggested when shooting people, as it reduces the amount of squinting, as well as when shooting silhouettes • Side Lighting - when the light is coming from any direction other than directly in front or behind of the photographer; often emphasizes texture and form
Front Light Side Light Back Light
If the light is bright and sunny and comes directly through the window, the amount of contrast can be difficult, but not impossible to deal with • If the window is in the shade, light can make great portrait and interiors, but the amount of light is limited • Two types of light can come through a window: direct (hard) and diffused (soft)
Tungsten light bulbs are very warm and can be used in many situations but are limited because of their relative low light output • When shooting in incandescent lighting, setting the white balance to incandescent will add a blue filter to the images to get a truer colour
Appears very green in colour to the digital sensor • When white balance is set to fluorescent, it adds a magenta filter • It is very common in public buildings
Portrait photography can be more difficult than other types because the subject is not still – expressions are always changing • Generally, a larger aperture (smaller number) is used to get a sharp subject and blurred background • A large aperture also good for faster shutter speed because more light is let into lens - important for kids especially • The “Aperture Priority” setting is a good choice for portraits so you can always have a shallow depth of field - just make sure light doesn’t get too low or else the shutter will be too slow to be focused without a tripod!
Direct sunlight can create shadows under the eyes and across the face • Look for open shade, for example, the shaded side of a building • In open shade, people are less likely to squint and light appears more diffused • Keeping subjects at the edge of the shade shows light direction and keeps texture in the face • In mottled sunlight, be sure that deep shadows don’t fall over the face
Models can move, and sunlight is always moving; always monitor your light • Overcast days can work because it creates a soft overhead light • If no shade is available, you can turn subjects so the sun is behind them, but that can cause bright areas on head and shoulders • Shade the lens to prevent lens flare • Meter light around the face or else the face may turn out too dark
Use a reflector to bring light into shadows (a piece of white cardboard, a light coloured shirt, a commercial reflector, etc.) • Flash can be used even in situations where light is sufficient to even out the exposure and add sparkle and shine to hair and eyes • On an overcast day, set white balance to cloudy to give a warm tone • Using black and white and a bit of fill flash can be good in overcast situations
Panning • When you move your camera to follow a moving subject while taking a photo • The result is your subject in focus and the background blurred to show motion
Landscape Lighting • Bring a tripod even on a sunny day – you'll want to have a deep depth of field (a smaller hole for light to get through) which means you'll need a longer shutter speed • A polarizer can take glare off water and other reflective surfaces, and filters that fit over your lense can increase contrast and even out exposure
Night Landscapes • A tripod is a necessity to reduce blur – nighttime photography calls for slow shutter speeds • A flashlight can be used to allow enough light to focus in on the scene before taking the picture • Rear curtain flash can be used as it goes off at the end of a long exposure and can add extra light