Download

1 / 55
550 likes | 730 Vues
Electronic Timesheet Training 2014. Payroll Department Introduction. Mary Lou Ardell pays all states except NY. Mike Gerko pays Central and NY. Jon Dubner processes all mileage requests.

E N D
Payroll Department Introduction Mary Lou Ardell pays all states except NY. Mike Gerko pays Central and NY. Jon Dubner processes all mileage requests. Michelle Yohon assists in payroll functions, provides technological support and performs accounting duties. Sandy Gallagher and Diane Ventrella pay Senior Employment Corporation participants.
The purpose of our discussion today: • Introduction of Electronic Timesheets utilizing ADP’s ezLaborManager • Requesting Mileage Expense Reimbursement • Answering Payroll Related Questions
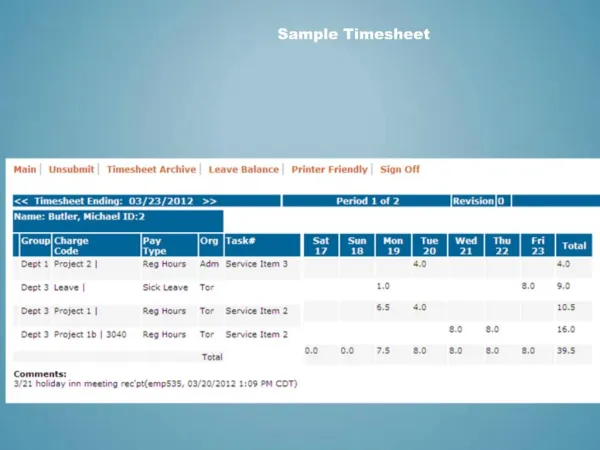
What is ezLaborManager? • Web based timesheets • An easier way to enter your timesheet • A quicker way for supervisors to approve timesheets • It eliminates the need for paper timesheets
Electronic Timesheet Instructions Create a Shortcut for ezLabor Manager: • Access the Internet by opening the Internet Explorer program • Go to the following address: http://ezlm.adp.com
Right click on your mouse on the link on the web page and select Add to Favorites. • Then the following screen appears: • Click Add
Click on Favorites and Right click on ADP ezLaborManager then select Copy and go back to your Windows desktop and on any empty space Right click and paste.
Double Click on the ADP ezLaborManager Icon now created on your desktop. • Enter the Client Name or ID: RuralOpps The Client Name or ID is case sensitive. • Click on the Submit button when Company Name has been entered.
Key in your User ID – first initial of first name with last name all in lower case (in most cases). Your password will be provided by Payroll. For example, Anthony Albright is aalbright for User ID. See the List of User ID’s and passwords provided by payroll. Call or email if you have two last names or any difficulty logging in.
You will be prompted to change your payroll provided password upon login. • Key in your payroll provided password for old password • Press the tab key and key in your new password. The password must be a minimum of 8 characters and a maximum of 30 characters; it is case-sensitive. Please make sure to keep your password in a safe place for future reference. If you can’t remember your password please contact payroll to have it reset.
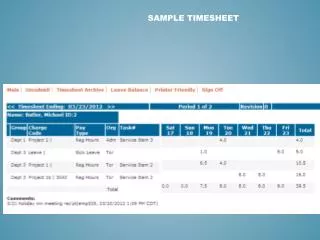
Next you will see the screen below • Click on My Timecard • Click on the drop down arrow next to Pay Date Range: to indicate either Current Pay Period or Next Pay Period or custom dates. Depending on when you are entering time into your timesheet. Check the dates that automatically populate to be sure you are in the correct pay period.
Y/R Exempt Employee Example: • Start by clicking the cell in the Hours column next to the day that you want to put hours into. Enter the number of hours that you want to be charged to a particular grant for that day. If you only charge to one grant then you will put all of your work hours in the one cell. If you have several project codes to charge to then you will put partial work hours in that row. • If the hours are work hours then no Earnings Code is needed. But if they are personal leave, special leave, holiday time, etc. then you MUST pick an earnings code by clicking in the earnings code box then by clicking on the magnifying glass.
Y/R Exempt Employee Example Continued: • The Office Code will be pre-populated based on your current processing group/office. Only make changes to the office code if you change offices and need other project codes that are not listed for your office code. If you need to change the office code click on the Office box then click on the magnifying glass and pick the appropriate one. • Next you will click on box under Project then click the magnifying glass to select your project code. If you do not see your project code listed it’s possible that the code is listed in another office code or that it may need to be added to the list of codes for your office or it has been discontinued. Please contact payroll if you need a project code added or removed. You cannot leave the Project field blank
Exempt Employee Example Continued: • If you have Non Work Hours for one of your days (CYLV, PYLV, HOLI, NONDIS) then you must pick NonWrk in the Project field. You cannot leave the Project field blank. • If you have Special Leave then you must pick SPECIAL in the earnings code and SPEC for the Project field. Please click on the yellow post it note to the right of Project field and let us know what the special leave was for. Ex: Jury Duty, Military Leave, Child Rearing Leave or Bereavement (include family relationship).
Y/R Exempt Employee Example Continued: • To save your hours you must click the save button on the top or bottom of the screen. • After you have saved your information into ezLM then you can click the red Exit button in the top right corner of the screen. Then close the internet explorer window.
Fixed Distribution Employee: • Start by clicking the cell in the Hours column next to the day that you want to put hours into. Enter the number of hours for that day. Because you have a fixed distribution all of your hours will be split according to the distribution in payroll. • If the hours are work hours then no Earnings Code is needed. But if they are personal leave, special leave, holiday time, etc. then you MUST pick an earnings code by clicking in the earnings code box then by clicking on the magnifying glass. • The Office Code will be pre-populated based on your current processing group/office. • If you have Non Work Hours for one of your days (CYLV, PYLV, HOLI, NONDIS) then you must pick NonWrk in the Project field. • If you have Special Leave then you must pick SPECIAL in the earnings code and SPEC for the Project field. Please click on the yellow post it note to the right of Project field and let us know what the special leave was for. Ex: Jury Duty, Military Leave, Child Rearing Leave or Bereavement (include family relationship). • To save your hours you must click the save button on the top or bottom of the screen. • After you have submitted your information into ezLM then you can click the red Exit button in the top right corner of the screen. Then close the internet explorer window.
Y/R Non-Exempt (Overtime Eligible) Employee: • Start by clicking the cell in the Hours column next to the day that you want to put hours into. Enter the number of hours that you want to be charged to a particular grant for that day. If you only charge to one grant then you will put all of your work hours in the one cell. If you have several project codes to charge to then you will put partial work hours in that row. • If you have overtime it will be automatically calculated for you. You will need to ensure though that it is charged to the particular project code that incurred the overtime. • If the hours are work hours then no Earnings Code is needed. But if they are personal leave, special leave, holiday time, etc. then you MUST pick an earnings code by clicking in the earnings code box then by clicking on the magnifying glass. • The Office Code will be pre-populated based on your current processing group/office. Only make changes to the office code if you need other project codes that are not listed for your office code. If you need to change the office code click on the Office box then click on the magnifying glass and pick the appropriate one. • Next you will click on box under Project then click the magnifying glass to select your project code. If you do not see your project code listed it’s possible that the code is listed in another office code or that it may need to be added to the list of codes for your office or it has been discontinued. Please contact payroll if you need a project code added or removed. You cannot leave the Project field blank. • If you have Non Work Hours for one of your days (CYLV, PYLV, HOLI, NONDIS) then you must pick NonWrk in the Project field. You cannot leave the Project field blank. If you have Special Leave then you must pick SPECIAL in the earnings code and SPEC for the Project field. Please click on the yellow post it note to the right of Project field and let us know what the special leave was for. Ex: Jury Duty, Military Leave, Child Rearing Leave or Bereavement (include family relationship). • To save your hours you must either click the save button on the top or bottom of the screen. • After you have submitted your information into ezLM then you can click the red Exit button in the top right corner of the screen. Then close the internet explorer window.
Seasonal Employee: • Start by clicking the cell in the Hours column next to the day that you want to put hours into. Enter the number of hours that you want to be charged to a particular grant for that day. If you only charge to one grant then you will put all of your work hours in the one cell. If you have several project codes to charge to then you will put partial work hours in that row. • If the hours are work hours then no Earnings Code is needed. But if they are personal leave, special leave, holiday time, etc. then you MUST pick an earnings code by clicking in the earnings code box then by clicking on the magnifying glass. (Choose SPERSONAL, SSPEC or SHOLIDAY for Seasonal Emp.) • The Office Code will be pre-populated based on your current processing group/office. Only make changes to the office code if you need other project codes that are not listed for your office code. If you need to change the office code click on the Office box then click on the magnifying glass and pick the appropriate one.
Seasonal Employee: • Next you will click on box under Project then click the magnifying glass to select your project code. If you do not see your project code listed it’s possible that the code is listed in another office code or that it may need to be added to the list of codes for your office or it has been discontinued. Please contact payroll if you need a project code added or removed. You cannot leave the Project field blank. • If you have hours for one of your days that is SPERSONAL, SSPEC or SHOLIDAY then you must pick your project code in the Project field. You cannot leave the Project field blank and as a Seasonal Employee the grant gets charged for those types of earnings codes as well. For overtime hours see Non Exempt Y/R. If you have Special Leave then you must let us know what the special leave was for.Please click on the yellow post it note to the right of Project field and enter info. Ex: Jury Duty, Military Leave, Child Rearing Leave or Bereavement (include family relationship). • To save your hours you must click the save button on the top or bottom of the screen. Then you can click the red Exit button in the top right corner of the screen. Then close the internet explorer window.
Error Messages: • If you receive an error message look for a symbol and then hold your mouse over the symbol for an explanation. • The Yellow Triangle with an Exclamation Point means Processed with Warnings. This causes no problems for your timesheet. • The Blue Shield means Unprocessed which causes no problems. • The Red Circle with the Yellow Exclamation Point can mean various different problems. It can include an improper earnings code, office code or project code. Usually this occurs if you typed in the code rather than clicking on the magnifying glass to select the code. All codes are case sensitive. • It’s also possible you may have entered information into a line then deleted it using the keyboard. You must click the box under the Select Column on the far left. Then click Delete at the bottom of the page for any line that you want to remove completely. Don’t do this unless you don’t mind losing the info on that line.
Error Messages Continued: • This message could mean that you changed two or three things at once and didn’t save them properly. Try deleting the last line that you did and re-entering it. To delete a line select the line. Click on the delete button then click on save. Then click OK to delete line.
Tips: • When moving from cell to cell use the tab key. Don’t forget to save the data when you are finished so that the information will be processed. The timesheet will be available for changes till payroll locks the pay period Monday at 12pm of the week that you get paid. • Clicking on the Preferences tab in the top left corner allows you to change some of the settings. You can change the lines per day by clicking on this. Which would be helpful if you have several project codes to charge to each day or if you want to make it just one line. Don’t change to Hide Unscheduled Days as all of the days will disappear. • If you need an extra line for a day then Hit the + key by the day and another line will appear or you can click the Insert button on the bottom of the page. • For Non-Distributed Hours - Add a line if an empty one isn’t available for the day. Enter hours then click on the Earnings Code box then click on the magnifying glass for earnings code NONDIS. Then pick the NonWrk code under Project. • You may also use the Request Time Off button instead of the paper request for personal/special leave form. Click on the Request Time Off button and fill out the form then your supervisor will be notified of the request. Then they may request more information, approve the request or deny the request.
Deadline Changes: • TIMESHEETS WILL NOW NEED TO BE SUBMITTED BY THE EMPLOYEE AND APPROVED BY THE SUPERVISOR FOR A DEADLINE OF MONDAY AT NOON DURING THE WEEK YOU GET PAID. • YOU CAN SUBMIT YOUR HOURS DAILY OR WAIT TILL THE PAY PERIOD IS OVER TO SUBMIT THEM. BUT THEY MUST BE READY FOR PAYROLL TO PROCESS BY MONDAY AT NOON OF THE WEEK THAT YOU RECEIVE YOUR PAYCHECK ON FRIDAY. • IF YOU FAIL TO MEET THIS DEADLINE THEN YOU WILL BE RESPONSIBLE FOR TURNING IN A PAPER TIMESHEET TO PAYROLL ASAP.
Mileage Instructions: • MILEAGE WILL NEEDS TO BE SUBMITTED ON THE STATEMENT OF AUTOMOBILE EXPENSES BY THE EMPLOYEE AND APPROVED BY THE SUPERVISOR FOR A DEADLINE OF MONDAY AT NOON DURING A PAYROLL WEEK. • Due to the electronic timesheet system, ezLaborManager, we are utilizing a separate mileage sheet. • The Statement of Automobile Expenses is an Excel spreadsheet that can be completed in Excel, printed, signed and turned in. Or it may be printed, filled in, signed and turned in.
Fill in your employee number, the pay period dates then your name, office name and pay period #. • Complete the next section as you normally did on the back of your paper timesheet. Please ensure that you provide an accurate description of where you went to and from along with a purpose. For example: Central office to Sam’s Club in Henrietta and back to Central office - to purchase office supplies. • Be sure to include the starting and ending odometer readings noting that it’s not necessary to calculate tenths of a mile. If you do use tenths of a mile you must use them throughout the odometer readings and the miles traveled. • You MUST put the Grant Number or Project Code at the top of the column and designate each trip to a project code. • If you have tolls or parking you must attach a receipt or copy of your EZPass Toll Statement. If you lost your receipt or paid a parking meter then please write a note explaining that. Tolls/Parking receipts need to have an explanation as to their purpose.
If tolls/parking receipts are not associated with a trip that you are claiming mileage for then please be sure to still put the date and purpose/location on a line with the toll/parking amount. Example would be if you drove the company car. • Total your miles for that timesheet • Calculate the total miles times the current mileage rate • Add in your tolls/parking • Add in any totals from another page of mileage expenses • Tally up the total reimbursements • Sign and Date your Statement of Automobile Expenses • Give to your supervisor to also sign and date then forward to Jon Dubner in the finance department. Jon can be reached at 585-340-3372 or jdubner@pathstone.org • Your Mileage Will Not Be Paid Until Your Statement of Automobile Expenses is Received in The Finance Department and Your Supervisor MUST have signed it in order for payroll to process it. Checks are cut the Tuesday after the pay day Friday then mailed to the offices.
Here is an example of a Statement of Automobile Expense filled out:
Here is an another example of a Statement of Automobile Expense filled out:
It is acceptable to list several trips with combined mileage if they are all work related and on the same day. See below for example:
Supervisor Instructions: • Follow the directions on the Electronic Timesheet Instructions first to create a shortcut for ezLabor Manager, then setup your password and login. • After you login you will see the following screen:
To Approve Timesheets as a Supervisor: • Click on the drop down arrow next to Employee Services and pick Supervisor Services.
Click on the Group Labor Tab • Click on the Default Filter Icon • Click on New • Highlight Supervisor in the Choose Items to Filter On Field then use the right arrow button to move it over. • Highlight First Name in the Choose Sort Order then use the right arrow button to move it over.
Highlight Supervisor in the Choose Items to Filter On Field then use the right arrow button to move it over. • Highlight First Name in the Choose Sort Order then use the right arrow button to move it over. • Click Next then give your filter a name. For Example: My Employees. Then click the + to add your employee number as the supervisor. • Find your employee number then click on the blue line. You can also search by last name (click on column & change it to Last Name) or first name instead of emp. # • Then click the Save button.
Click on the blue name of your custom filter to apply the filter. • Now you will notice that where it previously had Default Filter it is now set to your Custom Filter (in this example Michelle’s Employees). We recommend doing this as it will ensure that you are seeing all of your employees that you need to approve timesheets for. If upon creating this filter you find that you are either missing employees or you have extra employees listed please contact the payroll department to get it straightened out. • In the event that you are unable to approve the timesheets for the employees that you supervise we have enabled your supervisor to do so.
Use the arrow keys next to the filter to move alphabetically through your employees.
You may wish to change the Pay Date Range: to indicate either Current Pay Period or Next Pay Period. Depending on when you are approving time for on the timesheets. Check the dates that automatically populate to be sure you are in the correct pay period. • Next you can either click the box Supervisor Approval at the top to select all of the days or you can click each day individually to approve. • Then click Save
Timesheets Approvals as a Supervisor: • If any changes need to be made to the hours, earnings code, office or project code you can make these changes now. You will need to make the change then save it then refresh the screen (use FIND button) then you can approve timesheet. Payroll has access to an audit trail which will keep track of all changes made by employees, supervisors or payroll administrators. • Scroll through all of your employees and approve their timesheets. Please note that all timesheets not approved by the supervisor may be approved by payroll administrators in order for payroll to be calculated. However, continued Non Approval by supervisors may result in the employee not being able to submit timesheets electronically.
Reports: • Click on the Report Icon in the top right corner of the screen. • Click on Supervisor Reports.
Next you will see many reports that you can utilize for your employees.
Click on the Employee List Report. This report can be used to check and see if you have all of your employees listed.
You can rename the report name, title or description then ezLM will save it as your report and make it easy to run again in the future • Choose Employee Status • Set up a Filter to view only the employees’ that you supervise • Click on the drop down arrow next to Select Field and choose Supervisor • Then click on the Add Filter button
Then click on Save and Preview. Your report will be generated in Adobe Reader (.PDF) and from there you can save it or print it. Excel is available as well if needed.
To go to another report click on the blue link for Supervisor Reports Another Report you may find useful is Timecard Report. • Click on the pencil next to Timecard Report in the list of Supervisor Reports. • Change the name of the report and title if you want. • Change the Time Frame if necessary • Click on the Available Fields to highlight then use the right arrow button to move them to the Selected Fields section. You can use the up or down buttons to change which order the information is displayed in. For our example we chose to show them by last name, then first name, then employee number then office (which is actually the processing group). It will also show the hours automatically. • Next set the Employee Status to Active Employees
Next you will want to set up a filter for the employees that you supervise. Click on the Select Field drop down arrow and pick Supervisor. Then click the + and find your employee number and click on it. • Then click on Add Filter. Next click on Save and Preview.