Installation Training
Installation Training. Everything you need to know to get up and running. Sales Training Corporate Overview - Why Dot Hill Products Solutions Selling Dot Hill The Dot Hill Process Overcoming Objections Services and Support Storage 101 Technical Installation. Product Introduction.

Installation Training
E N D
Presentation Transcript
Installation Training Everything you need to know to get up and running
Sales Training • Corporate Overview - Why Dot Hill • Products • Solutions • Selling Dot Hill • The Dot Hill Process • Overcoming Objections • Services and Support • Storage 101 • Technical • Installation
Product Introduction Everything you need to know to get up and running
R-Evolution Product Description • Single-and Dual-controller hardware configurations • 2U form factor with either 12 - 3.5” drives or 24 - 2.5” drives • Fully redundant, Hot-swap components • DAS and SAN connectivity • Windows, Linux, Solaris • FC and iSCSI host interfaces • Support from 2 to 96 or 144 disks • SAS/SATA drives at many different capacity points • RAID 0, 1, 3, 5, 6, 10, 50 data protection + NRAID • Hot spare support (Local and Global) • Embedded Management software
Assured Family™ of Protection • AssuredRemote (Snapshot Replication : new ) • DR solution or local volume duplication with low cost storage • FC or iSCSI media can be used • Point-in-time logical image on both site • AssuredSnap (Snapshots) • Point-in-time logical image of a physical volume • Protection against accidental or malicious loss or corruption • AssuredCopy (Volume Copy) • Complete physical and independent copy of a volume • Additional protection against master volume failure Protect against local and logical failures
Data in Place Upgrades • Provides the ability to expand capacity, increase performance or switch host connections, speed and protocols with customer data in place! • Just replace controller(s) • From basic Architecture to: • More JBODs for additional capacity • Faster controllers for performance increase • Mixed protocols to meet dynamic environments • Advanced method for better data protection • Any reconfiguration with data intact using single, common architecture
Terms Used • Controller Tray/Chassis – An enclosure with one or two RAID I/O Modules • Expansion Tray - An enclosure with one or two JBOD I/O Modules • RAID I/O Module – A FRU containing the RAID controller and Host I/O module. Each controller tray contains one or two RAID I/O Modules. • Expansion I/O Module / JBOD controller – A FRU with simple disk interface capabilities (no RAID). Each expansion tray contains one or two expansion modules • WBI / RAIDar – Web Browser Interface • CLI – Command Line Interface
Management Interface Options • Multiple means to manage the storage • WBI – GUI interface, standard browser, no host software • CLI – Embedded in controller, can be used from serial connection or telnet/ssh session through Ethernet • Even more ways to monitor the storage • Visual – LED indicators on system, front and rear • WBI – monitors event logs for browser display • CLI – for prompted or scripted inquiry • SNMP – for central monitoring via common software • Email – Notification via email to sysadmins, distribution lists • SMI-S – Emerging SNIA common standard for storage • FTP – for debug log capture to file or upgrade controller, drive FW
Chassis Tour 12 Drive Sleds Status LEDs Chassis ID Controller Modules Power & Cooling Modules 24 Drive Slots
Chassis Tour - Disk Module Disk Slot Order 0-1-2 23-24
Chassis Tour – Status LEDs Unit Locator Fault / Service Power Temperature Fault
RAID I/O Module Host Activity Link Speed Link Status System Locator OK to Remove Ethernet Link Status Expansion Port Status Fault / Service Ethernet Activity Cache Status FRU Status • All controllers have a similar layout • Above shows a Fiber Channel controller
Expansion I/O Module SAS In Port SAS Out Port Service Port OK to Remove SAS Out Port Status System Locator Fault / Service Required Power SAS In Port Status
Power and Cooling Module Dual Fans in each power supply Ejection Handle AC Power Good DC-Fan Fault/ Service Required Power Switch Power Input
Array Configuration Everything you need to know to get up and running
Logs and More Advanced Stuff Everything you need to know to get up and running
Unique Features Everything you need to know to get up and running
SimulCache • During normal operation: • Host data sent to one controller module is automatically copied to the other controller module’s write cache using broadcast write technology • Broadcast write provides simultaneous caching of write data to the cache memory in both controller modules over an internal PCI Express bus • Improves mirrored cache write operations • 92% as efficient as non-mirrored cache operations
Conventional Cache Mirroring W-ack W Traditional Method SAN SAN 1) Host initiates write command 3) Second controller acknowledges write 2) Write is mirrored to second controller Controller 1 Controller 2 Host Interconnect (FC, SAS, etc.) Host Interconnect (FC, SAS, etc.) PCI PCI Disk Interconnect Cache Processor Processor Cache Disk Interconnect 4) Controller acknowledges successful write SAS Drives
SimulCache Mirrored Cache W-ack W W Host Interconnect (FC, SAS, etc.) Disk Interconnect Cache Processor The Dot Hill Advantage SAN SAN 1) Host initiates write command Controller 1 Controller 2 Host Interconnect (FC, SAS, etc.) Broadcast Write Circuitry Broadcast Write Circuitry PCI PCI SimulCache Processor Cache Disk Interconnect 2) Controller acknowledges successful write SAS Drives
EcoStor Technology • Battery-free alternative for cache backup • Ensures cache data is stored safely when power fails • System enters write-back mode in minutes vs. hours with batteries • Up to 10 year life span – eliminates periodic battery replacement down time • Environmentally friendly – corresponds with our global responsibility spirit
EcoStor Technology zz Store signature for On-board Storage Controller cache validity of Flash CPU Subsystem removable NV memory Remain Powered during Flush Operation Powered-down during Flush Operation CPCI PWR_STATE[1:0] Power DDR-SDRAM DDR Monitor and Interface FLUSH_STATUS[1:0] Cache Memory Backup Logic Reset RAID Primary Controller Power Compact Flash-II Socket IDE Backup Power Interface Power Regulators (CF card or uDrive) EcoStor Clock Source Super Caps provide enough power to flush cache data to the compact flash card, then refresh memory
Unbox and Rack Everything you need to know to get up and running
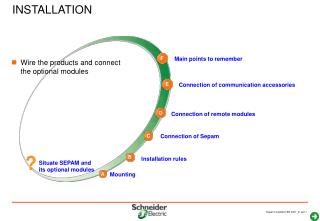
Installation Overview • Unpack the array • Obtain the necessary accessories and equipment • Mount the controller and expansion trays in a rack or cabinet • Connect the power to the two power modules • Perform initial power-up • Connect the management hosts to the controller tray • Connect the data hosts to the controller tray • Use WBI or the CLI to set the • Ethernet, netmask, and gateway addresses, for each controller module • Array date and time; change the management password • Set the basic array configuration parameters • Plan and implement your storage configuration
Assemble Rail Kits Attach side brackets 12-drive enclosure show below Install hanger fasteners
Install Rails 1 2 3 5 4
Connecting the Array Everything you need to know to get up and running
Connect storage and power up • Connect power • Connect to host network • Fiber Channel • Ethernet • Set management IP address
Connecting to a terminal emulator • Start and configure a terminal emulator, such as HyperTerminal using the following settings: • Terminal Emulator Display Settings • Terminal Emulation Mode ANSI (for color support) • Font Terminal • Translations None • Columns 80 • Terminal Emulator Connection Settings • Connector COM1 (typically) • Baud rate (bits/sec) 115,200 • Data bits 8 • Parity None • Stop bits 1 • Flow control None Connect to the storage array to set the management IP address
Applying the IP Address • At the prompt (#), type the following command to set the IP address for controller A • set network-parameters ip <address> netmask <netmask> gateway <gateway> controller <a|b> • Verify Ethernet connectivity by pinging the IP addresses • Optional • At the prompt (#), use the same command to set the IP address for controller B except b • Type the following command to verify the new IP addresses: • show network-parameters You can now manage the storage through the web interface
Changing the IP Address • After you have established the initial address you can change the address from the web based interface
Expansion Trays B B A A • You can add additional storage on the fly by cabling in JBOD systems Controller A SAS ‘Out’ port Controller B SAS ‘Out’ port SAS ‘Out’ ports SAS ‘In’ ports
Cabling Expansion Trays (cont.) IOM B IOM A IOM B IOM A IOM A IOM B IOM B IOM A In In In In In In In In Out Out Out Out Out Out Out Out 3 1 4 2 SAS Expansion Channel 0 RAID A 0 0 RAID B 0 • Cable from top RM-A to top IOM-A, and bottom RM-B to bottom IOM-B • Still have path to surviving JBODs on one chassis power lost • Repeat for each JBODs: • up 7 for 2U12 (max 96 drives) • Up to 5 for 2U24 (max 144 drives)
Non-Redundant Single Host DAS B A PO P1 PO P1 Host Port Connection – Single Connection • Utilizes a single HBA • Can access all A and B volumes • with ALUA (Asymmetric LUN Access) • volume on B has penalty for this • Is a non-redundant configuration
Redundant Single Host DAS B A PO P1 PO P1 Host Port Connection – Two connections • Utilizes two HBA’s • Has access to all A and B volumes • Is a redundant configuration • Host should use MPIO driver for HA purpose • Has more bandwidth in total
Redundant Dual Host DAS B 2 A 1 PO P1 PO P1 Host Port Connection – Two nodes DAS and MPIO Okay with MS Cluster or Linux based Cluster and other HA configuration
Redundant Multi Host SAN B 2 A 1 PO P1 PO P1 Host Port Connection – Applicable for all R/Evo gen. For ALUA or ULP systems (All but 2730, 2330), 2nd connection from server 1 to B-P1 can be go to B-P0 (More intrinsic and simple).