Comprehensive Guide to Cleaning a Revolver
This course provides essential procedures for safely cleaning a revolver. Participants will learn the importance of preventive maintenance and the consequences of neglecting firearm cleanliness. Key topics include selecting a safe cleaning location, ensuring the firearm is unloaded, and using the appropriate tools and solvents for effective cleaning. Step-by-step instructions guide you through the cleaning process from unloading to applying protective oil. By the end of the course, participants will appreciate the critical role of regular maintenance in ensuring firearm reliability and safety.

Comprehensive Guide to Cleaning a Revolver
E N D
Presentation Transcript
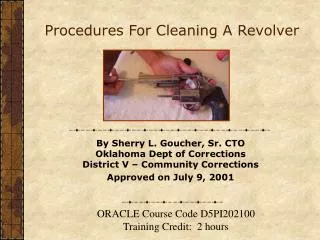
Procedures For Cleaning A Revolver By Sherry L. Goucher, Sr. CTOOklahoma Dept of CorrectionsDistrict V – Community Corrections Approved on July 9, 2001 ORACLE Course Code D5PI202100Training Credit: 2 hours
Course Objectives After finishing this course, participants will be able: • To understand the importance of preventive maintenance and cleaning • To understand what can happen if a revolver is not cleaned • To choose a safe location for revolver cleaning • To understand the steps to insure the revolver is unloaded • How to select and use the proper cleaning tools and solvents
Why Regular Maintenance? • The greatest cause of firearm malfunction is POOR MAINTENANCE. • Have a qualified armorer check the weapon before firing (even a factory-new weapon can malfunction).
After a weapon has been fired . . . • Residue in the bore (barrel) and cylinders after firing consists ofPrimer and powder residue“Leading” from the bullet • Primer and powder residue collect moisture and promote rust. Primary considerations are prevention of rust, preservation of the finish, and to ensure reliable operation.
Dirty Firearms • On the RangeMay cause jams or damage the weaponMay affect accuracy & dependability • On the JobThe risk of malfunction may cost your life, or the life of an innocent bystander.
The location for cleaning a firearm is also an important consideration . . . • If possible, clean it at the range after firing. • Choose a location which protects others from unintentional discharge of the weapon. The location should include an area with solid walls, or barriers which would trap a fired bullet.
Soft cloth Bore solvent or cleaner Gun oil or lubricant/preservative Bore and cylinder patches Cleaning rod and attachments (patch holder and bore brush) Toothbrush Dental pick Notes: Cleaning rods with attachments and bore/cylinder patches are made for specific calibers. Make sure to use the proper size to permit proper cleaning and to avoid damage. A screwdriver should only be used if it is a gunsmith’s model. A standard screwdriver may damage the screw slots. Cleaning Equipment
Step 1: Empty Your Revolver • Unload the revolver, remove the ammunition to a separate location, and leave the action (cylinder) open. • Visibly check each chamber to ensure the cartridges have been removed. Count the cartridges as an additional safety measure.
Step 2 • Attach the bore brush to the rod and dip the brush in bore solvent. • Pass the brush through the barrel from the muzzle end 8-10 times. • Make sure the brush emerges from the rear of the barrel before drawing it back through, and take care not to damage the muzzle end of the barrel through contact with the bore rod.
Step 3 • Remove the bore brush from the rod, and attach a patch holder and clean patch. • Dip the patch in bore solvent and pass it through the bore several times.
Step 4 • Remove the wet patch, and attach a clean, dry patch. Pass the clean patch through the bore from the muzzle end several times.
Step 5 • Inspect the dry patch for residue, and, if dirty, repeat until the dry patch comes out clean.
Step 6 • Perform steps 1-5 for each cylinder chamber of the revolver, passing the brush and patches through the chambers from the rear face.
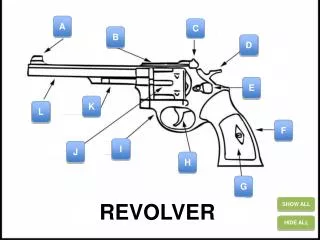
Step 7 • Using the toothbrush soaked in bore solvent and the dental pick, clean and remove all debris from under the extractor, rear cylinder face, front cylinder face, and the breech end (forcing cone of the barrel). Residue left under the extractor may cause malfunctions.NOTE: Inspect for, and clean any residue which may be present on all other visible surfaces, e.g. top strap, breech face, firing pin hole, etc. Ask your facility armorer if you need help identifying these components.
Step 8 Using a clean cloth, dry all solvent residue from under the extractor, front and rear cylinder faces, and breech end of the barrel. Solvent left under the extractor may cause malfunctions.
Step 9 • Using a clean cloth, apply a light film of gun oil to all exterior surfaces of the revolver. Ensure that the barrel bore and cylinder chambers remain dry of oil if the revolver is being returned to immediate duty. Oil left under the extractor or in the firing pin hole may cause malfunctions. • If being stored, lightly coat the chambers and bore with gun oil. Using a clean patch, dry the chambers and bore prior to future use of the revolver.
Step 10 Check tightness of the grip screws using the proper size screwdriver. Do not overtighten. DO NOT attempt to tighten side plate screws unless using a gunsmith’s screwdriver - screw damage may result.
The Last Step Now that your revolver has been cleaned, avoid skin contact with the metal surfaces of the clean revolver to reduce the risk of rust due to perspiration and skin oils.
Self-Test #1 Click on the letter by the answer you think is correct. 1. Even a factory-new revolver can malfunction when fired. True False
Self-Test #2 Click on the letter by the answer you think is correct. 2. The most-frequent cause of firearm malfunctions is poor maintenance. True False
Self-Test #3 Click on the letter by the answer you think is correct. 3. Primer and powder residue in the barrel and cylinders will not collect moisture and promote rust. True False
Self-Test #4 Click on the letter by the answer you think is correct. 4. Using a dirty firearm on the range may: Cause jams and damage the weapon Affect accuracy and dependability of the weapon Both A and B
Self-Test #5 Click on the letter by the answer you think is correct. 5. Cleaning rods, rod attachments, and bore/cylinder patches are made for specific caliber sizes. True False
Self-Test #6 Click on the letter by the answer you think is correct. 6. After unloading a revolver, it’s a good safety measure to visibly check the cylinder chambers and to count the cartridges you have removed. True False
Self-Test #7 Click on the letter by the answer you think is correct. 7. Dirt and oil residue left under the extractor can cause a revolver to malfunction. True False
Exit Page Thank you for taking this online course. Click the "Exit" button below to close the course. EXIT
Answer Page 1 Your answer is correct. Click button above to return to the test.
Answer Page 2 Your answer is incorrect. Please try again! Click button above to return to the test.