CSS Box Model
CSS Box Model. What is the CSS Box Model?.

CSS Box Model
E N D
Presentation Transcript
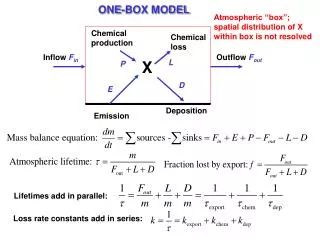
What is the CSS Box Model? • The “Box Model” is a tool we use to lay out our web pages in a number of individual "boxes" or "containers". When we plan our web page design, we must take into account not only the size of page content, but also the margins, borders, and padding involved. • Before we start building a page, we can plan where everything will go by arranging these boxes on the screen. Our goal is to create a balanced layout, with plenty of "white space" around the content.
The components of a box: Margin Border Padding Content
Introducing the <div> tag: • The <div> tag is our basic building block when laying out a page design. By defining the height and width of the <div>, we are "reserving" that amount of space on the screen for whatever content we wish to place there. • The actual content will go inside the opening <div> and closing </div> tags.
Example <div>: <head> <style type="text/css"> .box300 { width:300px; height:300px; border:1px solid black; } </style> </head> This is a 300 by 300 pixel boxwith a 1 px border. <div class="box300"> This is a 300 by 300 pixel box with a 1px border. </div> This is outside the box. This is outside the box. By establishing the box dimensions, we can leave it there as a placeholder until we have our content ready. In the meantime, the rest of the page can be built out with our other content.
Adding padding: <head> <style type="text/css"> .box300 { width:300px; height:300px; border:1px solid black; padding:10px; } </style> </head> This is a 300 by 300 pixel boxwith a 1px border and 10pxpadding. <div class="box300"> This is a 300 by 300 pixel box with a 1px border and 10px padding. </div> <p>This is outside the box.</p> This is outside the box. By adding 10px of padding on all four sides of the content, we have effectively made our box 320px by 320px (321px by 321px with the border).
Adding margin: <head> <style type="text/css"> .box300 { width:300px; height:300px; border:1px solid black; padding:10px; margin:10px; } </style> </head> This is a 300 by 300 pixel boxwith a 1px border and 10pxpadding and 10px margin. The dotted line here shows where the margin is but it will not show on the actual page. This is outside the box. <div class="box300"> This is a 300 by 300 pixel box with a 1px border and 10px Padding and 10px margin. </div> <p>This is outside the box.</p> By adding 10px of margin on all four sides of the border, we have now made our box 341px by 341px overall.
Calculating overall dimensions: • When designing our page, we have to calculate how much size a <div> element will consume: • Total element width = defined width + left padding + right padding + left border + right border + left margin + right margin. • Total element height = defined height + top padding + bottom padding + top border + bottom border + top margin + bottom margin
Pixels vs. Percent: • The width property can be specified in pixels or in percent. By using "width:50%", we are telling the browser to make the width of the element exactly 50% of the space available. • Using percent instead of pixels can make our page layout highly flexible. For example, we can use the entire screen real estate, no matter what size screen or resolution our web visitor has.
A technique to center a <div>: • Because we don't know what the screen resolution will be for our visitors, it can be challenging to get our pages to display attractively for all viewers. • A useful technique is to set the right and left margins of a <div> to the value "auto". This tells the browser to maintain an equal distance on the right and left, effectively centering the <div> no matter how wide the available area is:.centerme { margin:0 auto;} • This same technique can be used on a <div> element that contains all your page content in order to center your page on the screen, no matter what the screen resolution of your web visitor.