Input and Output
Input and Output. ENGR 1181 MATLAB 5. Input and Output In The Real World.

Input and Output
E N D
Presentation Transcript
Input and Output ENGR 1181 MATLAB 5
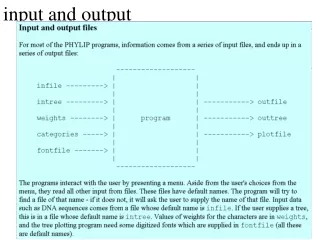
Input and Output In The Real World Script files (which provide outputs given inputs) are important tools in MATLAB to make calculations, graph results or even play a game. Script files should be general enough to be used by someone unfamiliar with the program.
Today's Learning Objectives • After today’s class, students will be able to: • Create a basic program that can be used over and over or given to another person to use. • Demonstrate proper use of the input command, which is the simplest command for interacting with the user. • Use fprintf, which allows the student control over how results are displayed in the command window.
GPA Calculator Example – Background • Script files can be used to complete known calculations or tasks the same way every time • How is GPA calculated? • (Grade Points)*(Credit Hours)/ Total Credit Hours • EX: ENGR 1181 (2 CH) – A (4.0), MATH 1151 (5 CH) – B- (2.7), PHYSICS 1200 (5 CH)– B+ (3.3) • (4.0*2+2.7*5+3.3*5)/(2+5+5) = 3.167
GPA Calculator Example – Using Script File • Ex: Write a MATLAB program for the GPA calculation. Use variables so the program can be used for any set of grades/credits. Steps: • Create variables for the grades as grade1, grade2 etc. • Create variables for the credit hours credit1, credit2 etc. • Write the formula for the GPA calculation using the values on the previous slide. Values are: Grade1 = 4, Grade2 = 2.7, Grade3 = 3.3, Credit1 = 2, Credit2 = 5, Credit3 = 5
GPA Calculator Example – Using a Script File clear %initialization of variables clc disp(‘Your Name’) disp(‘Seat Number’) %Assign the grades for 3 subjects grade1 = 4.0; grade2 = 2.7; grade3 = 3.3;
GPA Calculator Example – Using a Script File %Assign the credit hours for the 3 subjects credit1 = 2; %now complete the program! credit2 = 5; credit3 = 5; %Calculate the GPA from the equation GPA = ((grade1*credit1)+(grade2*credit2)+(grade3*credit3))/(credit1+credit2+credit3)
GPA Calculator Example – Using a Script File with Vectors • The same program could be more efficiently written using vectors. • Now write a program for calculating the GPA using vectors for the grades and credit hours. • Steps: • Create a vector called “grade” to input grades. • Create a vector called “credit” to input credit hours. • Write a formula to calculate the GPA with vectors using element arithmetic.
GPA Calculator Example – Using Script File with Vectors clear %initialization of variables clc disp(‘Your Name’) disp(‘Seat Number’) grade = [4 2.7 3.3]; %Assign the grades for 3 subjects in a vector %Assign the credit hours for 3 subjects in a vector credit = [2 5 5]; %Complete the program!!! GPA = sum(grade.*credit)./sum(credit) %Calculate the GPA by doing element by element arithmetic
Data Inputs to Programs • Both of the previous programs defined and assigned values to variables for grades and credit hours inside the program. • If we wish to run these programs for a different set of grades or credits, the program must be changed. • Once a program is written and verified, it is best not to change it – instead change input data.
Input to a Script File • Sometimes the user does not know what to enter or what is required for the program to execute. • We can prompt the user to enter values. This makes the program more robust and user-friendly. • This is done by using the input() command: x = input('text') Note the use of single apostrophes around the text
Interactive Example • For example, create a script file with: x = input(‘Please enter a value for x:’) Execute the script, the command window asks you: Please enter a value for x: 5 x = 5 User input
Input a String to a Script File • The input() command can also be used for a string input. • The user does not need to know or understand what a string is or what is happening in the code. y = input('text’,’s’) Adding the ,’s’ will convert the input to a string
Interactive Example Using Vectors • The GPA calculation program can also be written using vectors in the script file with inputs %ask the user to enter the 3 grades/CH as a vector grade = input(‘Enter the Grades as a vector: ‘); credit = input(‘Enter the corresponding Credit Hours as a vector: ‘); %Calculate the GPA by doing element by element arithmetic GPA = sum(grade.*credit)./sum(credit)
Interactive Example Output Enter the Grades as a vector: [4.0 2.7 3.3] Enter the corresponding Credit Hours as a vector: [2 5 5] GPA = 3.1667 • The values in red are entered following the prompt.
Display to the Command Window • At any time in the program, variables (or answers) can be displayed in the command window. • Any variable that has been defined and is stored in the program and can referenced. • If x is defined, then it can be displayed: disp(x)
Using fprintf Command • First of all, fprintf is similar to disp() but allows more information in a single line. • It can display 1 line of text. fprintf(‘Text and more text. \n’) • It can show a combination of text and variable output(s) on the same line. fprintf(‘Text and %valuedisplay and text. \n’,’variable’) • It can create tables (next slide).
Using fprint Command • To create a table using fprintf: • Assemble the data in rows according to the order it will be displayed as columns. • Print appropriate headers for the table. • Print the body of the table reserving space for the numbers.
Using fprint Command – Table Example %Put grades and credit hours together as a table TBL = [credit; grade]; %Print headers (can be disp or fprintf) fprintf(‘\n Grade Summary \n\n’) disp(‘Credit’) disp(‘Hours Grade’) %body of table fprintf(‘ %1i %3.1f\n’,TBL) %final results fprintf(‘\n The overall GPA is: %0.2f\n’,GPA)
Using fprint Command – Table Example • The previous script file produces: Grade Summary Credit Hours Grade 2 4.0 5 2.7 5 3.3 The overall GPA is: 3.17
Important Takeaways • Use the input() command to prompt a user to enter the necessary information. e.g.: x = input(‘Weight: ‘) • This can be automatically converted to a string by using ‘s’. e.g.: y = input(‘Enter your name: ‘,’s’) • The disp() command can display any variable at any time. e.g.: disp(x) • The fprintf() command is a more complicated but robust way to display information.
Preview of Next Class • Logical Expressions • Relational and logical expressions • True and False outputs • Various logical operators, how are they used? • Order of precedence for logical operators
What’s Next? • Review today’s Quiz #05 • Open the in-class activity from the EEIC website and we will go through it together. • Then, start working on MAT-05 homework. • Before next class, you will read about basic for loops. For loops are the beginning of more complex programming. For loops set the conditions and limitations for which a program will execute multiple runs of code. Loops can be nested within other loops.