Download
1 / 25
310 likes | 1.07k Vues
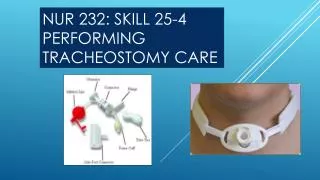
NUR 232: SKILL 25-4 PERFORMING TRACHEOSTOMY CARE. Illustration of a tracheostomy tube & placement. The anatomy is shown in cross-section. INTRODUCTION:

E N D
Illustration of a tracheostomy tube & placement The anatomy is shown in cross-section
INTRODUCTION: • A tracheostomy is a 51- to 76- mm (2- to 3-inch) curved metal or plastic tube inserted into a stoma through the neck and into the trachea to maintain a patent airway. It is place in patients who require long-term airway management because of airway obstruction, airway clearance needs, and long term intubation. • A tracheostomy offers advantages over long-term endotracheal (ET) tube placement such as decreased laryngeal and tracheal tissue injury, ease of breathing, and access for better oral hygiene. • Some patients with tracheostomy tubes are able to cough secretions out of the tube completely, whereas others are only able to cough secretions up into it. • A tracheostomy tube has a flange that fits against a patient’s neck and an outer cannula or primary airway. It may have a removable inner cannula for cleaning and an inflatable cuff that surrounds the outer cannula.
INTRODUCTION – CONT’D • An inflation tube and valve connect to the cuff for inflation. The pilot balloon expands and contracts on inflation and deflation. An inflated cuff keeps the tube stable within the trachea. • Standards for care include properly securing the tube, inflating the cuff to an appropriate pressure, maintaining patency by suctioning, and providing oral hygiene. A tracheostomy tube can cause granulation tissue to form on the vocal cords, epiglottis or trachea secondary to inappropriate cuff inflation. • An intubated patient is unable to speak because of placement of a tracheostomy tube which prevents normal airflow over and vibration of the vocal cords.
INTRODUCTION – CONT’D • Use verbal and non-verbal communication skills when you care for an intubated patient. • Alphabet charts, pen and paper, slates or chalkboards, or magnetic pen doodle boards are some common communication tools. • You may place a speaking valve over some tracheostomy tubes, which allows a patient to speak. • One type of tracheostomy tube is fenestrated, which means that the outer cannula has precut openings. • When the inner cannula is removed and the cuff is deflated, patients can speak. A speech pathologist must evaluate patients for aspiration risk before cuff deflation and inner cannula removal.
ASSESSMENT • 1. Observe for excess peri-stomal secretions, excess intra-tracheal secretions, soiled or damp tracheostomy ties, soiled or damp tracheostomy dressing, diminished airflow through tracheostomy tube, or signs and symptoms of airway obstruction requiring suctioning (see Skill 25-2) • 2. Assess patient’s hydration status, humidity delivered to airway, status of existing infection, patient’s nutritional status, and ability to cough. • 3. Assess vital signs, oxygen saturation, lung sounds, and patient’s ability to clear airway.
ASSESSMENT – CONT’D • 4. Assess patient’s understanding of and ability to perform own tracheostomy care. • 5. Check when tracheostomy care was last performed. • Tracheostomy care is provided at least every 4 to 8 hours and more often if indicated (e.g., increased airway or stoma secretions, infection {airway or stoma}).
PLANNING • 1. Expected outcomes following completion of procedure: • Inner and outer cannulas of tracheostomy tube are free of secretions; ties are clean, secured snugly, and tied in double square knot. • Tracheostomy tube is patent and secure, optimizing amount of oxygen delivered to patient and limiting risk of infection from retained secretions. • Stoma is pink, does not bleed, and is free of secretions and signs of infection • 2. Have another nurse or NAP assist in the procedure.
PLANNING – CONT’D • 3. Explain procedure and patient’s participation. • 4. Help patient to position comfortable for both nurse and patient (usually supine or semi-Fowler’s). • Promotes patient comfort and prevents nurse muscle strain. • 5. Place towel across patient’s chest. • Reduces transmission of microorganisms.
IMPLEMENTATION • 1. Identify patient using two identifiers (i.e., name and birthday or name and account number) according to agency policy. • 2. Perform hand hygiene. Apply clean gloves and face shield if applicable. • 3. Apply pulse oximeter sensor. • 4. Suction tracheostomy (see Skill 25-2). Before removing gloves, remove soiled tracheostomy dressing and discard in glove with coiled catheter. • 5. Perform hand hygiene. Prepare equipment on bedside table. • A. Open sterile tracheostomy kit. Open two 4 X 4 inch gauze packages using aseptic technique and pour normal saline on one package. Leave second package dry. Open two cotton-tipped swab packages and pour normal saline on one package. Do not recap normal saline.
IMPLEMENTATION – cont’d • B. Open sterile tracheostomy dressing package. • C. Unwrap sterile basin and pour about 0.5 to 2 cm (1/2 to 1 inch) of normal saline into it. • D. Open small sterile brush package and place aseptically into sterile basin. • E. Prepare length of twill tape long enough to go around patient’s neck 2 times, about 60 to 75 cm (25 to 30 inches) for an adult. Cut ends on diagonal. Lay aside in dry area. • F. If using commercially available tracheostomy tube holder, open package according to manufacturer directions.
IMPLEMENTATION – cont’d • 6. Hyper-oxygenate patient using ventilator settings or by applying oxygen source loosely over tracheostomy. • 7. Apply sterile gloves. Keep dominant hand sterile throughout procedure. • Clinical Decision Point: For tracheostomy tube with no inner cannula or Kistner button, continue with Step 9. • 8. Care of Tracheostomy with Inner Cannula: • A. While touching only outer aspect of tube, unlock and remove inner cannula with non-dominant hand following line of tracheostomy. Drop inner cannula into normal saline basin. • B. Replace tracheostomy collar, T tube, or ventilator oxygen source over outer cannula. (Note: May not be able to attach T tube and ventilator oxygen devices to all outer cannulas when inner cannula is removed.)
IMPLEMENTATION – cont’d • 8. Care of tracheostomy with inner cannula – cont’d • C. To prevent oxygen desaturation in affected patients, quickly pick up inner cannula and use small brush to remove secretions inside and outside inner cannula. • D. Hold inner cannula over basin and rinse with normal saline, using non-dominant (clean) hand to pour normal saline. • E. Replace inner cannula and secure “locking” mechanism. Reapply ventilator after hyper-oxygenating patient if needed.
IMPLEMENTATION – cont’d • 9. Tracheostomy with disposable inner cannula: • A. Remove new cannula from manufacturer packaging. • B. While touching only outer aspect of tube, withdraw inner cannula and replace with new cannula. Lock into position. • C. Dispose of contaminated cannula in appropriate receptacle and reconnect to ventilator or oxygen supply. • 10. Using normal saline-saturated cotton-tipped swabs and 4 X 4 inch gauze, clean expose outer cannula surfaces and stoma under faceplate extending 5 to 10 cm (2 to 4 inches) in all directions from stoma. Clean in circular motion from stoma site outward using dominant hand to handle sterile supplies.
IMPLEMENTATION – CONT’D • 11. Using dry 4 X 4 inch gauze, pat lightly at skin and exposed outer cannula surfaces. • 12. Secure tracheostomy. • A. Tracheostomy tie Method: • 1. Instruct assistant, if available, to apply clean gloves and securely hold tracheostomy tub in place. With assistant holding tracheostomy tube, cut old ties. • 2. Take prepared tie, insert one end of tie through faceplate eyelet, and pull ends even.
IMPLEMENTATION – CONT’D • 3. Slide both ends of tie behind head and around neck to other eyelet and insert one tie through second eyelet. • 4. Pull snugly. • 5. Tie ends securely in double square knot, allowing space for only one loose or two snug finger widths in tie. • One finger width of slack prevents ties from being too tight when tracheostomy dressing is in place and also prevents movement of tracheostomy tube in lower airway.
IMPLEMENTATION – CONT’D • 6. Insert fresh 4 x 4 inch tracheostomy dressing under clean ties and faceplate • B. Tracheostomy tube holder method: • 1. While wearing gloves, maintain secure hold on tracheostomy tube. This can be done with an assistant: or, when an assistant is not available, leave old tracheostomy tube holder in place until new device is secure. • 2. Align strap under patient’s neck. Be sure that Velcro attachments are on either side of tracheostomy tube. • 3. Place narrow end of ties under and through faceplate eyelets. Pull ends even and secure with Velcro closures. • 4. Verify that there is space for only one loose or two snug finger widths under neck strap.
IMPLEMENTATION – CONT’D • 13. Position patient comfortably and assess respiratory status. • 14. Be sure that oxygen or humidification delivery sources are in place and set at correct levels. • 15. Remove gloves and face shield and discard in appropriate receptacle. • 16. Replace cap on normal saline bottles. Store reusable liquids, date container, and store unused supplies in appropriate place. • 17. Perform hand hygiene.
EVALUATION • 1. Compare assessments before and after tracheostomy care. • Determines effectiveness of tracheostomy care. • 2. Assess fit of new tracheostomy ties and ask patient if tube feels comfortable. • Tracheostomy ties are uncomfortable and place patient at risk for tissue injury when they are too loose or too tight. • 3. Inspect inner and outer cannulas for secretions. • Presence of secretions on cannulas indicates need for more frequent tracheostomy care. • 4. Assess stoma for inflammation, edema, or discolored secretions. • Broken skin places patient at risk for infection. • Stoma infection requires change in tracheostomy skin care plan.
UNEXPECTED OUTCOMES • 1. Excessively loose or tight tracheostomy ties / tracheostomy holder. • Adjust ties or apply new ties / tracheostomy holder. • 2. Inflammation of tracheostomy stoma. • Increase frequency of tracheostomy care. • Apply topical antibacterial solution, allow it to dry, and apply bacterial barrier. • Apply hydrocolloid or transparent dressing just under stoma to protect skin from breakdown. Consult with skin care specialist. • 3. Patient has pressure area around tracheostomy tube. • Increase frequency of tracheostomy care and keep dressing under faceplate at all times. • Consider using double dressing or applying hydrocolloid or stoma adhesive dressing around stoma.
UNEXPECTED OUTCOMES – CONT’D • 4. Accidental de-cannulation. • Call for assistance. • Replace old tracheostomy tube with new tube. Some experienced nurses or respiratory therapists may be able to quickly reinsert tracheostomy tube. • Keep square tracheostomy tube or same size and kind at bedside in event of emergency replacement. • Same-size ET tube can be inserted in stoma in an emergency. • Insert suction catheter to confirm that new tube is in trachea. • Be prepared to manually ventilate patients in whom respiratory distress develops with Ambu-bag until tracheostomy is replaced. • Notify health care provider.
UNEXPECTED OUTCOMES – CONT’D • 5. Respiratory distress from mucus plug in cannula. • Remove inner cannula if applicable for cleaning or suction cannula. • Notify health care provider if tracheostomy tube requires replacement.
RECORDING AND REPORTING • Record respiratory assessments before and after care; type and size of tracheostomy tube; frequency and extend of care; type, color, and amount of secretions; patient tolerance and understanding of procedure; and special care in event of unexpected outcomes. • Report accidental de-cannulation or respiratory distress to the health care provider.
SPECIAL CONSIDERATIONS – TEACHING • Different types of tracheostomy tubes have different faceplates. Some are rigid; others are not. Instruct caregivers not to lift up rigid faceplates or they will dislodge the tube. • Some commercial tracheostomy tube holders require removal of excess tie material to fit properly. • If you anticipate long-term placement of tracheostomy, plan to teach patient and family tracheostomy care. • Patients with new tracheostomy frequently have bloody secretions for 2 to 3 days after the procedure and for 24 hours after each tracheostomy tube change.
END OF SKILL • This is the end of your skill. • Your book has provided a video for this skill and the link is as follows: • http://booksite.Elsevier.com/Perry-Potter/ClinicalSkills/video33.php • Elsevier: Perry-Potter: Clinical Nursing Skills and Techniques, 8e – 25.4 Performing Tracheostomy Care