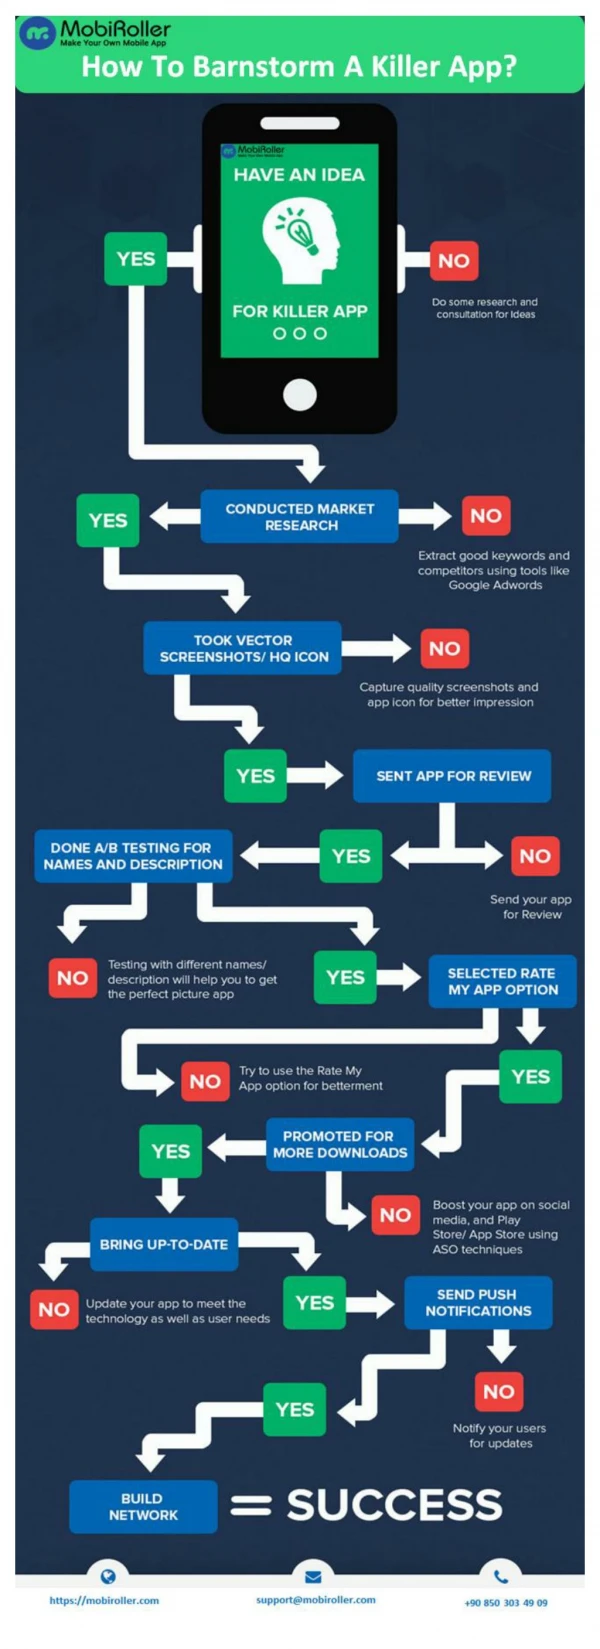
Download
1 / 37
370 likes | 571 Vues
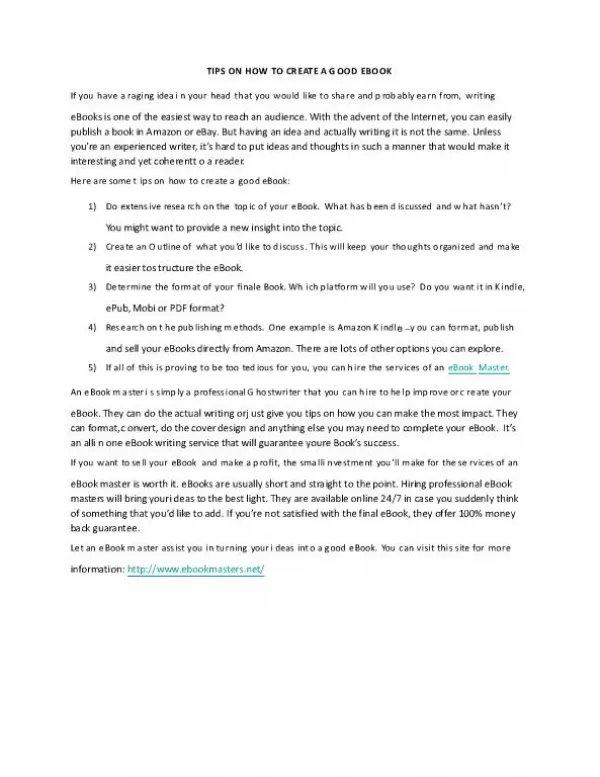
How to create and format an eBook, an easy to follow guide showing you everything you need to do to create your first professional money making eBook.

E N D
Contents Introduction ……………………………………………………………………………………………………………………..2 Adding & Modifying Headers and Footers……………………………………………………………..……….. 3 Adding Borders……………………………………………………………………………………………………………….. 4 Changing the Template Image…………………………………….……………………...………………………….. 5 Copyright & Disclaimer…………………………………………………………………….…………………………….. 6 Chapter Headings………………………………………………………………………….……………………………….. 7 Adding a Table of Contents…………………………………………………………………………………………….. 8 Adding a Cover Page……………………………………………………………………………………………………... 11 Adding Content and Images………………………………………………………………………………………….. 12 Creating Hyperlinks …………………………………………………………………………………………………..….. 13 Creating a Resource Section…………………………………………………………………………….....……….. 17 Saving your eBook as PDF………………………………………………………………………………………….….. 17 Our Recommended Resources………………………………………………………………..…………….....….. 20 Copyright Tim’s Minions 2012.
Introduction You will know by now or at least should know by now that many internet marketers give away free eBooks and reports to build email lists of potential customers. EBooks are brilliant because they can also be sold for quick profit and are not just for building email lists. The hardest part for many isn’t necessarily researching or writing the report but more importantly trying to format the eBook into something that looks good. Many people have become comfortable at using software like Word for writing letters but that can often be as much as they can do. Microsoft Word can do so much more and just knowing a few extra tools can have you creating those reports and eBooks in no time. A quick Guide to writing an eBook: You should know by now that the best eBooks are those that provide a service, they eliminate a problem. A bit like this eBook, I am showing people who have never written an eBook before how to format one easily. I am providing a step by step easy to follow process that should have the complete new beginner ready to start writing their own eBooks as soon as they have stopped reading. www.TimsMinions.com
Introduction You can find what problems people are having by searching forums or asking questions on your Facebook page, Twitter or your own blog. The next thing is to go and find out all about it. Research is the easiest part. Simply type into Google the things you are looking for. You will get plenty of information back, simply copy and paste the good stuff into a Word document, then when you have enough re write it in your own words. Divide it up into chapters, think of some interesting images to go with it then copy everything into the eBook template or build the eBook around your newly written Word document. I have created an eBook template for you to use straight away in MS Word 2010. The images in this report will help you add to or modify it or create your own from scratch. Click the link to access it. Tim’s Minions eBook Template If you do not use Word or are an Apple user I recommend you still read the eBook as you might gain some insights or ideas as what to do in your chosen software. Often the icons and logos are similar for the same functions. www.TimsMinions.com
Adding & Modifying Headers and Footers The first thing to do is open up our template or a Word document (obviously) ;-) You might have already got one open with all your writing and notes in it. Once the document is open, go and click on the Insert tab on the tool bar. www.TimsMinions.com
Adding & Modifying Headers and Footers Click on the Header icon and choose a Header from the list, in the template I used the Alphabet header as seen in the screen shot below. www.TimsMinions.com
Adding & Modifying Headers and Footers I would do the same with the Footer, click on the Footer icon which is next to the Header icon and choose the Alphabet Footer template so it matches nicely with the Header. If you use the template we have created then you will see both the Header and Footer area come with text that needs to be modified for your own eBook. Click your mouse above the Header line or below the Footer line, this will enable these areas to become editable. Click in the title itself and you will be able to delete the wording that is there and change it for your own. Do the same with the Footer area, once you have changed the text to your own click outside of the areas to disable the editing. www.TimsMinions.com
Adding & Modifying Headers and Footers I would do the same with the Footer, click on the Footer icon which is next to the Header icon and choose the Alphabet Footer template so it matches nicely with the Header. If you use the template we have created then you will see both the Header and Footer area come with text that needs to be modified for your own eBook. Click your mouse above the Header line or below the Footer line, this will enable these areas to become editable. Click in the title itself and you will be able to delete the wording that is there and change it for your own. Do the same with the Footer area, once you have changed the text to your own click outside of the areas to disable the editing. www.TimsMinions.com
Adding Borders To give the eBook more of a professional feel I would add a border to the page. You do not have to, it is optional, I have seen many eBooks this way and I like it. You on the other hand might not want a border but still read on, knowing what to do is a valuable skill. To add a border click on the Page Layout tab on the tool bar, then click on the Page Borders icon which will open up a window where you can choose borders of different sizes and colours etc. See the screen shot below. www.TimsMinions.com
Changing the Template Image In the eBook template we have created for you to use you will find that there is a large image on the front page ready for you to change. All eBooks have a cover image; it can be a complete separate page or a large image on page 1. We have placed a large image ready for you to change on a cover page. www.TimsMinions.com
Changing the Template Image To change the image all you have to do is right click on it and a menu will appear. Choose the Change Picture option, your picture library will open up, choose the image you want and double click on it. Your picture will replace the image exactly where it is. (If your image is not the same shape and size then it may need tweaking. Pull the sizing tabs on the side of the image that appear during editing of the image. www.TimsMinions.com
Copyright & Disclaimer In the eBook template there is a section directly under the image that says copyright and has the word You in brackets [You]. That is for you to modify with your name and company details. You can move it below the table of contents if you choose. Below that is a section for adding your disclaimers, have a look at the eBooks you have downloaded to get an idea of what should be put here. You want to make it clear that you are not held responsible for people’s actions and results. You are offering them information and help but should they fail to do it properly or something goes wrong you don’t want them holding you accountable for any mistakes THEY make and try to sue you for big money. Trust me, there are stupid people out there and they will try it! www.TimsMinions.com
Chapters Headings Next thing to do is sort out your headings, in the template there are a few already set for you. Simply edit them to suit your chapter Titles. To create a heading highlight the text then click on one of the pre-set heading templates. In the screen shots below you will see how to add them yourselves and modify them. www.TimsMinions.com
Chapters Headings These headings can be modified, if you like the font but want to change the colour and font size all you do is click on the Heading tab with the right mouse button and a drop down menu will appear. Choose the Modify option as shown below. www.TimsMinions.com
Chapters Headings A new box will appear with many options that allow you to change the settings and create a customized headings template. So now you have changed the pre-set Chapters in the template to your own headings or created your own headings in your own template you now add the table of contents. www.TimsMinions.com
Adding a Table of Contents MS Word has a great automatic content table that you add to your eBook, once you have written all the chapters you simply update the table and it self populates with the chapter and page details. I would be surprised if other editing software didn’t do the same in one way or another. You will find one in the template already in place, and you will just need to update the field as you go along. To add a Table of Contents, place the cursor exactly where you want it before going to the References tab, click on the Table of Contents icon as shown in the screen shot below. A drop down list will appear, choose the one you want, for this example and template I used the first Automatic Table 1. As soon as you click on it the table appears where you want it. www.TimsMinions.com
Adding a Table of Contents www.TimsMinions.com
Adding a Table of Contents If you are using the template you will have a table in place with the following • Introduction • Chapter 1 • Chapter 2 • Chapter 3 • Chapter 4 • Chapter 5 • Conclusion • Resources Normally 5 to 7 Chapters or Steps is ample for a short free report but you can add to these easily by just creating new headings then updating the table. To update the table left click your mouse in the table area and it will become editable. Click the option that says Update Table, another little box will open, check the radio button that will update the information you want and hit ok. www.TimsMinions.com
Adding a Table of Contents If you have added new headings then check to Update entire table, if you have just added more content to previous chapters then you only need to update the page information. www.TimsMinions.com
Adding a Cover Page This is the front page of your book; MS Word has several templates you can edit. Some people use them and some people don’t. For this eBook I will show you how easy it is to add the Cover Page. Click on Insert on the tool bar then click on the Cover Page icon. A list of templates will open. Choose one and click on it, it will automatically be added to the front of your eBook. www.TimsMinions.com
Adding a Cover Page You can edit the cover page with your own images and text using the same methods as shown in this report. I personally create my own cover page by adding the Alphabet Cover Page then modifying it with images and text creating my own feel. The template has one ready for you to modify. www.TimsMinions.com
Adding Content and Images Now you have the backbone of your eBook in place you can start to write out your eBook. If you are using the template and have written the bulk of your eBook in another word document simply copy and paste it into the right sections of the template. When you have come to the end of a section or chapter and you want the next chapter or section to start on a completely new page you will need to create a Page Break. This is a lot easier and safer than trying to keep hitting the return key and drive the cursor to the right place. When you go back in the editing process and add more words to chapters they will move your headings and chapters further down the pages if you haven’t used the Page Break tool. Creating a Page Break keeps things structured. If you add to your chapters it will still keep the chapters ending and starting on different pages and in the desired places. www.TimsMinions.com
Adding Content and Images www.TimsMinions.com
Adding Content and Images EBooks look better with images and adding them is very easy, simply go to the Insert tab and choose Picture. When you click on the icon your picture library will open up allowing you to choose the picture you want in your eBook. Once you have double clicked on your chosen image it will appear where you left your cursor. If you want it central it is advised to align your cursor in the central position before inserting the image. www.TimsMinions.com
Creating Hyperlinks • When creating an eBook you may want to add links back to your site or even an affiliate product where someone clicks through to a sales page, if they buy you get paid a percentage. And with digital products the percentage can be a huge 75%! So why wouldn’t you want to add a few? • Once your eBook has been converted to PDF the links stay clickable. Please be aware, some PDF converters can disarm the links so test the eBook before you go giving it away. The new MS Word converts straight to PDF and leaves all the links live. • To make some text link to external sites highlight it with your mouse then click the Insert tab on the tool bar and click the Hyperlink option as shown below. • This is a great site! www.TimsMinions.com
Creating Hyperlinks A box will open where you can add the URL of the destination that you want the linked words to send the reader to. You will see at the top the words that you highlighted to be hyperlinked. www.TimsMinions.com
Creating Hyperlinks Images can also be hyperlinked to external sites. You can use a graphic directing the reader to your own site or an image ad sending them to an affiliate offer like the example below. www.TimsMinions.com
Creating Hyperlinks To add a hyperlink to an image you follow the same steps as you did to add a link to text. Instead of highlighting as you did with the text you simply click on the image and the drop down menu will appear. Click on the Hyperlink option. Again the hyperlink box will appear, paste or type the destination URL into the address bar. (Please note, when copying and pasting links, a blank space can often be copied at the front and/or back of the link. Be sure that there are no blank spaces accidentally added when you add your links otherwise the hyperlink will not work and you can lose potential traffic and affiliate sales.) www.TimsMinions.com
Creating Hyperlinks As you can see, adding links is a very easy process. An eBook that has images that are linked to congruent affiliate products is a great business tactic. Many marketers have written eBooks about a subject and linked to several affiliate products via images and links. www.TimsMinions.com
Creating Hyperlinks • An eBook has a higher perceived value if it offers a lot more than just content. This is where a resources section comes in brilliantly. You can link to sites and resources that match the nature of your eBook, many of those can be linked with your affiliate links to products the reader may need and decide to buy. • As an example this report is about creating eBooks, to promote your eBook or report on your website or use as a list building free giveaway you will need an image of your eBook like this one. So as an example of an image advert I added an image that linked to the software that was used to create the eBook cover you see to the left. • Isn’t that a pretty good relevant affiliate product? It wouldn’t make sense if I tried to promote a ‘Lose Weight’ product in this eBook would it? www.TimsMinions.com
Creating a Resource Section In the resources section you could again link to your affiliate products in a list of tools and services you think people would find useful. For example your resources section would look a bit like this. Tim’s Minions eBook Template your FREE to use template. eBook Cover Creator Software for creating professional eBook covers in one click. OptimizepressWordpress Theme for building your squeeze and sales pages. Email Auto-responder Service for creating email lists and sending out your eBook/newsletters. Hosting Company for hosting your website or blog where you promote your eBook from. And so on. www.TimsMinions.com
Saving your eBook as PDF Once your eBook is written and complete it is time to convert it to a PDF file that can be uploaded to your site and shared around the web. As this little report is mainly based around the latest MS Word document I will show you how to save the file as a PDF document within it, I will also show you where you can convert your Word document to PDF on the web if you do not have the latest MS Word. All you do is go to save the file but instead of just clicking Save as you would normally you go to the Save As option in the drop down menu. www.TimsMinions.com
Saving your eBook as PDF Then go down the drop down menu in the Save as type bar to the PDF(*.pdf) option and click Save. If your version of Word does not have the ability to save straight to PDF there are places on line where you can do it for free. One such site is FreePDFConverter.com, when I tested this site, the text links worked but image links were disarmed. Something for you to bear in mind when creating your eBooks, however the service was easy to use. www.TimsMinions.com
Saving your eBook as PDF Click on the Choose File button to find your eBook Word doc then you can either click on the Convert Your File button and have it converted online or enter an email address in the email address field and have your PDF sent to you in a zip file. See the screenshot below. www.TimsMinions.com
Saving your eBook as PDF Another free PDF software isPrimoPDF, this is downloaded to your computer, when you want to convert a Word document into a PDF you go to print the document but instead of choosing a printer you choose Primo which will NOT print your document but convert it to a PDF file instead. They used to have a desktop icon where you could drag and drop your document which would then automatically be converted to a PDF file. I cannot say whether they still do this or if the images in the PDF files are disarmed. It has been a few years since I used PrimoPDF. Again this is FREE software. www.TimsMinions.com
Saving your eBook as PDF So now you know all you need to know to start churning out professional looking quality eBooks and reports. EBooks and reports have made lots of money for people from either giving them away loaded with affiliate links to products or by creating a series of great short and informative reports that they sell for £5 - £7 each to their growing lists of fans and customers. Imagine having an email list of a few thousand information hungry people and just a couple hundred of them bought your £7 reports each month. That would be a potential £1400 a month. People have and still do it. How many people can easily afford or afford to lose £7 compared to £97? This is the idea behind some very profitable eBook and report publishing businesses. www.TimsMinions.com
Our Recommended Resources Tim’s Minions eBook Template your FREE to use template. eBook Cover Creator Software for creating professional eBook covers in one click. FreePDFConverter free online Word to PDF converter PrimoPDF free to download to your computer PDF converter List Building Blueprint learn how to use free eBooks and reports to build a multimillion £$ business OptimizepressWordpress Theme for building your squeeze and sales pages. Email Auto-responder Service for creating email lists and sending out your eBook/newsletters. Hosting Company for hosting your website or blog where you promote your eBook from. www.TimsMinions.com