menu bar functions
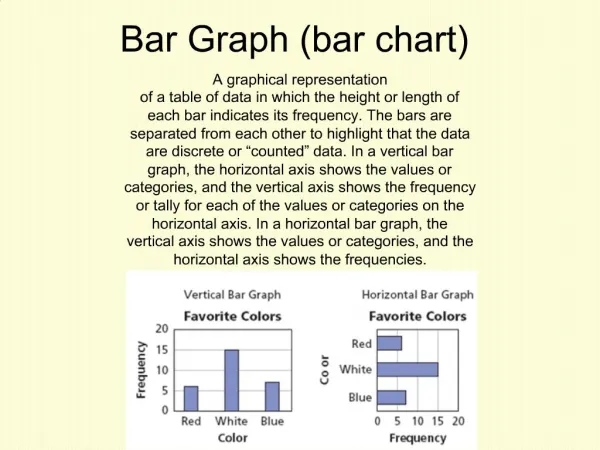
What is the Menu Bar?. The menu bar is a strip of buttons near the top of your screen which allow you to do a variety of functions.It is called a

menu bar functions
E N D
Presentation Transcript
1. Menu Bar Functions Presented by the Adult and Teen
Services Department
of the North Canton Library
2. What is the Menu Bar? The menu bar is a strip of buttons near the top of your screen which allow you to do a variety of functions.
It is called a �menu� bar because when you click on one a list of options will drop down.
These are called �drop down menus.�
3. What does it look like? The menu bar is the second bar across the top of your screen.
It is just below the Title bar.
It has a series of words instead of icons.
4. The menu bar will look something like this�
5. What does a drop down menu look like?
6. There are several things to notice about drop down menus. To the left of some of the options are icons.
These tell you that you could do the same function by clicking the appropriate icon on the toolbar if you preferred.
To the right of some of the options are keyboard commands.
These tell you which key combinations to press to do the same function using the keyboard instead of selecting from the menu.
7. Also notice� Following some of the words are three dots.
This means that when you select this option a window will open for you to give some instructions about the command. Sometimes there is an arrowhead pointing to the right.
This indicates that a submenu will open so you can make more choices about the action.
8. When the drop down menu appears it usually presents you with a shortened list of the most used options.All of the options are still there.At the bottom there is a circle with two arrows pointing down.This always tells you there are more options to view.
9. Each Microsoft program will have its own special menu bar options, but there are some basic ones.
10. Now we�ll look at the options on the File menu.
11. Close will end your session.Don�t worry; you will have a chance to save your work first. New�
This will open a new document for you to work on.
You will not lose any document you already have open. Open�
This will let you find and open a document you previously saved.
You will need to remember where the document is saved and what you called it.
12. Next are� Save
Click here when you want to save your work.
The first time you save you will be able to choose where you will save the document and give it a title. Save As�
When you use this option, you can select another location in which to save your document.
You might save it to a floppy disk or cd.
It is advisable to save often.
13. The Save As� window will look like this�
14. In the �File Name� box you can give your document a descriptive name so you will recognize it later and find it easily.
15. To the right of the �Save In� box at the top, there is an arrow. This always means there are more options.
16. From that list you can select where your document should be saved.
17. Now we will look at some printing options. Page Setup
Print Preview
Print
18. Page Setup will allow you to make some changes to how the text will appear on the page. You might change the margins or have it print lengthwise (landscape).
19. Print Preview shows you a picture of how the page will look before you print it.You can see how many pages it will be or if anything will be cut off.You will have to exit Preview to edit your document.
20. When you are ready to print your document select the Print option.A window will open and you can choose to print all or part of your work and choose multiple copies if you want them.
21. Also on the Print window is a button labeled �Properties.�This will give you even more print options.Don�t be afraid to try a few to see what will happen.
22. Near the bottom of the drop down menu will be a short numbered list.These are files recently used in the program.You can access them simply by clicking on them instead of searching for the folder where they were saved.
23. At the end of the drop down menu is the �Exit� option.This will close your program.You will be able to save your work first.
24. Next on the menu bar is �Edit.�
25. First, we have � Cut� and �Copy.� Cut
You can highlight a section of text and remove it using this function.
It will be saved on a clipboard so you can place the section somewhere else.
This is easier than retyping. Copy
You can highlight a section of text and copy it to another location.
The section will remain in the original location.
This is easier than retyping.
26. Using the �Paste� function is how you insert something you have either cut or copied.Move your cursor to the left of where you want the section to be placed, then select �Paste.�
27. Remember how to highlight something?Move your cursor to the left of where you want to start. Then press the left mouse button. Do not release it. Move the mouse slowly across the section you want to highlight.
28. When you are finished, release the button. The section should now have a black background and is ready to be edited.
29. Another way to highlight is to place the cursor to the left of the area you want to change and click the left mouse button a couple of times. Whole words and sentences will become highlighted.
30. �Delete� will remove an area you have highlighted.It will not be saved.You will not be able to place it somewhere else.
31. �Select All� is a useful function if you if you want to make changes to an entire document at once.Everything will become highlighted and ready to be edited.
32. �Find� and �Replace� are handy functions. Find
This will search your document and find the locations of specific words you want to find. Replace
This is a quick way to make changes to certain words.
Your document is searched and wherever the word appears it will be changed.
33. �View� changes how you see your document.
34. Different Microsoft programs will have different �View� options.Experiment with your options and see how they display your document.
35. The �Toolbar� option will let you select which toolbars will be displayed.
36. The �Ruler� option will display a ruler on the edges of your document in case you want to visually align parts of your work.
37. The �Header and Footer� option will allow you to have information such as document title, date, page numbers or anything you want display at the top or bottom of every page of your document.
38. Now let�s look at the �Insert� button.
39. Different programs let you insert different things into your document such as the date, pictures, charts or footnotes.
40. In Microsoft Word, you might select� Break
This lets you start typing on another page or a column without trying to move to the right place. Auto Text
This lets you insert common words or phrases you might use very often so you do not have to type them out all the time.
41. �Symbol� will display a table with a wide variety of symbols and letters of foreign languages.Just click on one and it will be inserted into your document.
42. Options such as Footnotes, Captions and Cross-references allow you to type bits of information to insert into non-traditional places in your document.
43. Options such as Picture, File and Object will open another window so that you can select clip art, files, charts, Excel and PowerPoint documents from saved locations.
44. Text box will place a plus sign where your cursor is. If you click the plus with your mouse and hold the left mouse button you can open a box as large as you want. Then you can type text inside the box.
45. Bookmark will allow you to flag sections of your document so can return to it quickly if you need to.
46. Choosing Hyperlink will let you create a link to something else such as another saved document, chart or picture. Your reader can then view these elements easily.
47. The Format options will help you change the way your work looks.
48. Font�
This window will let you change the size of the letters and their style.
Paragraph�
Allows you to set up how many spaces your paragraphs will indent.
49. Bullets and Numbering
This allows you to make lists with numbers or bullet points.
Right click on the list to see how you change the way the numbers and bullets look. Borders and Shading
You may make changes to the style, size and color of borders.
50. Columns
Allows you to set up to three columns of different widths on your page. Tabs
Here you can set the distances for your tabs.
Just type in the number of inches from the edge.
51. AutoFormatThis window will give you options that will automatically do certain things to your documents.You may set preferences like how fractions and ordinal numbers are displayed.You may select auto correct so that the right words are always capitalized.
52. There are many options for you to format how your work appears.Experiment with them and find the ones you particularly like.Most of the formatting options are also available on the Formatting Toolbar.Try our formatting functions tutorial for more information.
53. The �Windows� button is available in most Microsoft programs.It helps you organize on the screen the windows you are using.
54. New Window
This will open a new window containing the same information as the window currently open. Arrange All�
This will display all the windows you have open making it easier to move information from one window to another.
55. Split
This will divide your screen into two panes.
This lets you work on two parts of a lengthy document in the same screen.
No need for a lot of scrolling back and forth.
The numbered list at the button of the drop down menu is the windows that are currently open.
You can go to any of them quickly by selecting them from the list.
56. The last button we will look at is �Help.�
57. The Help options might look a little different in different programs, but they all will let you type your question or browse the help index then present you with information which matches your request.
58. This is also the place to look to control the Office Assistant.You can display or hide it or change its appearance.When displayed, the Assistant can answer your help questions and make suggestions as you work.
59. The Menu bar is there to make your task easier.Do not be afraid to try the various options.Remember that many of the functions on the menu bar can also be accomplished using icons on other toolbars. Use whichever method you find most comfortable.
60. Thank you for trying this tutorial.Try out some of our others or contact the Reference desk to sign up for some of our free computer classes.