DREAMWEAVER CS4
DREAMWEAVER CS4 . What’s New in Dreamweaver CS4 ? Workspace in Dreamweaver CS4 Opening and Creating Sites. What’s New in Dreamweaver CS4?.


DREAMWEAVER CS4
E N D
Presentation Transcript
DREAMWEAVER CS4 What’s New in Dreamweaver CS4? Workspace in Dreamweaver CS4 Opening and Creating Sites
What’s New in Dreamweaver CS4? • Gray interface: when you launch Dr.CS4 is that it’s all shades of gray. When you roll your cursor over the icons, the colorful designs reappear, making it easier to recognize and select them. • Customizable interface: Layout in CS4 have eight preset layout options, each optimized for a specific profile, including Designer, Coder, and Programmer
What’s New in Dreamweaver CS4? • Enhanced CSS support: CSS in Dr.CS4 better support for creating styles and CSS layouts,especially in the Property inspector. • Property inspector:has been split in two to better separate HTML options from CSS. You can also create and edit styles as you specify settings in the Property inspector
What’s New in Dreamweaver CS4? • Better integration with Photoshop, Flash, and other design programs: Some of the coolest improvements to Dreamweaver CS4 include greater integration among Adobe’s suite of programs
What’s New in Dreamweaver CS4? • Spry features for AJAX create drop-down menus, collapsible panels, and other interactive AJAX features
What’s New in Dreamweaver CS4? • Live View possible to render a page as it’d be displayed in a browser so you can see AJAX and other interactive features in action without leaving Dreamweaver
What’s New in Dreamweaver CS4? • Code Navigator is a handy way to keep an eye on the CSS code for your pages
What’s New in Dreamweaver CS4? • Related Files bar: find a handy list of associated files and scripts for any open document external CSS files, JavaScript files and other programming files
Workspace in Dreamweaver CS4 • Started in the Dreamweaver interface: the Welcome screen appears in the main area of the program
Workspace in Dreamweaver CS4 • Dreamweaver creates a new blank HTML page in the main workspace
Workspace in Dreamweaver CS4 • Changing workspace layouts choosing Window➪Workspace Layout and then choosing from any of the listed layouts such as Designer, App Developer,…
Workspace in Dreamweaver CS4 • The menu bar: the menu at the top of the screen provides easy access to most program features, including the options you find in the Insert bar
Workspace in Dreamweaver CS4 • The Document toolbar you find the Code, Split, and Design view buttons, which make it easy to change from displaying only the code or design in the workspace, or both the code and the design the page title Visual Aids button preview of the page
Workspace in Dreamweaver CS4 • The Document window: The big, open section in the main area of the workspace is the Document window where you work on new and existing pages. The Document window is displayed in split view, showing the code at the top of the window and the design at the bottom
Workspace in Dreamweaver CS4 • The Document window Document window is displayed in split view the code at the top of the window the design at the bottom
Workspace in Dreamweaver CS4 • The docking panels located to the right of the work area when you choose any of the designer layouts or on the left when you choose any of the developer layouts • The Insert panel includes seven sub-categories, each with a different set of icons representing common features
Workspace in Dreamweaver CS4 • Common Insert panel Displays icons for many of the most common features, including links, tables, and images
Workspace in Dreamweaver CS4 • Layout Insert panel: Displays div, table, and frame options essential for creating page layouts.
Workspace in Dreamweaver CS4 • Forms Insert panel: Features the most common form elements, such as radio buttons and boxes
Workspace in Dreamweaver CS4 • Data Insert panel: Displays options for building dynamic Web pages powered by database material.
Workspace in Dreamweaver CS4 • Spry Insert panel: Features a collection of widgets that combines HTML, CSS, and JavaScript to create interactive page elements, such as drop-down lists and collapsible panels
Workspace in Dreamweaver CS4 • InContext Editing Insert panel: Displays features that are handy for cre-atingRepeating and Editable Regions, as well as managing CSS classes, when working with dynamic content.
Workspace in Dreamweaver CS4 • Text Insert panel: Displays common text-formatting features, including paragraphs, breaks, and lists.
Workspace in Dreamweaver CS4 • Favorites Insert panel: Enables you to right-click (Windows) or Control-click (Mac) to add any of the icons from any of the other Insert bar options to create your own collection of favorite features.
Workspace in Dreamweaver CS4 • The Property inspector displays the properties, or options, for any selected element on a page, and it changes based on what’s selected. The Property inspector into two sections or many elements, one for HTML features and the other for CSS.
Workspace in Dreamweaver CS4 • The status bar includes access to a number of features that control the display of a page in Dreamweaver’s workspace, such as the magnifying glass, which enlarges the view of the open page Status bar Property inspector
Workspace in Dreamweaver CS4 • Changing preference settings you can easily alter Dreamweaver’s preference settings using the Preferences dialog box. • To open the Preferences dialog box, choose Edit➪Preferences
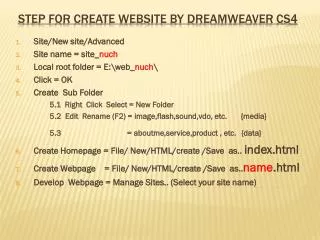
Opening and Creating Sites • Setting Up a New or Existing Site • The first thing to understand about the site definition process need to store all your site’s resources in one local root folder on your hard drive and identify the folder in Dreamweaver because all the elements of your site must remain in the same relative location on your hard drive as they are on your Web server in order for your links, images, and other elements to work properly
Opening and Creating Sites • Setting Up a New or Existing Site • Defining a Web site in Dreamweaver: the site definition process seems a little confusing at first, you’re creating a new site or working on an existing site • The process of defining a root site folder: • Choose Site➪NewSite ➪ The SiteDefinitiondialog box appears. • Click the Advanced tab • In the Category box on the left, make sure that the Local Info category is selected. • In the Site Name text box, type a name for your site
Opening and Creating Sites • Setting Up a New or Existing Site • The process of defining a root site folder: • Click the Browse icon (hint: it looks like a file folder) next to the Local Root Folder text box and browse your hard drive to locate the folder you want to serve as the main folder for all the files in your Web site • Specify the Default Images folder by entering the location or by using the Browse icon to locate it.
Opening and Creating Sites Use the Site Definition dialog box to set up a new or existing Web site in Dream-weaver
Opening and Creating Sites • Setting Up a New or Existing Site • The process of defining a root site folder: • For Links Relative To, leave the Document option selected unless you know that you want your links to be set up relative to the root of your site. • In the HTTP Address text box, type the URL of your Web site:TheHTTP address is the URL, or Web address, that your site will have when published on a Web server. • Select the Use Case-Sensitive Link Checking box. • Select the Enable Cache option. • Click OK to close the Site Definition dialog box and save your settings
Opening and Creating Sites • Editing and managing multiple sites After you complete the site definition process covered in the preceding exer-cise, you can make changes and additions to a site definition by choosing Site➪Manage Sites, selecting the name of the site in the Manage Sites dialog box, and then clicking the Edit button
Opening and Creating Sites • Creating New Pages • Starting from the Welcome screen • If you want to create a simple, blank Web page,chooseHTML from the Create New list in the middle column • If you’re creating a dynamic site, choose ColdFusion, PHP, or one of the other dynamic site options
Opening and Creating Sites • Creating New Pages • Starting from the Welcome screen The Welcome screen pro-vides a list of shortcuts for creating new files or opening existing pages in Dream-weaver
Opening and Creating Sites • Creating New Pages • Creating a page with the New Document window: create a new page by using the New Document window available from the File menu, as you see in the following the steps • Choose File➪New➪The New Document window opens • From the left side of the screen, select Blank Page • From the Page Type list, select HTML and then choose Create • From the Layout section, choose <none> • Choose File➪Save to save your page and give it a filename following the guidelines in the upcoming sections, “Naming new page files” and “Naming the first page index.html.”
Opening and Creating Sites • Creating New Pages • Naming new page files • Include an extension at the end to identify the file type(such as html for HTML files or .gif for GIF images) • Don’t use spaces or special characters in the filename (such as cat’s page.html.) you can use the underscore (_) or the hyphen (-). For example: cat-page.html • Naming the first page index.html Another confusing rule, and one of the most important, is that the main page (or the front page) of your Web site must be called index.html because most servers are set up to serve the index.html page first.
Opening and Creating Sites • Creating New Pages • Bestowing a page title • The title won’t appear in the main part of your Web page, but it does appear at the top of a browser window, usually just to the right or left of the name of the browser
Opening and Creating Sites • Creating New Pages • Designing Your First Page • Formatting headlines with the heading tags • Highlight the text you want to format. • In the Property inspector, at the bottom of the workspace, make sure the HTML button on the left side of the inspector is selected. • Use the Format drop-down list to select a heading option
Opening and Creating Sites • Creating New Pages • Designing Your First Page • Formatting headlines with the heading tags
Adding paragraphs and line breaks • Creating New Pages • Inserting and formatting text • Adding paragraphs and line breaksworking in design view in Dreamweaver and press the Enter key (Windows) or the Return key (Mac), Dreamweaver inserts a paragraph tag, or <p>, in the code, which creates a line break followed by a blank line. If you want a line break without the extra blank line, hold down the Shift key while you press Enter (or Return) to get Dreamweaver to insert the <br /> tag into the code, creating a single line breakphsand line breaks
Opening and Creating Sites • Creating New Pages • Inserting and formatting text • Inserting text from another program • Edit➪Paste /Edit➪Paste Special ➪ four main options • Text Only • Text with Structure includes paragraphs, lists, tables, and other structural formatting options. • Text with Structure Plus Basic Formatting includes structural formatting as well as basic formatting, such as bold and italic. • Text with Structure Plus Full Formatting includes formatting created by style sheets in programs, such as Microsoft Word • Retain Line Breaks Line breaks are preserved, even • Clean Up Word Paragraph Spacing
Opening and Creating Sites • Creating New Pages • Adding images • Note: Before inserting an image into a Web page, it’s good practice to save the image inside your local root folder • Follow these steps to add an image on your Web page: • Place your cursor on the page where you want to add the image. • Double-click the Insert panel at the top right of the workspace to open it. • Click the Images icon, located in the Common section of the Insert panel or click the small arrow to the right of the icon and then choose Image from the drop-down list.
Opening and Creating Sites • Creating New Pages • Adding images • Follow these steps to add an image on your Web page • Navigate to the folder that has the image you want to insert and double-click to select the image you want to insert into your page. • Enter alternate text in the Image Tag Accessibility Attributes dialog box. • Click OK. • Click to select the image on your Web page • Use the Property inspector to specify image attributes, such as align-ment, spacing, and alternate text.
Opening and Creating Sites • Creating New Pages • Adding images
Opening and Creating Sites • Creating New Pages • Setting Links To link to a page within your Web site, you can create a relative link that includes a path describing how to get from the current page to the linked page within your main root folder • Linking pages within your Web site • In Dreamweaver, open the page where you want to create a link. • Select the text or image that you want to serve as the link (meaning the text or image that a user licks to trigger the link).
Opening and Creating Sites • Creating New Pages • Setting Links • Linking pages within your Web site • Click the Hyperlink icon in the Common Insert panel, at the top right of the workspace • In the Hyperlink dialog box click the Browse icon to the right of the Link drop-down list. ➪The Select File dialog box opens • Click the filename to select the page that you want your image or text to link to, and then click OK (Windows) or Choose (Mac).
Opening and Creating Sites • Creating New Pages • Setting Links • Setting links to named anchors within a page(jump link) • Open the page on which you want to insert the named anchor • Place cursor next to the word or image that you want to link to on the page. • Choose Insert➪Named Anchor. ➪ The Insert Named Anchor dialog box appears • Enter a name for the anchor➪ Click OK. • To set a link to the named anchor location, select the text or image that you want to link from. • Click the Link icon in the Common Insert panel, at the top right of the workspace. • In the Hyperlink dialog box, use the small arrow to the right of the Link box to select the anchor.
Opening and Creating Sites • Creating New Pages • Setting Links • Linking to another Web site (external link) To create an external link, follow these steps: • In Dreamweaver, open the page from which you want to link. • Select the text or image that you want to act as a link. • In the Link text box in the Property inspector, type the URL of the page you want your text or image to link to.