Face Jugs
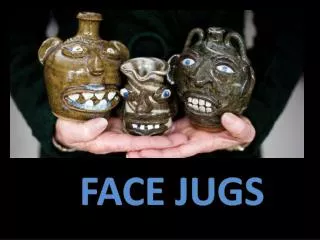
Face Jugs. A Georgia Craft By Randy Farley. What is a face jug?. A jug that has an “Ugly face on it.” The Ugly face has parts that have been exaggerated or minimized. Who made these face jugs?. The Meader family made the traditional crafts. When and where were these jugs made?.

Face Jugs
E N D
Presentation Transcript
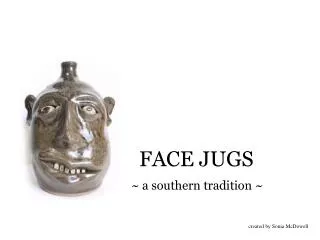
Face Jugs A Georgia Craft By Randy Farley
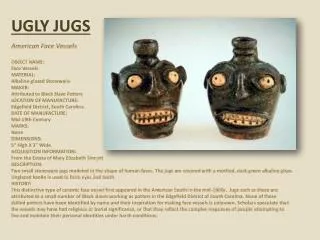
What is a face jug? • A jug that has an “Ugly face on it.” • The Ugly face has parts that have been exaggerated or minimized.
Who made these face jugs? • The Meader family made the traditional crafts.
When and where were these jugs made? • They have been made in the mountains of North Georgia since the early 1800’s.
What was the face jug used for? • It was used for holding liquids that were dangerous. The scary faces would keep children away from liquids that were harmful. • It was sort of like a Mr. Yuck sticker.
Day 1: Making the jug • Roll clay into a ball. • Press your thumb in the center of the ball, but do not let your thumb go through the ball of clay. • Use your two index finger and your middle finger to press the sides of the ball of clay to make a pinch pot. • Do not press the sides of the pot thinner than the thickness of your thumb. • Repeat process with another ball of clay. • Score and slip the edges of the pots. • Place them one on top of the other and smooth the seams away.
Day 2: The neck and the Stopper The neck: • First, cut a hole in the center of the vessel using your plastic knife. • Roll a separate piece of clay into a coil. • Fit the coil around the edge of the hole. • Score and slip. The Stopper: • Take a piece of clay and roll it in to a thick coil. • Using your fingers, press the bottom part of the coil in to a cone shape, leaving a thick part at the top. • See if it will fit into the hole of the neck.
Day 3: Making the face The handle: • Roll out a thick coil. • Form it to the shape of a handle. • Score and slip the places you want to attach it. • Attach it and smooth the seams away. The face: • Form and mold pieces of clay to the shapes of the face. • Score and slip the pieces and attach to the jug.