### Introduction to Rivanna: Connecting, Navigating, and Managing Allocations ####
1.07k likes | 1.15k Vues
Rivanna is a high-performance computing cluster that offers compute nodes, head nodes, storage, and Infiniband connections. Learn how to connect via SSH, FastX, and Open-on-Demand, manage allocations, navigate directories, check storage usage, and run jobs efficiently from scratch. Discover tips for data transfer and setting up Globus endpoints, as well as module loading for applications. ####

### Introduction to Rivanna: Connecting, Navigating, and Managing Allocations ####
E N D
Presentation Transcript
Introduction to Rivanna 20 March 2019
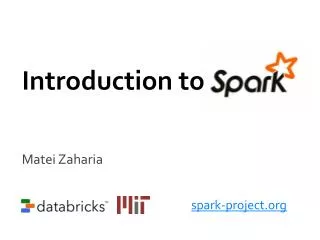
Rivanna in More Detail Compute Nodes Head Nodes ssh client Ethernet Home Directory Other Storage Scratch (Lustre) Infiniband
Allocations • Rivanna is allocated: At the most basic level, an allocation refers to a chunk of CPU time that you receive and can use too run your computation. • Allocations are measured in service units (SUs), where 1 SU = 1 core-hour • All accounts on a given allocation share the service units.
How to connect to Rivanna • There are three ways to connect to Rivanna: 1. ssh client • Instructions for installing and using an ssh client are provided in the appendix of these slides. 2. FastX • Using your web browser, go to URL https://rivanna-desktop.hpc.virginia.edu and log in. • Click on “Launch Session”; Select “MATE” and click on “Launch” 3. Open-on-Demand -- Coming Soon! • Using your web browser, go to URL https://rivanna-portal.hpc.virginia.edu • You will need to “Netbadge” in. Regardless of how you connect, you must use the UVa Anywhere VPN when off-grounds. See http://its.virginia.edu/vpn/ for details.
We will use FastX today: • In your web browser, go to URL: https://rivanna-desktop.hpc.virginia.edu
Starting up FastX • Click “Launch Session”; Select MATE; Click Launch
FastX Environment • A desktop for working on Rivanna
After you have logged in . . . • You will be in your home directory. • How you navigate will depend on how you connected to Rivanna. • ssh client: • A terminal window will appear. To navigate within your directory, you will need to use Unix/Linux commands. • See https://arcs.virginia.edu/UNIX-tutorials-for-beginners to learn more about Unix/Linux commands • FastX: • A desktop environment will appear. You can use your mouse to navigate or open a terminal window to use Unix/Linux commands or start interacive applications. • Open-on-Demand: • A dashboard will appear. You can click on the menu items across the top to access different tools, like a file manager, a job composer, or interactive applications.
Your Home Directory • The default home directory on Rivanna has 50GB of storage capacity • This directory is distinct from the 4GB home directory provided by ITS. • The ITS home directory is available as /tiny/$USER
Checking your Home Storage • To see how much disk space you have used in your home directory, open a Terminal window and type hdquota at the command-line prompt: • $ hdquota • Filesystem | Used | Avail | Limit | Percent Used • qhome 39G 12G 51G 77%
Checking your Allocation • To see how many SUs you have available for running jobs, type allocations at the command-line prompt: • $ allocations • Allocations available to Misty S. Theatre(mst3k): • * robot_build: less than 6,917 service-units remaining. • * gizmonic-testing: less than 5,000 service-units remaining. • * servo: less than 59,759 service-units remaining, allocation will expire on 2017-01-01. • * crow-lab: less than 2,978 service-units remaining. • * gypsy: no service-units remaining
Your /scratch Directory • Each user will have access to 10 TB of temporary storage. • It is located in a subdirectory under /scratch, and named with your userID • e.g., /scratch/mst3k • You are limited to 350,000 files in your scratch directory. Important: /scratch is NOTpermanent storage and files older than 90 days will be marked for deletion.
Running Jobs from Scratch • We recommend that you run your jobs out of your /scratch directory for two reasons: • /scratch is on a Lustre filesystem (a storage system designed specifically for parallel access). • /scratch is connected to the compute nodes with Infiniband (a very fast network connection). • We also recommend that • You keep copies of your programs and data in more permanent locations (e.g., your home directory or leased storage). • After your jobs finish, you copy the results to more permanent storage).
Checking your /scratch Storage • To see the amount of scratch space that is available to you, typesfsqat the command line prompt. • $ sfsq • 'scratch' usage status for ‘mst3k', last updated: 2016-09-08 16:26:12 • - ~28/10,000 GBs allocated disk space • - 153/350,000 files created • - 151/153 files marked for deletion due to age limits • To view a list of all files marked for deletion, please run 'sfsq -l'
Moving data onto Rivanna • You have several options for transferring data onto your home or /scratch directories. • Use the scp command in a terminal window. • Use a drag-and-drop option with MobaXterm (Windows) or Fugu (Mac OS). • Use the web browser in the FastX desktop to download data from UVA Box. • Set up a Globus endpoint on your laptop and use the Globus web interface to transfer files. (See https://arcs.virginia.edu/globus for details)
Modules • Any application software that you want to use will need to be loaded with the module load command. • For example: • module load matlab • module load anaconda/5.2. 0-py3.6 • module load gcc R/3.5.1 • You will need to load the module any time that you create a new shell • Every time that you log out and back in • Every time that you run a batch job on a compute node
Module Details • module avail – Lists all available modules and versions. • module spider– Shows all available modules • module key keyword – Shows modules with the keyword in the description • module list – Lists modules loaded in your environment. • module load mymod– Loads the default module to set up the environment for some software. • module load mymod/N.M – Loads a specific version N.M of software mymod. • module load compiler mpimymod – For compiler- and MPI- specific modules, loads the modules in the appropriate order and, optionally, the version. • module purge– Clears all modules.
Learning more about a Module • $ module avail python • $ module spider python • $ module key python • To locate a python module, try the following: • To find bioinformatics software packages, try this: • The available software is also listed on our website: https://arcs.virginia.edu/software-list • $ module key bio
Partitions (Queues) • Rivanna has several partitions (or queues) for job submissions. • You will need to specify a partition when you submit a job. • To see the partitions that are available to you, type queues at the command-line prompt. • $ queues • Queue Availability Time Queue Maximum Maximum Idle SU Usable • (partition) (idle%) Limit Limit Cores/Job Mem/Core Nodes Rate Accounts • standard 43 13(72.2%) 7-days none 20 64-GB 195 1.00 robot-build, gypsy • dev 1833(65.2%) 1 hours none 4 254GB 59 0.00 robot-build, gypsy • parallel 3528(73.5%) 3-days none 240 64-GB 176 1.00 robot-build, gypsy • largemem 48(60.0%) 7-days none 16 500-GB 3 1.00 robot-build, gypsy • gpu 334(85.0%) 3-days none 8 128-GB 10 1.00 robot-build, gypsy • knl 2048(100.0%) 3-days none 2048 1-GB 8 1.00 robot-build, gypsy
SLURM • SLURM is the Simple Linux Utility for Resource Management. • It manages the hardware resources on the cluster (e.g. compute nodes/cpu cores, compute memory, etc.). • SLURM allows you to request resources within the cluster to run your code. • It is used for submitting jobs to compute nodes from an access point (generally called a frontend). • Frontends are intended for editing, compiling, and very short test runs. • Production jobs go to the compute nodes through the resources manager. • SLURM documentation: https://arcs.virginia.edu/slurm http://slurm.schedmd.com/documentation.html
Basic SLURM Script • A SLURM script is a bash script with • SLURM directives (#SBATCH) and • command-line instructions for running your program. #!/bin/bash #SBATCH --nodes=1 #total number of nodes for the job #SBATCH --ntasks=1 #how many copies of code to run #SBATCH --cpus-per-task=1 #number of cores to use #SBATCH --time=1-12:00:00 #amount of time for the whole job #SBATCH --partition=standard #the queue/partition to run on #SBATCH --account=myGroupName#the account/allocation to use module purge module load anaconda #load modules that my job needs python hello.py #command-line execution of my job
Basic SLURM Job (Shorthand notation) • Most of the SLURM directives have a short hand notation for the options #!/bin/bash #SBATCH –N 1 #total number of nodes for the job #SBATCH –n 1 #how many copies of code to run #SBATCH –c 1 #number of cores to use #SBATCH –t 12:00:00 #amount of time for the whole job #SBATCH –p standard #the queue/partition to run on #SBATCH –A myGroupName#the account/allocation to use module purge module load anaconda#load modules that my job needs python hello.py#command-line execution of my job
Submitting a SLURM Job • To submit the SLURM command file to the queue, use the sbatch command at the command line prompt. • For example, if the script on the previous slide is in a file named job_script.slurm, we can submit it as follows: -bash-4.1$ sbatchjob_script.slurm Submitted batch job 18316
Checking Job Status • To display the status of only your active jobs, type: squeue –u <your_user_id> -bash-4.1$ squeue –u mst3k JOBID PARTITION NAME USER ST TIME NODES NODELIST(REASON) standard job_sci mst3k R 1:45 1 udc-aw38-34-l • The squeuecommand will show pending jobs and running jobs, but not failed, canceled or completed job.
Checking Job Status • To display the status of all jobs, type: sacct –S <start_date> -bash-4.1$ sacct –S 2019-01-29 3104009 RAxML_NoC+ standard hpc_build 20 COMPLETED 0:0 3104009.bat+ batch hpc_build 20 COMPLETED 0:0 3104009.0 raxmlHPC-+ hpc_build 20 COMPLETED 0:0 3108537 sys/dashb+ gpuhpc_build 1 CANCELLED+ 0:0 3108537.bat+ batch hpc_build 1 CANCELLED 0:15 3108562 sys/dashb+ gpuhpc_build 1 TIMEOUT 0:0 3108562.bat+ batch hpc_build 1 CANCELLED 0:15 3109392 sys/dashb+ gpuhpc_build 1 TIMEOUT 0:0 3109392.bat+ batch hpc_build 1 CANCELLED 0:15 3112064 srungpuhpc_build 1 FAILED 1:0 3112064.0 bash hpc_build 1 FAILED 1:0 • The sacct command lists all jobs (pending, running, completed, canceled, failed, etc.) since the specified date.
Deleting a Job • To delete a job from the queue, use thescancel command with the job ID number at the command line prompt: -bash-4.1$ scancel 18316
To follow along . . . • Go ahead and log into Rivanna. • If using FastX, open up a terminal window. • First, we will copy a set of examples into your account. At the command line, type: cd scp-r /share/resources/source_code/CS6501_examples/ .
Hello World Job • To see that the directory is there, type: • Move to the first folder (i.e., 01_serial) by typing: • You will see 2 files: hello.py and hello.slurm • To view the contents of files, type more followed by the filename: ls cd CS6501_examples/01_simple_SLURM ls more hello.slurm
Simple SLURM Job • If your program performs lots of computation, but uses only one processor, you should use the standard queue. #!/bin/bash #SBATCH --nodes=1 #SBATCH --ntasks=1 #SBATCH --cpus-per-task=1 #SBATCH --time=00:05:00 #SBATCH --partition=standard #SBATCH --account=your_allocation#Edit to class-cs6501-004-sp19 module purge module load anaconda python hello.py
Simple Job • Your results will be placed in a file with the name slurm_12345678.out, where 12345678 is replaced with the job ID number from your job submission. • Type ls to see if the output file exists in your directory. • You can look at the results by typing more following by the filename. For example: more slurm_12345678.out
PyTorch Job • PyTorch is an open source Python package to create deep learning networks. • The latest PyTorch versions are provided as prebuilt Singularity containers (called tensorflow) on Rivanna. • All of the tensorflow container images provided on Rivanna require access to a GPU node.
PyTorch Container • Before you run PyTorch, you will need to move a copy of the tensorflow container into your /scratch directory. • This step only needs to be done once. module load singularity module load tensorflow/1.12.0-py36 cp$CONTAINERDIR/tensorflow-1.12.0-py36.simg /scratch/$USER
Using GPUs • Certain applications can utilize for general purpose graphics processing units (GPGPUs) to accelerate computations. • GPGPUs on Rivanna: • K80: dual GPUs per board, can do double precision • P100: single GPUs per board, double precision is software (slow) • You must first request the gpu queue. Then with the gres option, type the architecture (if you care) and the number of GPUs. #SBATCH -pgpu #SBATCH --gres=gpu:k80:2
Caution: Limited # of GPUs • There are only a handful of GPUs on Rivanna: • 10 K80s with 4 GPUs each • 4 P100s with 4 GPUs each • You can check the status of the GPUs in two ways: • Type queues to see the percentage idle • Type sinfo | grepgputo see if any GPU nodes are down.
Putting it all together in a Script SLURM Script #!/bin/bash #SBATCH -o test.out #SBATCH -e test.err #SBATCH -p gpu #SBATCH --gres=gpu:1 #SBATCH -c 2 #SBATCH -t 01:00:00 #SBATCH -A your_allocation module purge module load singularity module load tensorflow # Assuming that the container has been copied to /scratch/$USER containerdir=/scratch/$USER echo $containdir singularity exec --nv$containdir/tensorflow-1.12.0-py36.simg \ python pytorch_mnist.py aa
Need more help? Office Hours Tuesdays: 3 pm - 5 pm, PLSB 430 Thursdays: 10 am - noon, HSL, downstairs Thursdays: 3 pm - 5 pm, PLSB 430 Website: arcs.Virginia.edu Or, for immediate help: hpc-support@virginia.edu
Appendices A: Using Jupyter Notebooks on Rivanna B: Connecting to Rivanna with an sshclient C: Connecting to Rivanna with MobaXterm D:Neural Networks
Appendix A Using Jupyter Notebooks on Rivanna
JupyterLab • JupyterLab is a web-based tool that allows multiple users to run Jupyter notebooks on a remote system. • ARCS now provides JupyterLab on Rivanna.
Accessing JupyterLab • To access JupyterLab, type the following in your web browser: https://rivanna-portal.hpc.virginia.edu/ • After logging in via Netbadge in, you will be directed to the Open OnDemand main page.
Starting Jupyter Instance • In the top, click on “Interactive Apps” and in the drop-down box, click on “Jupyter Lab”.
Starting a Jupyter Instance • Our example will be using TensorFlow; so, we need to make sure that we select the Rivanna Partition called “GPU”. • Also, don’t forget to put in your “MyGroup” name for the Allocation • Finally, click the blue “Launch” button at the bottom of the form (not shown here). • A form will appear that allows you to specify the resources for your Notebook.
Starting a Jupyter Instance • Wait until a blue button with “Connect to Jupyter” appears. • Click on the blue button. • It may take a little bit of time for the resources to be allocated.