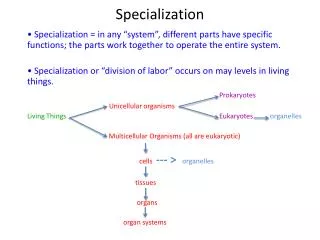
Introduction to DITA Specialization: Information, Domain, and Processing
450 likes | 480 Vues
Learn about DITA specialization covering information types, domains, and processing. Explore core design principles, specialization architecture, and specialized processes. Enhance your skills in customizing processing and creating specialized topics.

Introduction to DITA Specialization: Information, Domain, and Processing
E N D
Presentation Transcript
Introduction to DITA specialization Showing information type, domain, and processing specializations Title slide
Agenda • Review of DITA and specialization • Specializing an information type • Specializing a domain • Customizing processing
DITA defined • Darwin:DITA utilizes principles of inheritance for specialization • Information Typing: DITA was originally designed for technical information based on an information architecture of Concept, Task and Reference • Architecture: DITA is a model for extension both of design and of processes
Core design principles of DITA • Topic orientation • Discrete units of information covering a specific subject with a specific intent • Topic granularity • Self-contained topics combine with other topics into information sets • Strong typing • DTDs and schemas guarantee that DITA types follow identical information structures • Specialization • Architecture for extending basic types to new types adapted for a particular use within an information set • Common base class • Top-level "generic" base type provides “fallback” for all descendants
topic concept reference task The core DITA topic types – The “IT” in DITA A unit of information which is meaningful when it stands alone. Provides background information that users need to know. Provides procedural details such as step-by-step instructions. Provides quick access to facts.
Specializing from Topic to Task topic topic task task title title title title prolog prolog prolog prolog metadata metadata metadata metadata body body taskbody taskbody related related - - links links related related - - links links prereq prereq result result context context example taskxmp Small DTD additions to enforce document structure. May have no CSS or XSL process changes. postreq postreq steps steps step step cmd, (info | substeps | tutorialinfo | stepxmp cmd, (info | substeps | tutorialinfo | xmp | choices)*, result? | choices|choicetable)*, stepresult?
task task title title prolog prolog metadata metadata taskbody taskbody related related - - links links prereq prereq result result context context example taskxmp postreq postreq steps steps step step cmd, (info | substeps | tutorialinfo | stepxmp cmd, (info | substeps | tutorialinfo | | choices|choicetable)*, stepresult? xmp | choices)*, result? From Task to Business Task businesstask Additional structure changes. title prolog metadata btaskbody related-links prereq result context example postreq bsteps step appstep appdesc
Specializations from Topic Topic is the core. Each specialization is a delta in design, and if it needs special processing that's a delta too.
Benefit of design reuse through specialization • No need to reinvent the base vocabulary - Create a module in 1/2 day with 10 lines vs. 6 months with 100s of lines; automatically pick up changes to the base • No impact from other designs that customize for different purposes - Avoid enormous, kitchen-sink vocabularies; Plug in the modules for your requirements • Interoperability at the base type - Guaranteed reversion from special to base • Reusable type hierarchies - Share understanding of information across groups, saving time and presenting a consistent picture to customers • Output tailored to customers and information - More specific search, filtering, and reuse that is designed for your customers and information not just the common denominator • Consistency - Both with base standards and within your information set • Learning support for new writers - Instead of learning standard markup plus specific ways to apply the markup, writers get specific markup with guidelines built in • Explicit support of different product architectural requirements - Requirements of different products and architectures can be supported and enforced, rather than suggested and monitored by editorial staff
Specialized processes Specialized processes handle the delta for specialized topic types Base and delta DTDs Base and delta processors Base topic Base processors Task bcTask Concept Specialization-specific processors bcConcept Reference bcReference
Overview of exercises • Review of setup • Creating samples (in base markup, then in specialized markup) • Identifying new tags • Creating the information type • Creating the domain • Adding override processing • Summary
Setting up • Install DITA package http://www.ibm.com/developerworks/xml/library/x-dita6/x-dita_downloads.html • Install an XSLT interpreter (eg xalan, saxon, xt...)
Creating samples • Always easiest to start with something concrete and then figure out the general rules • So start by authoring a sample document in the closest existing information type • Then go through and rename tags that should be more specific • Then reverse-engineer the document type from its instance
Sample: A task for a wizard • Assuming that wizards do sometimes require documentation • A series of screens with next, back, and finish buttons • Let's say that each wizard task needs to describe how to open and finish the wizard, with one step per page in between • Can use markup to enforce consistency • Can also use special markup for the wizard title and the wizard-specific controls (next and finish) • This sample is for demonstration purposes only, not a best practice
Sample using task.dtd (mytask.xml) <task id="atest"> <title>Creating a foo</title> <taskbody> <steps> <step> <cmd>Click <menucascade> <uicontrol>File</uicontrol> <uicontrol>New</uicontrol> <uicontrol>Foo</uicontrol> </menucascade> to open the <wintitle>New Foo</wintitle> wizard.</cmd> <info>The <wintitle>New Foo</wintitle> wizard opens to the Name page, where you provide a name for the foo.</info> </step> <step> <cmd>Click <uicontrol>Next</uicontrol> and turn to the <wintitle>Properties</wintitle> page.</cmd> <info>The Properties page lets you define the color and shape of your foo.</info> <substeps> <substep><cmd>Set the color of the foo using the color wheel.</cmd></substep> <substep><cmd>Set the shape of the foo using the shape selection bar.</cmd> <info>You can edit the shape of the foo after you create it; this shape is just your starting point.</info></substep> </substeps> </step> <step> <cmd>Click <uicontrol>Next</uicontrol> and turn to the <wintitle>Location</wintitle> page.</cmd> <info>Select the project you want to save your foo in.</info></step> <step><cmd>Click <uicontrol>Finish</uicontrol> to close the wizard and create your foo.</cmd></step> </steps> <result>The foo, with the shape and color you selected, should appear in your project folder.</result> </taskbody> </task>
Sample with renamed tags <wiztask id="btest"> <title>Creating a foo</title> <wiztaskbody> <wizsteps> <wizopen> <cmd>Click <menucascade> <uicontrol>File</uicontrol> <uicontrol>New</uicontrol> <uicontrol>Foo</uicontrol> </menucascade> to open the <wiztitle>New Foo</wiztitle> wizard.</cmd> <info>The <wiztitle>New Foo</wiztitle> wizard opens to the Name page, where you provide a name for the foo.</info> </wizopen> <wizpage> <cmd>Click <wiznext>Next</wiznext> and turn to the <wintitle>Properties</wintitle> page.</cmd> <info>The Properties page lets you define the color and shape of your foo.</info> <substeps> <substep><cmd>Set the color of the foo using the color wheel.</cmd></substep> <substep><cmd>Set the shape of the foo using the shape selection bar.</cmd> <info>You can edit the shape of the foo after you create it; this shape is just your starting point.</info></substep> </substeps> </wizpage> <wizpage>> <cmd>Click <wiznext>Next</wiznext> and turn to the <wintitle>Location</wintitle> page.</cmd> <info>Select the project you want to save your foo in.</info></wizpage> <wizclose><cmd>Click <wizfinish>Finish</wizfinish> to close the wizard and create your foo.</cmd></wizclose> </wizsteps> <result>The foo, with the shape and color you selected, should appear in your project folder.</result> </wiztaskbody> </wiztask>
Identify information type and domain tags • Structural (information type) - tags you need in certain places, plus their containers • wiztask (from task) • wizbody (from body) • wizsteps (from steps) • wizopen, wizpage, wizclose (from step) • Pervasive (domain) - tags you want available everywhere • wiztitle (from wintitle) • wiznext (from uicontrol) • wizfinish (from uicontrol)
Creating the information type • Copy the parent module (task.mod) to a new module (wiztask.mod) • Keep anything related to task, taskbody, steps, and step • Three main sections: entities, element declarations, specialization attributes • In the entity section, delete everything except the DTD entity, included-domains entity, and entities for elements you're specializing, and the task-info-types entity • In the element section, delete everything except the elements you're specializing • In the specialization attributes section, delete everything except the elements you're specializing Review wiztask-intermediate.mod to compare your results
Specialize entities • In the entities section, change entity names and values from task ones to wiztask ones • eg: <!ENTITY % task "task"> becomes • <!ENTITY % wiztask "wiztask"> • you'll need to create three copies of step, since step has three specializations (wizopen, wizpage, wizclose) • eg: <!ENTITY % step "step"> becomes • <!ENTITY % wizopen "wizopen"> • <!ENTITY % wizpage "wizpage"> • <!ENTITY % wizclose "wizclose"> • This prepares your specialized elements for extension by domains • Rename task-info-types entity to wiztask-info-types • This prepares your module for integration with other modules in a DTD
Specialize elements • In the elements section, rename the element and attribute declarations to wiztask equivalents, and rename and adjust entities in the content model where you have changed entities from the original. For example: • <!ELEMENT steps ((%step;)+)> • <!ATTLIST steps %univ-atts; • outputclass CDATA #IMPLIED>> • becomes: • <!ELEMENT wizsteps ((%wizopen;), (%wizpage;)?, (%wizclose;))> • <!ATTLIST wizsteps %univ-atts; • outputclass CDATA #IMPLIED> • Again, you need three copies of the declaration for <step>, since it gets specialized to <wizopen>, <wizpage>, and <wizclose>
Specialize specialization attributes • Add copies of the entry for step, since you need to specialize it three times • Rename the attribute declarations to point to your new element names • To the end of each attribute value string, add wiztask/elementname • For example: <!ATTLIST steps %global-atts; class CDATA "- topic/ol task/steps "> becomes: <!ATTLIST wizsteps %global-atts; class CDATA "- topic/ol task/steps wiztask/wizsteps "> Make sure you include a space after the value before the string closes
Result: wiztask.mod • Review file to compare results
Creating wiztask-simple_shell.dtd • Copy task.dtd to wiztask-simple_shell.dtd in your wiztask directory • Adjust paths (to point back to the .mod and .ent files in the dtd directory) • Change <!ENTITY % task-info-types "task"> to <!ENTITY % wiztask-info-types "wiztask"> • Lets wiztask topics nest, for no good reason • Add an entry after "Embed task to get specific elements" that does the same things for wiztask: <!--Embed wiztask to get specific elements --> <!ENTITY % wiztask-typemod PUBLIC "-//IBM//ELEMENTS DITA Wiztask//EN" "wiztask.mod"> %wiztask-typemod;
Testing wiztask-simple_shell.dtd • Create a copy of your sample file (eg mywiztask-test.xml) and rename the element wiztitle to wintitle, and wiznext and wizfinish to uicontrol (since we haven't added support for them yet) • Add a DTD reference at the top of your sample file: • <?xml version="1.0" encoding="utf-8"?> • <!DOCTYPE wiztask SYSTEM "wiztask-simple_shell.dtd"> • Try opening the file in IE to make sure it is well-formed • Try processing it to HTML, eg: • saxon mywiztask-test.xml d:\dita13\xsl\dita2html_shell.xsl >mywiztask-test.html • Compare results with mywiztask-test.html in the accompanying samples • Test with a validating editor or parser
Creating the wiztask domain • We have three new elements: • wiztitle (from wintitle) • wiznext (from uicontrol) • wizfinish (from uicontrol) • All are specialized from elements in the user interface domain, so start by copying its files over to wiztask: • ui-domain.ent to wiztask-domain.ent • ui-domain.mod to wiztask-domain.mod
Creating wiztask-domain.mod • As with wiztask.mod, there are three sections: entities, element declarations, and specialization attributes. • In each section: • Delete everything except the entries for uicontrol and wintitle • Create an extra copy of entries for uicontrol (since we have two specializations of it) • Rename the entities and values to wiztask equivalents - eg: • <!ENTITY % uicontrol "uicontrol"> to <!ENTITY % wizfinish "wizfinish"> • Rename the element declarations • Rename the specialization attribute declarations, and add wiztask-d values to the end of each attribute, eg: <!ATTLIST wiztitle %global-atts; class CDATA "+ topic/keyword ui-d/wintitle wiztask-d/wiztitle "> Compare with wiztask.mod in the accompanying samples
domain.ent files • The domain.ent files are what make domains different from information types - they allow the elements declared in the domain to be substituted wherever an ancestor element is declared. • For each ancestor element, you need an entity that declares the elements you are specializing off of it. • You also need an entity that declares the ancestry of the domain as a whole, for inclusion in the domains attribute. • We need the information separated into two files - .ent and .mod - so that they can be included in the right order in the integrating DTD file.
Creating wiztask-domain.ent • Delete the existing entries for the UI specializations, leaving only the last entity (the d-att entity) • Create the entities for specializations of keyword: <!ENTITY % wiztask-d-keyword "wiztitle"> <!ENTITY % wiztask-d-wintitle "wiztitle"> the name of the entity says this entity is part of the wiztask domain, and is defining specializations of keyword (via wintitle) and of wintitle (directly). • Create the entity for specializations of uicontrol: <!ENTITY % wiztask-d-ph "wiznext | wizfinish"> <!ENTITY % wiztask-d-uicontrol "wiznext | wizfinish"> note that there are two specializing elements, separated by a bar • Rename the d-att entity, and add the wiztask domain to its list: <!ENTITY wiztask-d-att "(topic ui-d wiztask-d)"> this gets used in the domains attribute, so that processes can tell what domains are in use by a document
Integrating domains with information types • Create a copy of wiztask-simple_shell.dtd called wiztask_shell.dtd • We are specializing ui-domain, so look for existing entries for that module (ui-domain, or ui-d) • It appears in four places: • vocabulary declarations (where the .ent files are pulled in) • vocabulary substitutions (where content models that allow parent elements are extended to allow elements specialized off them) • vocabulary attributes (where the domain attribute is defined) • vocabulary definitions (where the .mod files are finally pulled in)
Integrating wiztask-domain • At the end of vocabulary definitions, add an entry for wiztask-d: <!ENTITY % wiztask-d-dec PUBLIC "-//IBM//ENTITIES DITA Wizard Task Domain//EN" "wiztask-domain.ent"> %wiztask-d-dec; • At the end of vocabulary substitutions, add entries for wintitle and uicontrol (which you are expanding to allow specialized elements): <!ENTITY % wintitle " wintitle | %wiztask-d-wintitle;"> <!ENTITY % uicontrol " uicontrol | %wiztask-d-uicontrol;"> And expand the definitions of ancestor elements to include the new entities (in this case, keyword for wintitle specializations, and ph for uicontrol specializations): <!ENTITY % keyword "keyword | %pr-d-keyword; | %sw-d-keyword; | %ui-d-keyword; | %wiztask-d-wintitle;"> <!ENTITY % ph "ph | %pr-d-ph; | %sw-d-ph; | %hi-d-ph; | %ui-d-ph; | %wiztask-d-uicontrol;"> • Under vocabulary attributes, add the wiztask domain to the end of the included domains: <!ENTITY included-domains "&ui-d-att; &hi-d-att; &pr-d-att; &sw-d-att; &ut-d-att; &wiztask-d-att;"> • At the end of the vocabulary definition section, pull in the .mod file: <!ENTITY % wiztask-d-def PUBLIC "-//IBM//ELEMENTS DITA Wizard Task Domain//EN" "wiztask-domain.mod"> %wiztask-d-def;
Testing the newly integrated DTD • Go back to your original sample file, mywiztask.xml • Add a DTD reference at the top of your sample file: • <?xml version="1.0" encoding="utf-8"?> • <!DOCTYPE wiztask SYSTEM "wiztask_shell.dtd"> • Try opening the file in IE to test it (quickest/easiest way to validate against a DTD on Windows) • Try processing it to HTML, eg: • saxon mywiztask.xml d:\dita13\xsl\dita2html_shell.xsl >mywiztask.html • Compare results with mywiztask.html in the accompanying samples
Are all these outputs starting to look the same? • They should - we've added new markup, but are reusing existing processing rules that get applied based on the class attribute of each element. • As long as each specialized element obeys the rules of specialization - the same or more restrictive content models - the processing can safely handle what the specialized element throws at it. • In the next exercise, let's see what it takes to shake up the output a little.
Specializing output 1: copy an existing template • Create a new XSLT module: wiztask-d.xsl • Add XSLT header stuff, and copy the template match for wintitle to use as a start: <xsl:stylesheet version="1.0" xmlns:xsl="http://www.w3.org/1999/XSL/Transform"> • <xsl:template match="*[contains(@class,' ui-d/wintitle ')]"> • <span> • <xsl:call-template name="setclass"/> • <xsl:apply-templates select="@id"/> • <xsl:call-template name="flagit"/> • <xsl:apply-templates/> • </span> • </xsl:template> </xsl:stylesheet>
Specializing output 2: change match statement and code • Change the match statement to point to wintitle, and change the behavior to make wiztitle bold: <xsl:stylesheet version="1.0" xmlns:xsl="http://www.w3.org/1999/XSL/Transform"> <xsl:template match="*[contains(@class,' wiztask-d/wiztitle ')]"> <b> <span> <xsl:call-template name="setclass"/> <xsl:apply-templates select="@id"/> <xsl:call-template name="flagit"/> <xsl:apply-templates/> </span> </b> </xsl:template> </xsl:stylesheet>
Specializing output 3: integrating the specialized code • Copy dita2htmlImpl.xsl into the workshop directory, and rename it to wiztask2htmlImpl.xsl • Modify the paths of the existing imports, and add a reference to the wiztask-d.xsl module at the end of the import list: <xsl:import href="../../xsl/xslhtml/topic2html.xsl"/> <xsl:import href="../../xsl/xslhtml/task2html.xsl"/> <xsl:import href="../../xsl/xslhtml/ref2html.xsl"/> <xsl:import href="../../xsl/xslhtml/xslhtml/domains2html.xsl"/> <xsl:import href="wiztask-d.xsl"/> • Copy dita2html_shell.xsl into the workshop directory, rename it to wiztask2html_shell.xsl, and edit to point it at wiztask2htmlImpl.xsl
Test output saxon mywiztask.xml wiztask2html_shell.xsl >mywiztask-new.html Compare with mywiztask-new.html in the accompanying samples. The wizard title should now be bold. Note that generic wintitles in the same document are not affected. Exercise for the reader: create an equivalent specialization module and shell for PDF output, and re-run the taskbook build to get specialized output for wiztitle in PDF as well.
Mechanics • class attribute for a new information type element: • starts with - • lists ancestor elements plus current element, scoped by information type (the topic-level element name) • ends with a space • class attribute for a new domain element: • starts with + • lists ancestor elements plus current element, scoped by domain package name (arbitrary name, typically something-d, used consistently for element names and in domains attribute) • ends with a space • domains attribute • lists the domains, and their ancestors, in use by the current document type • allows comparison of constraints (does task 1 allow the same things as task 2?)
Summary • Mechanics are simple • Design implementation is copy and extend, but copy only the parts you need to change - reuse everything else by reference • Design hierarchy has one module per information type or domain, that are integrated into doctypes by a shell DTD • Processing hierarchy has an equivalent structure: processing modules integrated into a transform by a shell XSLT • But processing hierarchy can get away with a subset of the design modules: don't need processing modules for every design module, only the ones that need special processing
What's the value? • A lot of work to define just seven elements • But no work to define the other 100-odd already defined • No work to get those tags enabled in existing processes • No work to get the content integrated in existing books and Webs • And reuse by reference means you can pick up enhancements to both base design and base processes when you want to. • The real work is in figuring out what your tags need to be. What DITA does is simplify the mechanics of getting those tags into an authoring and processing environment you can test with your users - shorten the feedback cycle, improve more quickly. • A rapid prototyping architecture that scales to a production one.
Recommended reading Introductions • http://xml.coverpages.org/DITA-IntroductionBrief.ppt • slides 18-24 of the first briefing presentation provide an overview of specialization • http://xml.coverpages.org/DITA-EXTREME-SpecializationPres.pdf • provides a more technical overview, with checklists/instructions Additional recommended reading: • http://xml.coverpages.org/priestleySIGDOC2002-DITA.pdf • provides in-depth view of the technology, process, and policy issues of specialization • http://www.ibm.com/developerworks/xml/library/x-dita2/index.html • specifics of information type specialization • http://www.ibm.com/developerworks/xml/library/x-dita5/index.html • specifics of domain specialization