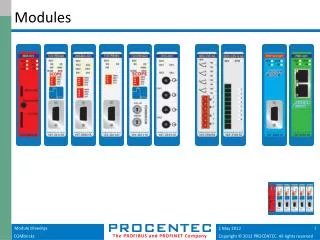
Steps to replace modules
We provide the special reliable LED Lighting Technology provides significant advantages in terms of luminous efficiency, minimizing losses refraction and reflection inside the optical system. For more details visit us at - https://goo.gl/hm7N0W<br>


Steps to replace modules
E N D
Presentation Transcript
Steps to replace modules Step 1: Loose the waterproof connectors in Counter clockwise direction (as shown in picture No. 1) Step 2: Take off the 8 screws used to fix the bracket (as shown in picture No.2)
Take off the bracket and screws and put them away (as shown in picture No.3) Step 3. Loose the back protection cover (as shown in picture No. 4)
Open the back cover as shown in Picture No.5 Step 4: Take away the water proof wire from the module (as shown in picture No.6)
Step 5: Take out the module (as shown in picture No. 7) Take out the modules (as shown in Picture No. 8)
Steps to replace modules – fix the modules Step 6: Fix the modules to be replaced, twist the screws clockwise (as shown in picture No.9) Step 7: Fix the waterproof connector of the modules, twist the screw in clockwise to fasten them. (As shown in picture No.10)
Step 8: Fasten the back cover in clockwise direction (as shown in picture No.11) Step 9, Fix the bracket, fix all the 8 screws, and twist them in clockwise (as shown in picture No.12)
Step 10, Fasten the waterproof connector, twist the connector clockwise (as shown in picture No.13) The tools necessary to finish the replacement: 1:M5 Allen driver 2:Cross screwdriver Sun Energy LED Lighting