Download
1 / 20
200 likes | 361 Vues
Oil Fuel Line De-aerators. What they are, what they do and how to install. What is an “oil de-aerator ”. Removes air , or bubbles , from the fuel so that they don’t cause problems Safe , reliable oil heat needs two things: E quipment that is well maintained

E N D
Oil Fuel Line De-aerators What they are, what they do and how to install
What is an “oil de-aerator” • Removes air, or bubbles, from the fuel so that they don’t cause problems • Safe, reliable oil heat needs two things: • Equipment that is well maintained • Clean fuel free of contaminationIE: no dirt, water, or bubbles.
Bubbles are Bad... Two kinds of bubbles found in fuel systems • Air • Air bubbles means either a leak in the system or the bubbles were delivered with the oil • Air bubbles in the oil are the result of the oil being churned up during loading, transporting, and delivery • No system is immune; all systems have bubbles • Gases • Gasses are drawn out of the oilwhen under a vacuum
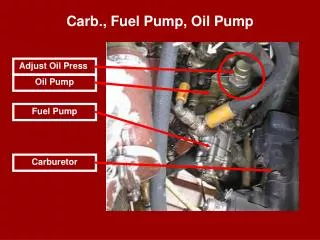
What makes bubbles so bad? This is a cut-away diagram of a normally operating pump, except for the air bubble in the nozzle line. The bubble is deceivingly small, since its size has been compressed by the 100 psi pressure in the nozzle line. As long as the pump operates, the bubble remains small and compressed, having no effect on burner operation.
When the pump shuts down and rpm decreases, the piston will close against the nozzle seat cutting off the flow of oil from the pump, but not the flow of oil from the nozzle. The expanding bubble has taken over for the pump in supplying the pressure pushing oil out the nozzle.
Oil flow does not cease until the bubble has expanded back to its original size and nozzle line pressure has dropped to zero. The result is virtually no cut-off, with a sooty, smoky shutdown. A solenoid valve won’t help this problem. It’s strictly a bubble thing. But there’s more...
This is a cut-away of a pump’s strainer chamber with the pump operating normally. Note that the oil does not fill the entire strainer chamber. This is normal because during bleeding the oil level rises high enough to cover just the inlet to the gear set. The air cushion at the top quiets the hydraulic wine of the gears and doesn’t affect pump operation. As long as the inlet to the gear set stays covered, all is well.
If air enters the pump it immediately rises to the top pushing down the oil level in the strainer chamber partially uncovering the inlet to the gear set.
The gear set will gulp air and oil and the pressure becomes unstable resulting in poor combustion, noise, rumbling, pulsation, etc. If enough air enters the oil level drops below the inlet to the gear set. Pressure is lost and the burner eventually locks-out
The second type of bubbles are gases. These come from dissolved vapors and volatiles that are drawn out of the oil when it’s exposed to vacuum. The higher the vacuum the more bubbles produced. High lift, long runs, undersized tubing, restricted lines, partially plugged filters, and sticky check valves are all major causes of high vacuum that can boil volatiles out of the oil creating bubbles.
The bubbles drawn out of the oil rise to the top of the strainer chamber, the oil level falls, the gear set gulps foamy oil, pressure becomes unstable, and the burner eventually locks-out.
One-Pipe vs. Two-Pipe No piping arrangement can eliminate bubbles. One-pipe systems are simple, use less material, prolong filter life by only passing the oil through the filter once, and pre heat the oil as it moves through the piping slowly. But they can’t deal with bubbles. Two-pipe systems used for higher lift and can deal with some of the bubble problems caused by higher vacuum. They are harder to install, use more material, load up filters much faster, and constantly bring cold oil to the pump. The return line is pressurized and can be an environmental problem if a leak develops.
From the tank to the de-aerator one-pipe is used. The only oil moving up the inlet line is what’s going out to the nozzle so filters last longer and the oil will pre-heat to ambient temperature before reaching the pump. Between the de-aerator and the pump it’s two-pipe system with all the self-priming, bubble handling, high lift capabilities of a two pipe system. Long high lift jobs are possible because: • Flow rate from the tank is low so vacuum is lower • Any bubbles (foam) developed due to vacuum are handled by the de-aerator.
Installation The actual piping of the de-areator is quite easy. This illustration shows a simple one-pipe system, gravity fed, which is a good candidate for a de-aerator.
Installation con’t • Mount the de-aerator in a convenient place close to the burner. • Flexible oil lines are preferred and are available in 24" or 36" lengths. This makes the piping easy between the de-aerator and the pump especially on swing-out door boilers. • Remember to install the by-pass plug in the pump before connecting the lines! When using a de-aerator , the pump must be set for two-pipe or the system will not work.
This illustration shows the completed piping. The former one-pipe system is now a de-aerator system.
Installation con’t A two pipe can also be converted to a de-aerator system using the same steps outlined above for the one-pipe system. Skip installing the by-pass plug because it is already installed. Make sure that the old return line, which will no longer be used, is capped off (sealed) leak tight.