Download
1 / 58
580 likes | 817 Vues
Florida Computer-Based Assessment Infrastructure Trial Training. November 23, 2010. FLDOE’s CBT Certification Process. Web-based FCAT/EOC Certification Tool Survey to collect information regarding available technology resources and testing plans from schools.

E N D
Florida Computer-Based Assessment Infrastructure Trial Training November 23, 2010
FLDOE’s CBT Certification Process • Web-based FCAT/EOC Certification Tool Survey to collect information regarding available technology resources and testing plans from schools. • Action Plan from Deficient Schools Only to devise a plan to address deficiencies. • District-wide Infrastructure Trial to test hardware and network utilization and identify any issues that must be resolved .
Clarification of On-line Test Content • Infrastructure Trial • Invalid sample of test-like material • ePat Practice Tests • FCAT Grade 10/Mathematics Retake and Reading Retake • Algebra I End of Course (EOC) • Biology I EOC • Geometry EOC • Full Test Content
Infrastructure Trial vs. ePat Practice Tests • Please remember that the content in the Infrastructure Test is NOT appropriate for student practice.
Infrastructure Trial vs. ePat Practice Tests (contd.) • Please remember that the content in the Infrastructure Test is NOT appropriate for student practice.
PearsonAccess “Operational” and PearsonAccess Training Center • PearsonAccess (www.PearsonAccess.com/fl) • “Operational” BlueHeader • A website used for almost all test preparation (e.g., preID, test setup, administration, and reporting tasks. • The correct administration must be selected every time you log in. • Training Center BrownHeader • Access the Training Center Tab on the PearsonAccess home page • Provides an opportunity to practice PearsonAccess tasks and means of managing the Infrastructure Trial Note: User accounts are required for school assessment coordinators and technology coordinators to access both sites.
SCHOOL ASSESSMENT COORDINATOR RESPONSIBILITIES
Before Trial: Creating Sample Students • Sample students must be created within the Training Center in order to administer the Infrastructure Trial. • Not actual students in your school • The number of sample students to be created should be based on the maximum number of computers that will be used concurrently during testing. • Creating at least ten percent more students that you plan to test concurrently to have extra student authorization tickets in the event of any login complications. • Each ticket is valid for one login attempt, unless the student is resumed in PearsonAccess. • Instructions for resuming students are provided on pages 53-56 of the Infrastructure Guide.
Before Trial: Sample Students • 1. Log in to the Training Center. • 2. Go to the home page and click Create Students. • 3. You will then be prompted to select your organization from a list. Select your organization and then click Next.
Before Trial: Sample Students (contd.) • 4. Next, you must • designate a CLASS NAME (create a new class) and USE ALL CAPS • test name (Florida Infrastructure Trial), and • the number of sample students you would like to create. Up to 99 sample students can be created at a time. • 5. Click Create Students
Before Trial: Sample Students (contd.) • 6. A prompt will then appear to continue with creating students. Select Yes – Create Students to continue, or No – Cancel Create to cancel. • 7. A confirmation screen will appear once the sample students have been created. • 8. Repeat the steps above until you have created sample students for the number of computers that will be tested concurrently, plus at least 10% additional students.
Before Trial: Sample Test Session • 1. Go to the Test Management tab in the Training Center and click on Manage Test Sessions. • 2. Click on New Session. • 3. Enter the Session Name, School, Test to be Administered (“Infrastructure Trial”), Read Aloud (“No”), Default Form Group Type (“Main”), Scheduled Start Date, Scheduled Start Time, and Location/Room. Entering a date and time for a session is for planning only. A session has to manually be started on the Session Details screen.
Before Trial: Sample Test Session (contd.) • 4. Click View By: Classes to see a list of classes. Click the box next to the name of the class to be added. (View By: Students can also be used and individual students can be selected.) • 5. Click Save to create the session. A confirmation page will be displayed once the session has been created.
Before Trial: Printing Student Authorization Tickets • Authorization tickets include a Login ID and test code for each individual sample student. This information is necessary in order to log in to the Infrastructure Trial. • 1. Go to the Session Details screen for that test session. • 2. To print authorization tickets, click on Authorizations > Student Authorizations and then select the format in which you would like to download them. • The authorization tickets can be downloaded in three different formats: Detail View, Grid View, and List View. • a. Detail View only shows one authorization ticket per page. • b. Grid View shows six authorization tickets per page in a three row/two column layout. • c. List View displays three authorization tickets per page separated horizontally. Note: It is strongly recommended that you select one format and use it consistently at your school.
Before Trial: Printing Student Authorization Tickets (contd.) • 3. Once you have selected the file you want, open it and print the authorization tickets. Note: For the Spring 2011 administration, Student Authorization Tickets are secure documents and must be stored in a locked limited access location.
Before Trial: Configuring Browser Setting for Pre-Caching Content (Technology Coordinator) • Once the Infrastructure Trial session has been created, content can now be cached. • Notify your technology coordinator to Configure the Browser Setting for Pre-Caching Content (see instructions in Infrastructure Guide pages 43-47) Important Note: • The proctor caching software must be enabled and running. • The test content cannot be cached from the Proctor Caching computer; instead use any other computer on the same network as the caching computer.
Before Trial: Configuring Browser Setting for Pre-Caching Content (contd.) • Once this is done, a window will open with the status of the proctor cache. Minimize this window while Proctor Caching is running but do not close the window. • The Infrastructure Trial is now ready to be cached.
Before Trial: Caching Test Content • After the technology coordinator has configured the browser setting for pre-caching content then the Infrastructure Trial test is now ready to be pre-cached. • Log in to the Training Center and navigate to Test Management > Manage Test Sessions. Select a session to cache and click Proctor Caching in the top yellow bar.
Before Trial: Caching Test Content (contd.) • After all test items have been retrieved, the status page will present a confirmation message. • Once the test has been 100% cached, the Infrastructure Trial can now be started. Note: The main reason a test may not be cached properly is if Pearson’s sites have not been allowed through a district’s or school’s content filter or firewall (see your Technology coordinator if you have a problem).
Before Trial:Starting a Test Session • The session must be started before sample students are able to log in to the Infrastructure Trial. • 1. Go to the Session Details screen for the test session. • 2. Click Start in the top left corner of the Session Details screen. • 3. A confirmation screen will appear. Select Yes – Start Session to start the session or No – • Cancel if you don’t want to start the session yet. • 4. A confirmation page will be displayed once the session has been started successfully.
Conducting the Infrastructure Trial • Schools conduct the Trial using the maximum number of computers that will be tested concurrently during the spring administration. • Volunteers log in to complete the Trial test. • Students or adult volunteers can be used - not necessary that computer-based testing students are used. • Trial is NOT appropriate for student practice. • One volunteer can run multiple computers because volunteers supply a random answer every 10 seconds. • Volunteers will log issues on Student Authorization Tickets. • Use the script provided in the Infrastructure Readiness Guide. • Estimated time for Trial is approximately 30 minutes.
Launching TestNav 6.9 • TestNav 6.9 is launched by double-clicking the TestNav 6.9 icon on the desktop. • Enter the URL for the Infrastructure Trial in the Address line. This URL can be found on the student authorization tickets. • Click Go and TestNav will present a login page.
Logging in to the Infrastructure Trial • Enter the Login ID and Test Code and click Login. • TestNav will load the test items and the welcome screen will appear.
During the Trial:Monitoring Test Session • Once a session has been started, there are a number of actions that may need to be carried out in order to complete the Infrastructure Trial. • These actions may include: • resuming sample students, • resuming sample students with saved responses, and • marking tests in completed status.
During the Trial:Resuming a Student • 1. To resume a sample student, go to the session page and check the box next to the Student Name that needs to be resumed. Then click Resume Test. Note: Test administrators in the room will do this for the full administration.
During the Trial:Resuming a Student (contd.) • 2. After Resume is clicked, a confirmation page will display. Select Yes – Resume Tests to start the session or No – Cancel if you don’t want to resume the student yet. • 3. Another confirmation page will be displayed once the student has been successfully resumed. • 4. Go back to the session page and the student’s status will now show “Resumed” and the sample student will now be able to log back in to the session. • 5. If a student logs back into the test, but none of their responses appear, the student will need to exit the test again. • In order for the responses to be populated again, the student will need to be marked in “Resumed-Upload” status. • To mark the student in “Resumed- Upload” status, the student will need to be resumed twice.
Exiting the Infrastructure Trial • Once all test items have been viewed and tools have been tested in the Infrastructure Trial, the test can be submitted. • Submit the test by clicking Submit on the review page. • Responses will now be submitted and the student status will show as “Completed” on the session page.
After the Trial: Stopping the Test Session Stopping a Session • 1. Before a session can be stopped, students must be either in “Completed” or “Marked Complete” status. To stop the session, select Stop in the top left corner of the session page. • a. To mark a student’s test complete, the student must be in “Exited” status. • b. Go to the session page and check box beside the student to be marked complete. • c. Click Mark Test Complete. • d. A confirmation page will be displayed and the student’s status will now show “Marked Complete”. • 2. After Stop is clicked, a confirmation page will display. Select Yes – Stop Session to stop the session or No – Cancel if you don’t want to stop the session. • 3. Another confirmation page will be displayed once the session has been stopped successfully.
After the Trial: Purging Test Content (Technology Coordinator) Purging Test Content (Windows) • Notify your technology coordinator to purge test content • To purge test content: • 1. Go to Start > Programs > Proctor Caching > Purge Cache. • 2. Click Delete to confirm that you would like to purge the contents of the cache.
After the Trial:Infrastructure Trial Survey • To assist Pearson and the FLDOE to identify areas of need and to direct resources and support • One representative (School Assessment Coordinator or Technology Coordinator) from each school: • Review all notes on Student Authorization Tickets to provide school-level response • Provide feedback to District Staff by December 3, 2010 • Complete a comment form online available at http://tinyurl.com/infrastructuretrialby December 8, 2010
COMPUTER PREPARATIONS SCHOOL TECHNOLOGY COORDINATOR
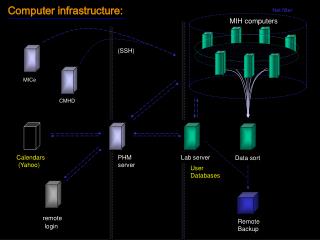
Proctor Caching – How does it help? • Proctor Caching allows you to pre-cache test content to your local network before the test. • Reduces burden on your ISP by eliminating redundancy in requests for test content. • Stores an encrypted local copy of all pre-cached tests. • A caching solution is required for Florida online testing and will deliver the best online testing experience.
Test Delivery – Local Installation • Download and install TestNav 6.9 on each workstation used for Test Delivery. • Configure each machine to communicate with the Proctor Caching machine. • More challenging to manage than a server installation. • System automation tools like SMS (Windows) and Apple Remote Desktop (Mac) make local installs much more practical.
Wireless Networks Best Practices • DO use a local installation of TestNav 6.9 • File Share installations will work fine, but a local install for wireless testing increases the odds of success. • Local installations reduce network traffic on access points to just test content and student responses. • DO NOT overload access points with too many clients. • The bandwidth curve of online testing is different than normal internet usage. • Use common sense wireless networking principles and past wireless performance as a guide. • Reducing the client to access point ratio for online testing can avoid the access point bottleneck.
TestNav 6.9 Installation Best Practices • The TestNav 6.9 proxysettings.properties file is the only configurable settings file. This file can be edited with Notepad or TextEdit. • Editable variables in proxysettings.properties • Proxy_Host - Designates a proctor caching or proxy machine IP address • Proxy_Port - Designates a proctor caching or proxy machine port number • Primary_Save_Location & Alternate_Save_Location - Designates the Early Warning save locations • Student machine logins will need full access to these directories • TestNav/temp • TestNav/Logs • Early Warning Save Locations
TestNav 6.9 Installation Best Practices (contd.) • Local Installation - If you use hard drive imaging tools like Deep Freeze, you must exclude the TestNav/Logs and Early Warning System save locations. • Network Installation • Do not run the TestNav installer on the file server itself. • Run the installer on a client workstation and install TestNav to a shared folder on a network drive. • Once installed to the network drive, ensure the proxysettings.properties file has valid file paths for the save locations.
TestNav 6.9 Installation Best Practices (contd.) Firewalls/Content Filters • The following domains and ports must be allowed to pass through your Internet firewall or proxy system. • Port 443 is for admin access only. • Student level traffic is port 80. • Hash encryption can inadvertently form a word.
TestNav 6.9 Installation Best Practices (contd.) Disable Popup Blocking Software (for PearsonAccess) • A pop-up blocker will block the pre-caching screens from opening on administrative workstations. Enable Student Read/Write-Access • Students must have read-access to the TestNav installation directory. • Students must have read/write access to the TestNav/Logs and TestNav/Temp directory. • Students must have read/write access to the Student Response File save locations whether they are located on the workstation or on a network share.
TestNav 6.9 Installation Best Practices (contd.) Applications that launch automatically • Any applications that may automatically launch on a computer should be configured not to launch during testing sessions. Common applications that may launch automatically include: • Anti-virus software performing automatic updates, • Power management software on laptops warning of low batteries, • Screen savers, and • Email with Auto message notification. Screen resolution • All tests are authored to a screen resolution of 1024 x 768 so make sure that your testing machines are capable of 1024 x 768 resolution. • Screen Resolutions below this setting will cause an error as TestNav tries to load the test. • Screen Resolutions above this setting will cause the test to appear smaller than the available screen size.
System Check for TestNav 6.9 • The following steps will guide you through the process of using System Check for TestNav 6. • The System Check tool can be found by going to www.pearsonaccess.com/fl and clicking on Support > Additional Resources. The specific URL is www.FLassessments.com/SystemCheck • Click the TestNav 6 tab and follow the instructions provided. • Once you see the “Congratulations” screen in the TestNav window, click the Network User Capacity tab.
System Check for TestNav 6.9 (contd.) • Click Add Caching Server. Enter a generic name for the Proctor Caching computer to be tested, the IP address of the Proctor Caching computer, and port 4480. Click Save.
System Check for TestNav 6.9 (contd.) • Select the appropriate Test Administration from the drop-down box. • Click Start and System Check will perform a bandwidth test. Once the test has been run, System Check will show an estimate for how many students can be tested on the specified Proctor Caching computer.
System Check for TestNav 6.9 (contd.) • Click the Testing Volume Calculator tab. This tool will be used to estimate how many users can be tested with the bandwidth that is available.
System Check for TestNav 6.9 (contd.) • Select the correct test administration • Enter the number of students that will be testing concurrently on a single caching server. • Slide the green bar under “Available link speed between workstations and Proctor Caching workstations” to specify the available bandwidth between the testing workstations and the Proctor Caching computer.
System Check for TestNav 6.9 (contd.) • Now slide the green bar under “Average network utilization for the network between workstations and Proctor Caching workstations” to indicate the percentage of bandwidth normally used at this site (excluding the bandwidth congestion for testing). • Once this is done, the “Outputs” box will now either be white, yellow, or red.