Download
1 / 15
150 likes | 320 Vues
LAMRT River Rescue Training. 25th September, 2005. Hazard Awareness Equipment + Clothing Throwbags + Throwlines River Crossing White Water Swimming Live Bait Rescue Tension Diagonal. Vee Lower Tag Line Snag Line. Content. Hazard Awareness. Strainers Trees Barbed Wire

E N D
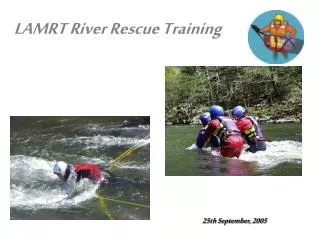
LAMRT River Rescue Training 25th September, 2005
Hazard Awareness Equipment + Clothing Throwbags + Throwlines River Crossing White Water Swimming Live Bait Rescue Tension Diagonal Vee Lower Tag Line Snag Line Content
Hazard Awareness • Strainers • Trees • Barbed Wire • Hydraulic • Stoppers • Whirlpools • Undercuts • Entrapment • Feet • Kayaks • Falls + Drops
Potential LAMRT Incidents • Trapped or Stranded Canoeists/ Kayakers • (Normally with specialist equipment + clothing + some self rescue training? + boats) • Gill Scramblers, Sight Seers, Children,Swimmers, Car Accidents • (No equipment, specialist clothing or self rescue capability) • Significant rescue problems most likely in high water conditions
Equipment • Buoyancy Aid. Ideally with quick release chest harness; should be as uncluttered as possible (to reduce snagging hazard); snug fitting. • Helmet. Should fit well; contain foam padding; have drain holes; protect forehead and ears, breakaway or similar buckle • 2.5 to 3 metre length of tubular webbing (unstitched). Can be passed around a tree trunk, the two ends laid together and tied off with a simple overhand knot to form a sling. • Pear Shaped (HMS) karabiner with a plain sprung gate. Needs to be large enough for a knotted throwline to pass through, as a guide it should be large enough to clip onto a paddle shaft. • Throwline. Throwbag containing 15-25m floating poly rope, minimum 10mm and ideally 12mm diameter. Any loops at either end of the throwline should be removed. A clean end is required at the end of the throwline, i.e. no knots etc., and it should be possible to remove the throwbag from the rope in order to extend the length of another rope. • Knife. Never use a rope on the river without a knife. Folding knives with serrated blades are preferred. Do not attach the knife with a length of cord etc. to your person (or buoyancy aid etc.) • Dry Suit. Worm over warm fleace with as fewer zips as possible. Dry suits must never be warn without a buoyancy aid (your legs float + you head sinks!!!!)
Buoyancy Aid Harness Use • Water Use Mode releases under load • Never enter the water with the buckle in belay mode
Throwbags + Throwlines • Judge distance before throwing and unpack excess rope before throwing. Never throw more rope than is needed, as this can become a hazard. • Alert the swimmer that you are ready to throw. Shout ROPE and hold the line in the air so that the swimmer can see it. Make eye contact if possible before throwing. • Aim to throw the rope over the swimmer, within arms reach, and DO NOT let go of the end of the rope. • Choose a stance that will allow you to take the force of a swimmer on the end of the rope. • Another person can hold onto the shoulder straps of the thrower’s buoyancy aid to give more security. • NEVER TIE OFF THE END OF THE ROPE ! • To reduce the shock of the catch (pulling the rope out of the swimmers hands), either feed the rope out and gradually slow down the rate of feed, or move downstream with the swimmer if the terrain allows.
River Crossing • Face upstream • Use a support • Use multiple people in all but the shallowest water
Live Bait Rescue • Warning – this technique involves putting the rescuer at risk and should therefore only be used to rescue an incapacitated victim. • This requires two rescuers one of which, the swimmer, needs to be wearing a buoyancy aid fitted with a quick release chest harness. A karabiner and throwline are also required. • The second rescuer acts as a belayer and positions him/herself with the throwline above an eddy, ideally with an outcrop jutting out into the main flow of the river. A sling and karabiner should be used to belay from a tree or rock. • The swimmer rescuer then climbs out onto the outcrop ready to dive flat onto the victim He/she holds 2 metres of the throwline coiled in their upstream hand, the remainder of the rope is held taut by the belayer. When the victim floats down to the swimmer rescuer he/she dives onto the victim and at the same time throws the coiled rope away upstream. The rescuer pulls the victim to them and grabs onto both shoulder straps of their buoyancy aid from behind, ready to take the shock of the rope, which pendulums them into the eddy
A method for getting a party across a river or a rescuer to a victim stranded mid-stream (see also Vee Lower). Angle should be 50-60 deg C. If throwlines need to be joined. Lay the ends together and then doing an overhand knot. A clean end is required on the downstream end of the joined lines, i.e. remove the throwbag and any loops/knots. Each end the rope is run through a karabiner which in turn is attached via a sling to a sturdy anchor, e.g. tree trunk. The rope may be looped into the karabiner several times to increase friction. The line is then tensioned by a person at each end, at no time should the rope be tied off. A third person can then clip a sling onto the line using a karabiner. Holding the sling over the shoulder nearest to the starting bank (facing downstream) & launch into the river, the current flow slides you downstream and across the river. Never hold onto the tensioned rope, if the karabiner stops midway at the knot then wriggle the sling to make the karabiner slip over the knot. Keep the rope across the river tight, otherwise the traversing person will be stuck mid-stream Tension Diagonal
Vee Lower • One belayer and the rescuer stands on one bank, whilst the other belayer on the opposite bank throws across their line (holding onto the end). Both throwbags are clipped together with a karabiner and then into the centre rear part of the rescuers releasable chest harness. Belays are set up as for the tensioned diagonal except both belayers are opposite each other on the riverbank. • Both ropes are held taut as the rescuer enters the water. As the shorter rope is fed out the rescuer moves to mid stream in the vee of the rope. The rescuer uses hand signals to indicate which direction he/she wants to be lowered. Feeding out the rope on river left moves the rescuer to river right, and vice versa. Position someone downstream of the rescuer to interpret the hand signals and to feedback these to the belayers. • Suggested hand signals: • Left or Right - Point in direction of travel required. • Forward – both hands beckoning forward. • Stop – Both hands straight up. • Releasing Chest Harness – One arm punched up and down repeatedly (as in toilet flush). • Set up a throwline (and live bait if necessary) downstream as a back up.
Tag Line • A tag line is a high visibility line that the victim can make contact with (i.e. tag). Usually two throwlines are used with bags clipped together and held tight across the river. The throwbags are moved together,above the water, to the point where a surfacing victim can grab them. The victim is then pulled to one side or the other. • A buoyancy aid or life ring can also be clipped onto the tag line to make it more visible to the victim and to provide extra flotation.
Snag Line • Similar in construction to the basic tag line. The snag line is see-sawed under the victims chest to provide stability, or in the case of foot entrapment is see-sawed down to and under the foot to release it. In this example two snag lines can be used, one to provide stability and keep the victim’s head above water, the other to release the trapped foot. • Small rocks can be added to the throwbags used in the snag-line to help it sink towards the bottom. In practice even the weighted snag line will plane to the surface.