Download
1 / 30
731 likes | 2.39k Vues
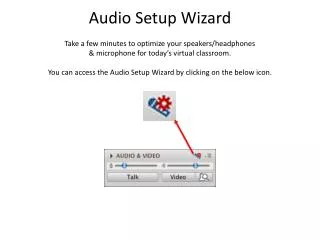
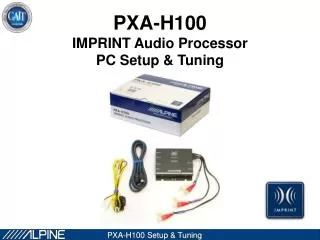
PXA-H100 IMPRINT Audio Processor PC Setup & Tuning. Step 1 – Connections PXA-H100. RCA Outputs for Front, Rear and Subwoofer Guide Input for the navigation System Power Connector. Connector for the microphone Ai-Net connection from the Headunit to the PXA

E N D
PXA-H100 IMPRINT Audio Processor PC Setup & Tuning
Step 1 – Connections PXA-H100 RCA Outputs for Front, Rear and Subwoofer Guide Input for the navigation System Power Connector Connector for the microphone Ai-Net connection from the Headunit to the PXA Ai-Net Connection when you use a CD-Changer for example USB Connection to the PC
Step 2 – Configuration PXA-H100 Setting `X-Over` DIP-switch `Front/Rear/Sub` When you have a 3-way system calibrate the system manually with the „Bass Engine“. Notice: This setting works not precise with MultEQ Typical System: You can do the calibration with MultEQ.
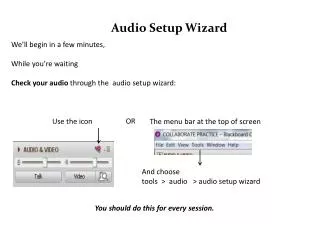
Step 3 - System switches Headunits You can use the internal Amps from all „IMPRINT Ready“ Headunits when the PXA-H100 is connected. Notice: When the system Switches are fixed in the „EXT AP“ (External audio prozessor) Position, the Pre OUTs Front and Rear are changed to Pre INs. bottom side CDAs IVAs
Typical System Diagramm When the system switch of the HU is in the „EQ/DIV“ position you can use the integrated amplifier of the Headunit. That means the Pre Outs Front and Rear are changed to Pre Ins. Pre IN: Front, Rear Pre Out Sub Setting of the PXA-H100:
Typical System Diagramm The Front and Rear System passive; powered by a 4 channel amp and one mono amp for the sub. Setting of the PXA-H100
Step 4 - Crossovers & Gains 200Hz 15Hz 1) Set Amplifier Gains: • Front & Rear = 1/2 gain • Subwoofer = 1/4 gain • 2) Turn all Amplifier Crossovers ’OFF’ • Allow the PXA-H100 to Set the correct Crossovers for the best Sound Quality • NOTES: • If subwoofer Low-Pass Crossover cannot be turned off then select the highest frequency setting (eg. 200Hz) • If subwoofer Subsonic Filter cannot be turned off then select the lowest frequency setting (eg. 15Hz)
Step 5 - Software Install • Install IMPRINT Sound Manager Software • If necessary install the USB- drivers • Requires: • PC with Windows XP • PXA-H100 Setup Disc V2.10 • 2m USB to Mini USB cable *Notice: although Windows Vista has not been officially approved by Audyssey Labs, it will work in most cases. Please contact your local Alpine support for details.
Step 6 - PC Setup • It’s now time to connect your PC via USB • Requires: • PC with Windows XP (with any or no service pack) • IMPRINT Sound Manager software installed • included USB to Mini USB cable When the microphone is connected with the PXA-H100 the HU will show the message “MultEQ Setting Mode Don´t touch any button”
Step 7 - Preparing the Vehicle & Microphone 1) Ensure that all seats are in the proper position for the driver. If speakers are installed in the door empty the door compartment. *Notice: The measurement results may improve when the front headrests are removed before measurements. In case the car is equipped with active headrests, don't attempt to remove them. • 2) Attach the microphone to a camera tripod, using the pre-threaded nutsert • Notice: Make sure the microphone is • connected to the PXA-H100
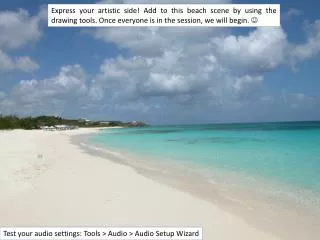
Keep silence Notice: The measurement area must be absolutely quiet. Every noise can degrade the performance. Stop the engine, switch the air-condition and the fan off. Close the doors, windows and sunroof while measuring. In this case...silence is golden...
Step 8.1 – Start the latest Program Version 2.10 • Connect the PXA-H100 to your Computer • Start PC Programm • Select PXA-H100
Step 8.2 - Listening area Selection Select which area is your prefered listening position by double click. For example Front left. That means the timedelay will be set for this position.
Step 8.3 - Measuring Position 1 • Place the microphone in the Driver’s Listening Position • Notice: Place mic at normal ear height, centered approximately 5,0 cm in front of the headrest position. *Notice: Microphone MUST be pointing straight up 2) Exit the Vehicle and Close ALL Windows and Doors.
Step 8.4 - Measuring Position 1 Double-click ‘Measure’ Notice: The first measurement takes a long time, approximetly 10 minutes. It´s the most important measurement. There will fixed the levels crossovers, gains, timedelay. And the software will check which speakers are connected as well. The software shows always the status and the options.
Step 8.5 - Measuring Position 1 6 5 1 4 3 2 The measurement starts: Notice: You should hear a series of Logarithmic Chirps coming from each speaker: Driver seat front, passenger seat front, passenger seat rear, driver seat rear, and then sub left and right. The chirp starts very quiet and gets louder and louder Chirp Order: 1,2,3,4,5,6 When the first measurement is You can read which speakers are detected. It´s not a problem to make a measurement without a rear system.
Step 8.6 - Measuring Position 2 • Move the microphone to the rear center Position • NOTE: Place the microphone at normal ear height, centered approximately 5,0 cm in front of the headrest position. 2) Exit the Vehicle - Close ALL Windows and Doors 3) Double-click ‘Measure’ to begin measuring Position 3.
Step 8.7 - Measuring Position 3 • Move the Microphone to the co driver side Listening Position • Notice: Place the microphone at normal ear height, centered approximately 5,0 cm in front of the headrest position. 2) Exit the Vehicle - Close ALL Windows and Doors 3) Double-click ‘Measure’ to begin measuring Position 3.
Step 8.8 - Measuring Position 4 • Move the Microphone to the front left corner of the driver seat • *Notice: Reduce the height of the Mic to • shoulder height 2) Exit the Vehicle - Close ALL Windows and Doors 3) Double-click ‘Measure’ to begin measuring Position 4. • *Notice: Reduce the height of the Mic to • shoulder height
Step 8.9 - Measuring Positions 5 • Move the Microphone towards to the center console as far as possible while keeping it on the driverseat • *Notice: use the same height like position 4 2) Exit the Vehicle - Close ALL Windows and Doors 3) Double-click ‘Measure’ to begin measuring Position 5.
Step 8.10 - Measuring Positions 6 • Move the tripod with the microphone to the rear right position of the driver seat surface. *Notice: use the same height like position 5 2) Exit the Vehicle - Close ALL Windows and Doors 3) Double-click ‘Measure’ to begin measuring Position 6.
Step 8.11 - Finishing MultEQ • After you have finished all 6 measurements double- click • Notice: a minimum of 3 microphone measurement points are required. Our recommendation is 6 positions. The result will be much better. IMPRINT Sound Manager will now display the MultEQ results. You can see the curve before and after MultEQ has done the calculations. The basic setting is the REFERENCE Curve. Double-clickto select your preferred curve.
Step 8.12 - Selecting a Target Curve • Select one from the 3 available ‘Target Curves’ • Notice: Each ‘Target Curve’ is similar to choosing a shape for your over-all EQ settings on a classic EQ. Choose the curve that best suits your customers needs. 2) Confirm your choice by a double click on the OK button 3) Double-clickwhen you havefinished
Step 8.13 – Save Permanently • After selecting the Target curve choose the preset. If you want to save a second target curve choose another curve like in step 8.12 described. Confirm by double-click Now all seetings are saved permanently.
Step 9 - Exiting IMPRINT Sound Manager Disconnect USB cable and the microphone from PXA-H100 and Computer X X When the microphone is disconnected the display shows“Please push any key” Follow this instruction and you are ready and can enjoy the IMPRINT Sound
Step 10 - Fine Tuning If the Sub is not loud enough, you can adjust the Gain for the Sub amp You can do some fine tuningBASS/MID/Highon the headunit
Our experience with MultEQ First, MultEQ can not work wonders. The installation is still an important part of a good Audio system. If you have a good result before the MultEQ measurement, the difference between ON/OFF won´t be so impressing. If you have some Phase Problems MultEQ will change the phases but you don´t see that and the software makes no comment. Sometimes you have some level differences. The reason is the strategy of MultEQ. Attenuation has prority to amplification. To make two passes with different conditions is not possible. For example one measurement for the driverseat (6 Positions) and the second for all front passengers. When the measurements are done well, the tonale balance, attack, and soundstage will be much improved. Sometimes you can improve the result when you try a different microphone position. If you put the microphone closer to the midrange may you have more midbass. It depends on the system setup.
How to demonstrate MultEQ Make sure that the measurements are done in the best way as possible. Choose a audiophile music with a sophisticated instrumentation. The lead vocals of the track should stay at the center position of the sound stage. Because MultEQ makes the adjustments that the first microphone position is similar with center of the sound stage. Before you begin the demonstration switch MultEQ off. Hear a few seconds and then switch MultEQ on. Now you will hear a ´much improved sound stage, a perfekt tonal balance and it sounds very sophisticated. It is sometimes helpful to tell the customer what he hears. Then he feels much safer and its easier to judge the system. If you have a different level between MultEQ ON and OFF. The reason is the strategy of MultEQ. Don´t be shy to demonstrate Mult EQ with factory speakers and the headunit amplifier. The result will be a vast improvement just as well.
Troubleshooting You have no sound check the DIP Switches of the headunit You have a bad perfomance; the tweeters are very loud check the microphone positions You have no navigation voice Have you a connection from the Headunit to the „Guide In“ on the PXA (KCE- 030N)? Problems with the Software You should have the latest software version V2.10 The software doesn´t detect the PXA Make sure that you have installed the USB driver. Don´t use a USB cable with poor Quality.