Download
1 / 23
230 likes | 431 Vues
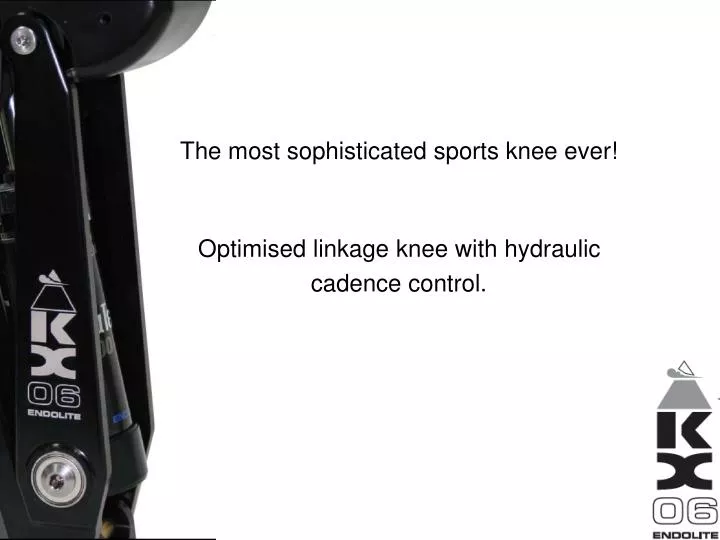
The most sophisticated sports knee ever! Optimised linkage knee with hydraulic cadence control. KX 06. Overview November 2007. KX06 Features. Polycentric Knee with CaTech Swing and Stance control

E N D
The most sophisticated sports knee ever! Optimised linkage knee with hydraulic cadence control.
KX 06 OverviewNovember 2007
KX06 Features • Polycentric Knee with CaTech Swing and Stance control • Geometry and path of instantaneous centre of rotation means that the transition from extension into flexion requires less initiation load • Max weight 145Kg K1-K3 136Kg K1-K4
KX06 Benefits • Security of 4 bar at heel strike • Ability to yield down slopes • High weight limit • Good sitting cosmesis
KX06 Benefits contd. • Improved gait because of smoothness of transition stance-swing • Greater range of amputees can be fitted because of high weight limit • Knee for the highly active!!
Cylinder Options • Swing & Stance • Swing Only Cylinder has sleeve in top trunnion very precisely positioned .25mm protrusion each end of trunnion! This insert is used only in KX06
KX06 Alignment Recommendations • S&S align Thro’ to slightly behind (up to 10mm) anterior upper pivot. • S unit align through to 5mm anterior to front upper pivot
KX06 Alignment Recommendations • 22mm attachment point to centre of top upper axis • S&S socket will be positioned posteriorly relative to ant. upper axis • S unit socket will be positioned anteriorly relative to ant.upper axis
Attachment options (proximal) • Single bolt allows angular alignment adjustments (no slide) • 4Bolt Pyramid etc. • Sliding pyramid is good option (EP-FSR CaTech rotating sliding female pyr adapt & EP-MSR CaTech sliding male pyr adapt)
Note: 1 anti-rotation screw Attachment options Single Bolt = 169207
Sliding Adaptors EP-MSR EP-FSR • When using an existing socket it is often helpful to use a sliding adaptor to achieve the optimal alignment
Distal Attachment • Pyramid • Dome can detach held in place by “O” ring • Note rib to flat surface of dome must locate in groove on Knee
Order Information Part numbers: KX06 (with CaTech swing and stance unit) KX06-swing (with CaTech swing only unit)
Warranty • 3 years
Cosmetic Finishing • Expect that most users will refrain from using a cosmesis • Those who wish it may use a standard low density foam (561021, 22, 23)
Cylinder Removal • Grip rear links lightly in a vice with soft jaws (or clamp block available from Blatchford, Pt No. 941250) • Undo both pivot pin screws (T20 940274) • Remove grub screw (2.5mm)
Cylinder Removal • Remove top pivot pin sufficiently to release trunnion using alignment pin 940084 • Clamp body at distal end in a vice as shown using soft jaws or clamp block and remove distal pivots using a 5mm Allen key. • Slide dummy pin sufficiently to remove cylinder • Do not lose spacers
Cylinder Replacement • Secure unit in vice (otherwise difficult to get Pivot pin in) • Lubricate Pivot Pin (STP) • Screw suitable 6mm screw into Pivot Pin to aid in re insertion (interference fit, will not push in) • Tap gently into position (sits just below bearing surface on each face)
Cylinder Replacement • Replace Torx screw (Loctite first) Tighten until Pivot Pin shaft rotates to position “flat” adjacent to grub screw: View thro’ grub screw hole in top trunnion • Add loctite to grubscrew and replace.Tighten gently against flat and tighten Torx screw to 5Nm
Cylinder Replacement • Loctite and torque (5Nm) second Torx screw to upper Pivot Pin • Tighten grub screw fully. Do not over tighten! • Reposition knee unit in vice • Loctite and refit Lower Pivot Pins (Do not forget spacers) • Torque to10 Nm
KX06 Thank you