Download
1 / 35
370 likes | 391 Vues
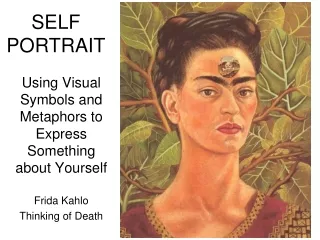
Learn to create a relief self-portrait using cardboard, calipers, and drawing techniques. Add facial features, texture, and clothing details for a realistic touch.

E N D
I can make a relief-self-portrait out of cardboard • Measure your head using the calipers • Length---Top of head to underneath chin • Width---Bottom of right ear to bottom of left ear • THIS IS THE SIZE OF YOUR CARDBOARD!! • Turn your dots into an oval shape for your head (an upside down egg!!)
I can make a relief-self-portrait out of cardboard 1. Divide your cardboard face in half from the top to bottom AND side to side Front 2. Trace your own eyes with your fingers and feel where your ears line up with your eyes. 3. Glue the ears to the back of your head, secure with ONE piece of masking tape. Back
EYES 3. Draw the left eye using the same measurement on the left of the “centered eye” and draw your right eye on the right side. 2. Draw one eye measurement in the center of your face • Measure an eye with the calipers Right eye Left eye
EYES OPTION 1 • Carve out the whole eye shape • Put a drawing of the eye on white paper OR brown paper (in black pen) behind the cut-out shape
1. Draw football shapes using your measurement marks. 2. Add the “pits” on the insides of your eyes 3. Cut out the football shapes and erase the drawn line under the eyes 4. Put white paper behind the empty eyes and trace the shape with a pencil. Draw your iris (how it really looks!) using a black pen. Include lines for shading the iris, a black pupil in the center and a highlight. 5. Tape the paper behind the face
EYES OPTION 2 • Carve out JUST THE WHITES OF THE EYES • Put a piece of white paper OR brown paper behind Draw WITH A PEN, the pupil, lines for shading the iris, highlight and details around the eye. Then paint in the highlights with white paint.
AROUND THE EYES • Draw upper and lower eye lids & eyelashes with a BLACK PEN!!
EYEBROWS 1. Look at the distance between your eyelid and your eyebrow. Draw your eyebrows onto your cardboard face. 2. Trace your drawn eyebrow with tracing paper. Put the tracing paper UPSIDE DOWN onto another piece of cardboard and RETRACE your lines. This will transfer your shape onto the cardboard. Repeat for the second one. 3. Cut the eyebrow shapes out. 4. Add texture to your eyebrow my one of the following methods, then glue onto face. Draw the hair lines Draw the hair lines then cut with an X-acto Peel off the top layer of cardboard to reveal bumps Cut hair lines with an X-acto
Don’t forget your glasses! Draw them on the cardboard (you can even try to trace your frames on your cardboard). Then trace them with tracing paper. Transfer the tracing paper drawing to another piece of cardboard and cut them out. Color them black where needed.
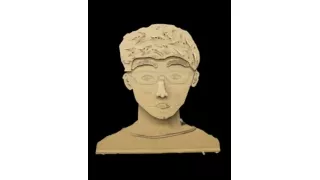
NOSE Your nose needs to be popping off the flat cardboard creating a high relief Make the nose at least three levels of cardboard Create one shape of the bridge of the nose and the lower part of the nose Create a ball-like shape for just the ball of the nose
Front of face -Nose is popping out and smaller pieces have been atached Back of the face
Needs to be in relief. Trace it with a black pen, add curved lines in lips MOUTH
Draw your hairline on your cardboard face. • Put your cardboard face on top of a larger piece of cardboard. Draw the overall shape of the hair. Trace where the cardboard face is. • Use tracing paper and transfer your hairline onto the larger piece of cardboard. • Cut out that whole hair shape. • If you have hair overlapping your face then make it overlap!! • Add texture!!! Look at the eyebrow examples for different ways to add texture. HAIR
You can also add multiple layers of hair or individual strands
NECK, SHOULDERS & CLOTHES Your neck and shoulders need to be proportional to your face! Include some type of clothing!!! Cut out your neck and clothing from a separate piece of cardboard and glue it BEHIND your face Draw details or values on your clothes
SHADING Where are there dark values on your face?? Under hair Under and around eye Bridge of nose Bottom of nose Under ear, behind neck Philtrum Corners of mouth Under bottom lip Under chin on neck Veins in neck Jawline Under hair
Assessment • Different levels (at least 3) have been worked into the cardboard to create an effective relief sculpture • Facial features, neck and shoulders are proportional to each other and the overall portrait • At least two things have been hand-drawn onto the portrait (hair, facial features, clothing patterns, values) and shading has been added • The cardboard portrait resembles either the student or the drawing of the student. • CRAFTSMANSHIP- The cardboard has been cut through enough to not leave pieces still hanging off, no tape is showing
Final Grade:_______________________ Name:________________________ Block:________ 2.5, 2.4, 2.3, 2.2, 2.1 3.5, 3.4, 3.3, 3.2, 3.1 3.0, 2.9, 2.8, 2.7, 2.6 4.0, 3.9. 3.8, 3.7, 3.6 • All of the details of the facial features (as discussed in class) have been successfully added. The portraits have been shaded on top of the cardboard to add values to the face. • Facial features, neck and shoulders are proportional to each other and the overall portrait 2.5, 2.4, 2.3, 2.2, 2.1 3.5, 3.4, 3.3, 3.2, 3.1 3.0, 2.9, 2.8, 2.7, 2.6 4.0, 3.9. 3.8, 3.7, 3.6 • The cardboard portrait resembles either the student or the drawing of the student. Details have been added to make it different from other students 3.5, 3.4, 3.3, 3.2, 3.1 3.0, 2.9, 2.8, 2.7, 2.6 4.0, 3.9. 3.8, 3.7, 3.6 2.5, 2.4, 2.3, 2.2, 2.1 • Different levels have been worked into the cardboard to create an effective relief sculpture (nose is at least 3 levels, lips are raised, hair is raised and multiple levels, clothes are in relief) 3.5, 3.4, 3.3, 3.2, 3.1 3.0, 2.9, 2.8, 2.7, 2.6 4.0, 3.9. 3.8, 3.7, 3.6 2.5, 2.4, 2.3, 2.2, 2.1